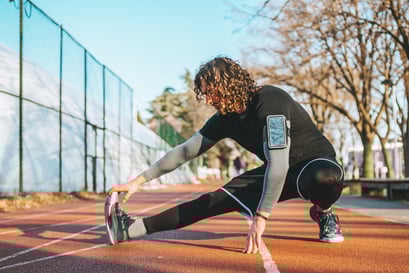
<img height="1" width="1" style="display:none" src="https://www.facebook.com/tr?id=424649934352787&amp;ev=PageView&amp;noscript=1">

NIFS Healthy Living Blog

Activating Your Greatest Potential: Fascia Training for Athletes

GettyImages-1187356524(1)In an athlete’s world, every fraction of a second and inch of athletic performance are significant for them to play at their best on and off the field. However, being an athlete means consistently searching for innovative ways to elevate your game. This is where fascia training enters the conversation as one of the many ways of improving one’s athletic performance. Fascia training is an emerging topic that holds the promise of unlocking your untapped potential and improving your performance.

In this blog, you willet an introduction to the world of fascia, understand its role within your body, and see how and why fascia training can be what you need to enhance your athletic performance.

What Is Fascia?

Fascia is a connective tissue network that wraps around muscles, bones, and organs, providing structural support, and facilitating movement and proprioception (awareness of the position or movement of a specific part of your body within space). This intricate web of tissue plays a pivotal role in transmitting force and energy throughout the body. For athletes, optimal fascial health can lead to improved agility, explosiveness, and overall performance.

How Are Fascia and Athletic Performance Connected?

Fascia, having elastic properties, stores and releases elastic energy within the body during any movement. Within athletes, well-conditioned fascia can contribute to enhancing power output and efficiency like a coiled spring that can unleash explosive bursts of stored energy, enabling it to reach greater heights. This can make an athlete extremely efficient and powerful in their respective disciplines.

What Are Some Benefits of Fascia Training?

  • Improved Elasticity: Fascia training includes techniques that target myofascial release and dynamic stretching, resulting in fascia elasticity maintenance. This specific elasticity translates into more efficient movements, reduced risk of injury, and improved range of motion.
  • Enhanced Proprioception: Because proprioception is one of the properties of fascia, a well-conditioned fascial system will result in enhancements in proprioception. This improvement in proprioception will translate well into better balance, coordination, and agility. For example, gymnasts must have well-conditioned fascial systems for improved proprioception because they’re efficiently twisting, flipping, and turning in all directions during competition.
  • Injury Prevention: Engaging in fascia-focused exercises can help prevent injuries by maintaining the suppleness and resilience of the fascial network. In turn, this supports joint health and reduces the likelihood of strains and sprains.

How Can I Incorporate Fascia Training into My Daily Routine?

  • Dynamic Stretching: Incorporate dynamic stretching such as (but not limited to) high kicks, leg swings, walking lunges, and trunk twists. You will be stimulating the fascial system and promoting its elasticity.
  • Myofascial Release: By utilizing foam rollers, massage balls, or any tool to apply pressure to specific areas, you’re releasing tension and improving your blood flow within the fascial network, thus resulting in the system working more efficiently.
  • Plyometric Training: Plyometrics typically involves explosive movements that stress and “train” the fascial system within the athlete’s respective discipline(s). Exercises include box jumps, lateral bounds, high skips, and more, all of which have the goal of activating and improving the responsiveness of the fascial system.

Conclusion

Fascia training presents a groundbreaking avenue for athletes to tap into their full potential. By understanding the role of fascia in the body and implementing targeted training techniques, athletes can enhance their performance, reduce the risk of injuries, and elevate their overall athletic prowess. As the science behind fascia continues to evolve, athletes have an exciting opportunity to incorporate this innovative approach into their training arsenal, taking their achievements to new heights on the field, court, track, or wherever their specific discipline/passion lies.

New call-to-action

This blog was written by Deveon Martin, NIFS Health Fitness Specialist. To read more about the NIFS bloggers, click here.

Topics: injury prevention plyometric dynamic stretching proprioception fascia myofascial release

The Why and How of Training Your Hip Adductors

GettyImages-1308568450Everyone needs strong hips. Athletes need them to perform a wide variety of movements within a given sport. Aging adults need them to help reduce the risk of falls. When we think about the hip, most people think about the glutes and abductors. You can look in any gym and see a handful of people with a band around their knees performing a plethora of movements working the glutes and abductors. However, the most neglected muscle is the one on the inside of the thigh: the adductor.

Anatomy and Function of the Adductor

The adductor muscle is situated in both the medial and posterior compartments of the upper leg. It attaches to the hip bone and to the linea aspera of the femur. The primary role of the adductor is to adduct and internally rotate the thigh at the hip joint. It also plays an important role in hip extension and stabilizing the pelvis along with the glutes and hamstrings.

Why You Should Be Training the Adductors

The adductors are a secondary muscle group that assists the larger muscle groups during compound exercises such as squats and deadlifts. However, there are important benefits to focusing accessory movements on the adductors. As I mentioned, the adductor plays a role in hip extension and stabilization of the pelvis. Hip extension is one of, if not the most powerful movements of the body. It is how we jump, stand, walk, run, and sprint. If we neglect the adductor muscles, we are missing out on added stabilization of the pelvis during all these movements.

Groin strains are the most common among athletes who are sprinting, cutting, and changing directions. Throughout these movements, the adductors take on a large load of eccentric forces. This means that just like the hamstrings during a heel strike, these muscles are force absorbers. A muscle is more likely to tear or strain if it is not strong enough to absorb an increasing amount of force. Strengthening the adductors can reduce the likelihood of a groin strain.

The adductors not only stabilize the pelvis, but they also control pelvic rotation. This is highly important for sports such as baseball, softball, golf, hockey, or tennis. All of these sports rely highly on the rotational power of your hips for swinging and throwing. Weak adductors will not help you hit farther or throw harder.

Movements for the Adductors

  • Adductor Machine: Not all gyms or facilities have one of these machines. However, if you do have access to one, it’s the simplest way to directly train the adductors.
  • Adductor Foam Roller Hold: Although you do not get the same overloading stimulus as the adductor machine, the foam roll hold could be a substitute for the machine. For this variation, all you need is a foam roller, or an object similar in width and it needs to be solid. In a seated or lying position, bend your knees to 90* and place the foam roller between your knees and squeeze. This is an isometric movement that you can make harder by holding for a longer duration. 
  • Banded Adduction: For this you will need a super band and a place to anchor the band close to the ground. To perform this movement, you will be in a standing position with your side to the band. Wrap the band around the inner foot and step out until you feel tension on the band. From your starting point, let the band pull your foot away. Stand tall and bring your foot back to the center.
  • Lateral Lunge: This is a great movement for any skill level because it can be progressed and regressed. To perform a body-weight lateral lunge, start with both legs together. Step one foot out and begin to bend that knee and start to sit your hips back. Push off that leg and bring both feet together. To progress this movement, simply add weight.
  • Copenhagen Plank: For this movement you will need a bench or a box. You will start in a side plank position with your top foot on the bench and your bottom leg either straight or bent. From this position, you will pick your hip up and hold.
  • Medicine Ball Scoop Pass: For the rotational action of the adductors, we will perform a rotational throw. With a medicine ball in both hands, shift your weight to the outside foot. From this position, push off the outside foot and rotate the hips, and then the shoulders, and throw the ball at the wall.

New call-to-action

This blog was written by Evan James, NIFS Exercise Physiologist EP-C, Health Fitness Instructor, and Personal Trainer. To learn more about the NIFS bloggers, click here.

Topics: injury prevention muscles senior fitness training exercises athletes hips hip mobility fall prevention

The Case for Adding Stretching to Your Exercise Routine

GettyImages-1062457690Chances are if you are like me, you have been told your whole life, “Make sure you’re stretching, it’s important!” But to many, the first thought that pops into their head when they think about stretching is, “Why?” And that is a very understandable response because stretching can involve a lot of discomfort (in the beginning) and to some, it might even cause a bit of pain. But there certainly is a method to the madness, and a reason why stretching is a vital component of your fitness program and, ultimately, your lifestyle.

What Is Stretching?

For starters, I’ll briefly describe what stretching is. Stretching can be somewhat of an umbrella term in that a lot of day-to-day activities do in fact involve some sort of stretching to some degree. In fact, every time your muscles contract there is a stretching and a shortening occurring inside the muscle to produce force. But the type of stretching I am talking about today is more deliberate and the kind of stretching most people think of when they hear the word “stretching”; think bending over and touching your toes, for example.

Stretching is important because it is all about increasing your range of motion and flexibility in the hope that doing this can lower your risk for muscle and joint injury or strains. The better our bodies are able to move, the lower the chance is for a muscle strain or getting injured when caught in an awkward position. Stretching both statically and dynamically is known to reduce injury risk.

Types of Stretching

The main types of stretching are active, passive, dynamic, and proprioceptive neuromuscular facilitation (PNF) stretching.

  • Active stretching is the main one people think of when they are told to stretch, and this type of stretching can be really good for isolating certain muscle groups. A big part of active stretching is the fact that you yourself are the one stretching out your muscles; there is no outside intervention. 
  • Passive stretching is similar to active stretching in that it can be isolated to certain muscle groups, but this type normally has a partner assisting in the stretch to perhaps reach a little bit more range of motion. For example, as you can see in this picture, the person on the ground is relaxed and her partner is the one actively applying stretching force to her leg, ideally achieving more range of motion.
  • Dynamic stretching is the next variation. In this type you have more of a momentum-based approach. What I mean by that is that a big part of it is using body movement and motion of the limbs themselves to achieve a change in range of motion. For example a foundational dynamic movement is high knees. This explosive movement of having knees come up as high as they can go will create range of motion throughout the legs. The foundational piece of this type of stretching is an idea of the stretch shortening cycle, which is a concept that as muscles contract and lengthen, they then shorten, and as a result are ready for activity.
  • Proprioceptive neuromuscular facilitation, or PNF for short, is last but not least. PNF stretching is essentially the technique of contracting and relaxing the muscle in order to increase range of motion. The rationale behind it is that after contracting a specific muscle, the signals that lead to a muscle resisting stretching are used up, and by following up the contraction immediately with a stretch, the muscle is more likely to achieve a higher range of motion. 

Incorporate Stretching into Your Workout

After seeing these different types of stretching in more detail, the last thing to consider is, “Is this something I should incorporate into my exercise routine?” The answer is a resounding YES! Stretching has been researched and studied and has been shown to decrease the chance of injury and increase performance. So the next time you throw on your running shoes and get ready to hit the ground running (literally), take a second to do a light stretching warmup. Your body will thank you down the road (also literally)!

New call-to-action

This blog was written by Ricky Rocha, Health Fitness Specialist. To learn more about the NIFS bloggers, click here.


Topics: injury prevention muscles stretching warmup dynamic stretching proprioception

To Strongman Train or Not to Strongman Train? Here Are the Benefits

You may have seen the crazy events where men and women lift giant stones, carry logs, and pull vehicles. Did you ever think that this type of training might be exactly what you need to do to have better fitness results? Strongman workouts aren’t as intimidating as they seem. Let’s look at the benefits of Strongman training, and why you should start incorporating it into your training program.

Strongman liftingMuscle Mass Gains

There are two important factors in muscle mass building. First, you want to apply the strategic tearing down of the muscle tissue and the subsequent rebuilding via nutrition and rest. Strongman workouts provide the right amount of wear and tear on the muscle tissue to safely tear it down so that it can be rebuilt bigger and stronger than before. Second, growth hormone levels in your body enable a better recovery state and directly influence muscle growth. Heavy lifting, which is what Strongman workouts are all about, has been shown to result in a higher release of growth hormone, which can support muscle mass growth.

Increased Strength

When these athletes are carrying giant logs and moving Atlas stones, it almost goes without saying that they will notice changes in their strength levels. Strongman workouts are based on compound and functional movement patterns, which use several major muscle groups at the same time. Include this with a heavy weight load, lower repetitions, and higher sets, and you are likely to see strength gains. Studies show that Strongman workouts are just as effective as traditional resistance-based workouts at improving your strength levels. However, it’s not just your major muscle groups that will see the benefit; your grip strength will also improve a lot.

Improvement on Functional Movement Capacity

With a powerlifting workout, you are focusing on three exercises that begin at Point A and end at Point B. Many Strongman exercises take place in different planes of movement, which can help your day-to-day functional movement patterns. For example, when performing the Farmer’s Walk, you are holding heavy dumbbells or kettlebells and walking across the floor for a prescribed distance. Another example is carrying an Atlas stone; again, you are holding a heavy weight with proper posture and moving that weight. This translates into real-world benefits such as when you are carrying groceries, playing with the kids, or doing chores. Improving your functional movement capacity will result in a higher quality of life and a lower risk of injury.

Accelerated Fat Burning

As mentioned above, Strongman exercises activate several major muscle groups simultaneously. For example, the sled drag involves the quadriceps, hamstrings, calves, glutes, hip flexors, chest, arms, and core. That is a lot of muscle groups for one movement. The more muscles you use and the greater the intensity during the exercise, the more calories you will burn. Strongman workouts allow you to build muscle mass while helping you lean out. Studies show that compound movements, such as Strongman exercises, can help promote fat burning.

Smashing Through Plateaus

If you have been lifting for a while and you feel as if you are not progressing, consider Strongman workouts. The Strongman style of training pushes you outside of your box, challenges your muscles in a new way, and can potentially help you smash through your plateau. Incorporating a Strongman workout in place of your current traditional resistance training program will introduce a new set of stimuli for your muscles to adapt to. The heavy loads, unique movements, and overall demand on the body should be just what you need to see increases in strength, size, and power.

Preventing Injuries

Strongman workouts help build muscle mass that protects your internal organs. These workouts form strong connections between the muscular and central nervous systems. Most importantly, Strongman workouts strengthen the core, which is where all movement originates and where most injuries occur. A weak core is a recipe for bad news. Lower-back pain is the most common complaint in modern-day doctors’ offices. While the cause might be from a direct injury, most lower-back pain is the result of a weak core and overcompensating muscles. Strongman workouts strengthen the major muscle groups, improving your functional movement patterns and preventing injury.

Easy Transition to Other Sports

One of the benefits of Strongman is that this type of training is not limiting. You can use Strongman workouts as a foundation and then hop to other forms of training such as powerlifting, bodybuilding, or CrossFit. Everything you learn and do in Strongman will apply to many other forms of sports, training, or physical activity. With Strongman workouts, you are simultaneously building a lean and muscular physique, which makes it ideal for bodybuilding. You are also developing incredible raw power, which is ideal for powerlifting. Finally, the explosive strength you gain will be useful in a CrossFit WOD (workout of the day).

If you are a beginner, intermediate, or advanced in your fitness journey, consider starting to add Strongman training to your fitness program in some shape or form. You will be able to build a strong foundation for your fitness routine that will benefit you for years to come.

New call-to-action

This blog was written by David Behrmann, NIFS Health Fitness Instructor. To learn more about the NIFS bloggers, click here.

Topics: workouts injury prevention core CrossFit powerlifting muscle mass muscle building strength training functional movement building muscle plateaus fat loss strongman

What Is Your Target Maximal Heart Rate for Training?

GettyImages-1310475310While training your cardiovascular system, it is important to understand how much you are stressing and overloading the system. Just like with your musculoskeletal system, there is a maximum rate your heart can achieve. The best way to discover this number is to undergo a maximal aerobic capacity test, but it isn’t necessarily practical or safe for all populations.

Calculating Your Maximal Heart Rate

A much easier way to determine your personal maximal heart rate is to use a predicted value. For the general population you can simply subtract your age from 220 and that would equal your age-predicted heart rate.

220 – (Age) = Age-predicted maximal heart rate (APMHR)

Now that you know your predicted maximal heart rate, you can figure out where your heart rate should be when exercising aerobically. The ranges are as follows:

  • Very light: <30%
  • Light: 30–39%
  • Moderate: 40–59%
  • Vigorous: 60–89%
  • Near maximal: >90%
  • APMHR x (desired percentage lower end) = Lower target heart rate

APMHR x (desired percentage upper end) = Upper target heart rate

Choosing the Right Range

So what do these ranges mean?

  • If you are new to the gym, you probably want to start more in the very light to light range. This can prevent burnout and reduce the risk of injury. Starting lower and progressing the duration of the workout, the number of times you exercise per week, or the intensity is a great way to ease yourself into exercise.
  • If you are looking to gain some cardiovascular fitness and reduce your risk for cardiovascular disease, you want to shoot for the moderate range. This will stress your system enough to see the benefits associated with cardiovascular training such as a lower resting heart rate.
  • Finally, if you are looking to set a new personal best mile time or are training for the Mini-Marathon, having a few training days in the vigorous range to near maximal can really help overload your cardiovascular and reap the benefits.

Ask Your NIFS HFS

If you want to learn more about heart rate ranges, come to the Track Desk and ask one of our Health Fitness Specialists.

New call-to-action

This blog was written by Grant Lamkin, NIFS Health Fitness Specialist. To learn more about the NIFS bloggers, click here.

Topics: cardio injury prevention cardiovascular heart rate aerobic Mini-Marathon Training Program

Skip the Abdominal Crunch and Try These Core Strength Exercises

Screen Shot 2021-09-07 at 4.16.27 PM
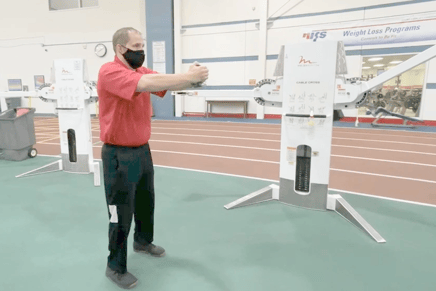
We all know that core stability and strength is an important factor in exercise, athletics, and even daily living. Being able to properly brace and stiffen the core is an important skill in preventing lower-back injuries when attempting certain movement patterns that occur every day. The abdominal crunch, which people often think of as a core exercise, is actually not a movement we see in our day-to-day lives. Try and think of a time you have had to mimic the abdominal crunch under a heavy load: it simply does not occur.

More often than not, we need to be stronger in the core in a more upright or natural standing posture. The abdominal crunch is now being found to stress the low-back area, can cause discomfort by compressing your back joints, and can even lead to injury after a while.

So you are probably wondering, how do I strengthen my core in an upright position? The answer is through anti-movement patterns. These could be anti-rotational, anti-flexion/extension, or anytime you are forcing your body to resist being moved from a normal posture. These patterns can be accomplished in an isometric hold or a dynamic pattern with bands, kettlebells, or weights.

Anti-rotational Exercise: The Paloff Press

An example of an anti-rotational exercise would be the Paloff press, shown here:

The goal is to press the handle from your belly button slowly and in a controlled manner so that the core has to work to not let your body turn.

Anti-Flexion or Extension Exercise: The Plank

An example of an anti-flexion or extension would be a plank, as shown here:

The goal is to keep your hips down and really engage the core area by pulling your belly button in. You can add weights to your back or increase the time you do these to make them more challenging!

Strengthening Exercise: The Kettlebell March

An example of strengthening the core in that normal standing position would be a kettlebell march, where you can either do two kettlebells in the front squat position or one held out in front. Both are shown here:

Marching slowly and controlled is the key for this exercise. While doing this, all the muscles in your core fire to prevent you from falling any direction while you balance on one leg.

See a NIFS Health Fitness Specialist to learn how you can start strengthening your core in a neutral position to assist with your exercises and your day-to-day life. See these links for more information:

ACSM core PowerPoint: http://forms.acsm.org/TPC/PDFs/23%20Best.pdf

PT Dr. Aaron Horschig: “The Big Three”: https://www.youtube.com/watch?v=2_e4I-brfqs

Like what you've just read? Click here to subscribe to our blog!

This blog was written by Grant Lamkin, NIFS Health Fitness Specialist. To learn more about the NIFS bloggers, click here.

Topics: injury prevention videos core strength core exercises lower back pain anti-rotational anti-flexion

Thomas's Corner - Stability Ball Warm Up Series

Greeting NIFS Friends!  Warm ups are a vital part of your workout as we have found that a good warm up can lead to a better workout performance, decreased chances for injury, and relief from soreness post-exercise (ultimately getting you back the gym sooner than later).  Your warm ups can become quite ritualistic and routine, which is fine, but sometimes spicing things up a little can benefit more than just your workout regiment.  Adding new movements and patterns, new equipment and tools, and having your body adjust to these challenges could help you overcome stagnation and rejuvenate your program.  

The stability ball adds a plethora of movements that directly impact target areas such as the torso, hips, and shoulder. For beginners to exercise, these patterns begin to train the body for more complex movements as well as injury prevention caused by a potential deconditioned starting point.

Give these stability ball warm up exercises a try!


This blog was written by Thomas Livengood, NIFS Health Fitness Instructor and Personal Trainer. To learn more about the NIFS bloggers, click here.
Topics: injury prevention warmup stability stability ball

Gambling with Sports Injury: Warning Signs and Recovery

GettyImages-512753571Sports careers, whether you are junior varsity or a hall of fame professional, all come to an end at some point. Often, these endeavors are marred with setbacks due to injuries ranging far and wide and sometimes spanning years. During competition and in the spirit of the moment, athletes sometimes push their bodies and minds beyond what was thought possible, resulting in amazing feats—but also potential injuries.

Don’t Play Through Your Injuries

Injuries that occur when we push our bodies to the limit can become more pronounced when an athlete decides to continue activities instead of receiving timely treatment. Once commonplace, playing through injuries was more accepted in the past. However, with modern sports medicine and advanced technology, sports enthusiasts can enjoy longer, more productive careers than ever before due to increased injury awareness and preventative maintenance.

The adage “listen to your body” still rings true. Although you might not know what you are listening for, you can assess your situation and make smart decisions to help prevent more serious injury.

How Do You Know When You’ve Overdone It?

Symptoms of sports injuries and illness can vary, and anytime you have a serious concern about your health, refer to your primary care physician. Because every person experiences pain differently, resulting in a wide threshold, you may need to seek advice and consult a professional to help assess your situation. Here are some of the most common symptoms of injuries, according to Harvard Health.

  • Chest pain: Although this goes without saying, your heart is the most vital muscle in the body. Although coronary artery disease is not curable, treatments make it possible to decrease the chances for heart attacks (which may occur when a deconditioned individual is subjected to extreme strenuous exertion).
  • Difficulty breathing: Similar to chest pain, difficulty breathing can be a sign of more serious underlying issues with not only the lungs but also the heart and blood pressure. With high blood pressure, exercises such as sprinting and powerlifting typically put a lot of strain on the heart.
  • Joint swelling and pain: The swelling of a joint can range from tendon, ligament, or muscle injury to arthritis in the joint. It is good to know whether you are experiencing injury or arthritis because this will determine your level of treatment.

How to Recover and Get Back in the Game

These symptoms are common and can happen to almost anyone who exercises. Many other factors such as genetics, age, and medical history all play a role—not only in your injury, but also your healing process. “Getting back on the horse” is something we eventually want to do (once we are healed).

Here are a few tips that can get you back on the road to recovery without jeopardizing your health.

  • Before beginning a new workout program, meet with a fitness professional who can assess your physical fitness levels. Many tests are available, the Functional Movement Screen (or FMS) is designed to not only pinpoint potential red flags, but also to prescribe routines intended to better your movement patterns and decrease your chances for injury.
  • Beginning a proactive fitness program that targets your weaknesses and strengths can also help decrease your chances for injury. A program that identifies your strengths and uses them is good, but you also need to make sure your weaknesses are addressed. As these weaknesses become stronger, as a whole, you will become stronger.
  • Moving your workout to a more low-impact setting might also help. The pool adds a great opportunity to create exercise but not put stress on the joints. We know that swimming takes some skill, but just treading water can be a great way to burn calories. Depending on availability, zero-gravity treadmills and water treadmills are often used in the professional athlete world to get athletes moving (technology never ceases to amaze me).

Not sure about swimming? Check out these blogs by NIFS staff regarding the impact of swimming and some great ideas to help you get started.

Muscleheads rejoice and evolve!

Like what you've just read? Click here to subscribe to our blog!

This blog was written by Thomas Livengood, NIFS Health Fitness Instructor and Personal Trainer. To learn more about the NIFS bloggers, click here.

Topics: Thomas' Corner swimming injury prevention injuries sports recovery illness athletes student athletes joints low-impact

Push and Pull: The Ideal Workout Program for Restarting Training

GettyImages-1267535453Let’s face it: building your own workouts isn’t always the easiest thing to do. Sure, you probably strike gold a few times a year and the exercises you choose seem to be flawless, from the balance of muscle groups worked to the flow of the routine that you get into. There is nothing better than having that program that just seems to get the job done.


What Workout Program Should You Use When You’ve Taken Time Off from Training?

But let’s say that life happens and you took an extended time off from training due to school, work, or some other important reason (pandemic maybe?). So what now? Where do you go from here? The go-to for many individuals would be to jump right back into the same program they were doing before their long layoff. It worked great for them before their break, so it must be the best way to resume activity, right? More than likely, this might not be the most ideal situation to set yourself up for future success. When your body has become detrained from a long layoff, you run the risk of overtraining—which could possibly lead to those nagging injuries that linger throughout your rebuild process.

Find a Program That Balances Pushing and Pulling

To me, a GREAT training program is a delicate balance of “pushing” and “pulling” exercises. The general consensus of the “push-pull” method is that you alternate (or superset) upper-body push movements (for example, bench press, shoulder press) with upper-body pull movements (for example, bent-over rows, pull-ups). Even the great Arnold Schwarzenegger used this method to pack on loads of muscle when he was at the apex of bodybuilding. Now, are you Arnold? No. Are you trying to look like Arnold? Also no (more than likely). Below you will find another interpretation of the “Push-Pull” method that may better fit those who are restarting their exercise routine, or those who are looking to switch up their programming.

Benefits of Full-Body Workouts

As I mentioned before, the push-pull method often refers to two upper-body exercises from opposite muscle groups (for example, chest and back). The superior version (in my opinion) of this would be to couple either an upper-body push exercise with a lower-body pull exercise, or an upper-body pull exercise with a lower-body push exercise (see table below). This type of full-body workout allows for two main benefits:

  1. Ample rest time is allowed: While the upper body works, the lower body rests (and vice versa).
  2. There is potential for reduced soreness: Instead of hammering one muscle group for a ton of exercises, a more gradual stress is applied to the muscles over multiple workouts. It could also be a great option for returning to exercise or resistance training.

Movement Examples

If you think this type of workout might be what you are looking for, give it a shot. Choose one exercise from column 1 and one exercise from column 2. Alternate those two exercises for the desired number of reps and sets. When finished, either choose one exercise from the same two columns OR switch it up and choose one exercise from column 3 and one exercise from column 4. Remember, the ultimate goal is to match each push movement you perform with an opposite pulling motion.

Column 1 Column 2 Column 3 Column 4

Upper-body Push (chest/
shoulders)

Lower-body Pull (hips/
hamstrings)

Upper-body Pull (back)

Lower-body Push (quads)

Bench Press

Trap Bar Deadlift

Pull-Ups

Front Squat

Strict Shoulder Press

Slider Hamstring Curl

TRX Inverted Row

Step-ups

Half-kneeling Shoulder Press

Single-leg RDL

Band Face Pull

Lunges

Push-up Variations

Lateral Lunge

Seated Row

Split Squat

“Jammer” Press

Reverse Hyper

Dumbbell Reverse Fly

Wall Sit


Adjust Your Program Periodically

As with most workout structures, adding wrinkles into the program every so often will allow you to continue the muscular adaptations that are occurring and keep you engaged. That could mean an adjustment to the number of reps, sets, or rest periods you are currently using, or simply choosing different exercises. The ways that you can tweak this kind of program are endless, and I believe that with great effort, you will see positive changes in whatever physical adaptation or change you are after.

Like what you've just read? Click here to subscribe to our blog!

This blog was written by Alex Soller, Athletic Performance Coach and NIFS trainer. To find out more about the NIFS bloggers, click here.

Topics: injury prevention muscles training lower body upper body workout programs adaptations pandemic full-body pull push restarting workouts

Get the Perfect Deadlift Setup Every Time

GettyImages-579405946With the sport of powerlifting taking off in the last couple of years, more and more people are taking up the sport as a hobby and to improve their overall fitness levels. Training to improve strength in the squat, bench, and deadlift is a great way to improve total body strength and improve body composition.

Some may argue that lifting heavy is unsafe and should be saved for the athletes. The common myth is that lifting heavy may lead to injuries. The movement most argued against is the deadlift. When performed too heavy with poor form, this may be true. However, when performed with the proper progressions, and the proper technique, the deadlift is the best total-body movement to improve strength, power, and body composition.

Why the Deadlift?

There are three main benefits to performing the barbell deadlift:

  • First off, it is a whole-body movement. The deadlift works multiple muscle groups at the same time, offering more bang for your buck compared to isolation exercises.
  • Secondly, the deadlift improves strength and stability. Because it is a compound exercise, working more than one joint, this lift can be performed with heavier loads, leading to greater increases in strength.
  • Lastly, deadlifts can help improve posture. The muscles used while maintaining a flat back in the deadlift are the same muscles that help with sitting and standing up straight. The deadlift strengthens these muscles, leading to improved posture over time.

Now that we have gone over the benefits, let’s talk technique.

The Deadlift Setup

Follow these steps:

  1. Foot position: With your feet hip-width apart, the barbell should be placed over the center of your foot. An easy way to get the best foot placement is to look down, and move forward and backward until your shoelaces are directly under the bar.
  2. Grip: Without bending your knees or moving the barbell, bend over and grip the bar right outside of your legs. It is important that you do not move the barbell.
  3. Shins to the bar: Once you have your grip established, bend your knees and bring your shins to the bar. Do not over-bend them and push the bar away from you.
  4. Chest up and back flat: Without dropping your hips any further, puff up your chest and squeeze your shoulder blades together. By doing this, you will naturally flatten out your back.
  5. Drag: Take a big belly breath, hold it, and drag the bar up your shins. Keep your back muscles engaged and keep the bar close to your body the entire movement. When you let the bar get away from you, you have to compensate with your lower back, and this can lead to injury.

Keys to Success

Now that you have a safe setup, here are a couple of things to think about while performing the movement.

  1. On the last step of your setup, look out ahead of you. You do not want to overextend your neck, and you also do not want to be staring at the ground the entire time. Keeping your head in line with your spine will allow you to keep a neutral spine throughout the whole movement.
  2. When standing up with the barbell, your hips and shoulders should rise at the same time. If you allow your hips to come up first, the bar will get out in front of you, and like I mentioned earlier, you will have to compensate by pulling with your low back.
  3. Lastly, take a deep belly breath. A belly breath does not mean air all the way in your stomach, but what it does mean is filling your lungs all the way to the bottom to pressurize your core. A pressurized core equals engaged abdominals. When performing any lift, you want to create a solid core to help stay upright.
Watch the video below for the proper deadlift technique in action.

Screen Shot 2021-01-19 at 11.23.53 AMIf you are new to lifting and don’t know where to get started, come visit us at the Track Desk in the Fitness Center.

Like what you've just read? Click here to subscribe to our blog!

This blog was written by Evan James, NIFS Exercise Physiologist EP-C, Health Fitness Instructor, and Personal Trainer. To learn more about the NIFS bloggers, click here.

Topics: NIFS injury prevention weight lifting strength powerlifting deadlift total-body workouts heavy lifting