<img height="1" width="1" style="display:none" src="https://www.facebook.com/tr?id=424649934352787&amp;ev=PageView&amp;noscript=1">

NIFS Healthy Living Blog

Warming Up for Vertical and Broad Jumps with Pogo Jumps

GettyImages-1225454377Want to jump higher, jump farther, or possibly dunk a basketball? With all the athletes I have trained over the years, at some point within their sport they all jump. Competitive as athletes are, they want to be able to jump higher like in volleyball, or jump farther like swimmers coming of the blocks, for example.

Warming Up Your Lower Body

Before you start jumping, you need to warm up your lower body. A fun way to wake up your lower body and prepare for explosive work like vertical or broad jumps is to incorporate easy plyometrics into your fitness routines. Plyometrics refers to exercises involving rapid stretching and contracting of your muscles.

An easy warm-up drill into plyometrics for athletes is to start with pogo jumps. They are one of my favorite athletic drills to warm up with and incorporate within athletic workouts. Pogo jumps are a great tool for teaching athletes what it feels like to be fast and or explosive off the ground. I use pogo jumps primarily to target the calves and shins. To a lesser degree they also target the hamstrings and quads within our warm-ups.

Proper Form for Pogo Jumps

Here’s what we want to see out of athletes when doing pogo jumps: minimal ground contact time, and minimal knee flexion (knees over the toes). Each jump is mainly with ankle movement instead of hips and knees. Never let your heel touch the ground. Stay on the ball of your foot to utilize your lower-leg elasticity. Low pogo jumps look similar to bunny hops, and high pogo jumps are similar but emphasize more explosive power for height on each jump, making you look more like a kangaroo.

Pogo Jump Drills

Depending on available space, pogo jumps can be done in place for typically 10–20 jumps in a row, or you can do them for distance down and back in a 10-yard space. If doing pogo jumps laterally, I like to go 10 yards down right and switch halfway, and keep going 10 yards left. Like most exercises, you are only going to get out what you put into it, so really push yourself to jump for speed (quickness) or height (explosive) each time. As always, make sure that you are keeping good form when you jump as well.

Goal: Improve vertical leap, quickness, and footwork
Equipment Needed: None—just you!
Space: In place or 10–20 yards distance

Drill: Low Pogo Jump

Execution: Begin the drill in an athletic posture with the feet hip/shoulder-width apart. Raise heels up and stand on the balls of your feet. Quickly bounce up and down on the balls of your feet. Don’t let your heels touch the ground. 

Drill: High Pogo Jump

Execution: Starting the same as low pogo, stand tall with feet slightly spread apart about hip-width. Raise heels up and stand on the balls of your feet. Advance the low pogo drill by attempting to gain more height in your jump and still minimizing ground contact time.

Like what you've just read? Click here to subscribe to our blog!

This blog was written by Michael Blume, MS, SCCC; Athletic Performance Coach. To learn more about the NIFS bloggers, click here.

Topics: exercises plyometric sports warmups drills jumpings

Hacks 4 Golf Hacks: Warming Up Before You Tee It Up

GettyImages-153066762Looking back on the history of my work in the blog world, I have found that every year around this time I tend to write about a sport I sometimes love to hate: golf. So, without further ado, it is time for my yearly “golf blog,” where I share a few insights from a hack’s viewpoint that will hopefully lead to some success in your game. If you play this frustrating yet beautiful game, you know that every round can either be 4 hours of bliss, or contemplating why you spent so much money on those clubs. And maybe that’s what makes the game so special for so many, the never-ending battle between good and evil (thoughts, that is).

Whatever it is that keeps you coming back to the links, obviously you want to play the best you can and as long as you can. The proper warm-up for any type of fitness or performance activity has been spoken and written about by countless fitness pros, yours truly included, but I would argue it’s super important to your game and your health to talk about warming up before you tee it up.

Before the Course

If you are like me, sometimes you get to the course with only a few minutes to spare before your tee time. Here are a few strategies you can implement that don’t take a lot of time and will benefit both your game and your body.

  • Be fit: Okay, I lied, this one does take some time, but being fit and healthy before taking on any activity is imperative to maintaining your health. I think we would all agree it might be foolish to hop into a 5 v 5 pickup game on the basketball court if you have been on the couch for the last three months. You would want to work on your cardio, power, and endurance so that you can compete and enjoy the activity. Same goes for golf. Don’t let the cart fool you: it is a physically demanding game—if you wish to compete with your pals, that is. So, take care of yourself and make sure you are getting that minimum 150 minutes per week of moderate to vigorous exercise recommended by the ACSM.
  • Soft-tissue work at home: If you have time before hitting the course to hit the foam roller, I highly recommend it. Spend some time on the glutes, lats, adductors, T-spine, and hamstrings. (link)

On the Course and in a Hurry

Here are some videos that demonstrate some important warm-ups and drills.

Screen Shot 2020-09-01 at 12.41.25 PM

  • Increase Tissue Temp: Walk, small plyometrics (jumping jacks), light jog

Drills:

  • Chest Stretch
  • SA OH Reach
  • Club windmills
  • Reverse Lunge with Lateral Reach
  • Lateral Leg Swings
  • Trunk Rotations (iso)
  • Back and Down Swings

Now, there may be a few things holding you back from completing a proper warm-up before enjoying a great day of the oldest game. You may not show up to the course in time. I make time to get there early to get outside and really begin the round before the first tee. You might feel a little “goofy” going through a proper warm-up in front of your friends. To that I say, “success favors the prepared,” and you can show them drills after you beat them on the course, or are able to play again immediately without soreness, or carry the bag for 18 holes and remain upright. A proper warm-up may not get you on tour, but it may save you a few strokes aside and keep you playing longer.

Like what you've just read? Click here to subscribe to our blog!

This blog was written by Tony Maloney, ACSM Certified Exercise Physiologist and Health Fitness Instructor. To find out more about the NIFS bloggers, click here.

Topics: videos golf warming up drills lifetime sports

Three Drills to Develop Athletic Agility

GettyImages-871413050
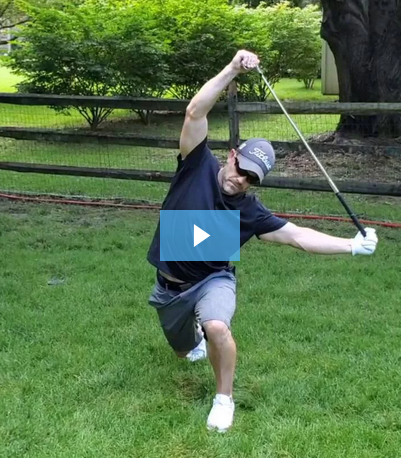
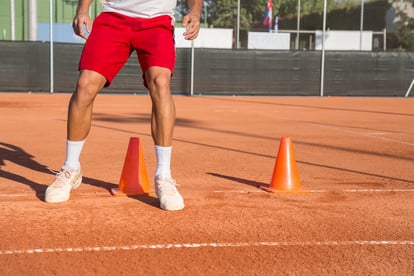
Agility drills basically represent an obstacle. Athletes who can respond faster to starts, stops, and change of direction earlier than the obstacle will have a practical advantage on the playing field. This blog highlights three of my favorite agility drills that can be built into your team’s conditioning routines. The benefits of these runs, jumps, and cuts include increases in reactionary speed, coordination, footwork, and body awareness. Athletes need to be able to change direction rapidly under control without decreases in speed.

You will need a good strength base before doing any high-intensity agility drills. These three drills are great for giving athletes the ability to keep their eyes on the play while knowing what is around them. Adding teammates to the mix always makes it fun and competitive.

Enjoy the drills!

Screen Shot 2020-03-03 at 2.54.12 PM
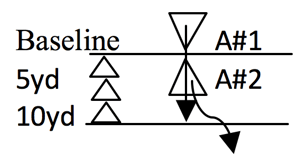
Drill 1: Offense/Defense—Partner Reaction Acceleration Tag

Setup: Cones are spaced 10 yards apart with a middle cone at the halfway point.

Number of Athletes: 2
Athlete 1: Offense (starts the drill); Athlete 2: Defense (reacts and chases)

Execution: Both athletes start on the ground head to head on the baseline. Athlete 1 starts the drill and is allowed two fakes before they must stand, turn, and sprint 10 yards. Athlete 2 reacts and chases Athlete 1 once they stand and turn and has 10 yards to catch and tag Athlete 1 in a sprint fashion.

Screen Shot 2020-03-03 at 2.54.22 PM
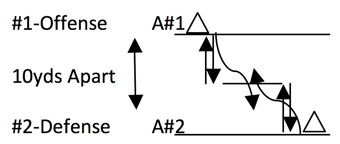
Drill 2: Cat & Mouse—5-5 Shuttle Reaction Tag

Setup: Cones are spaced 10 yards apart with a middle cone at the halfway point.

Number of Athletes: 2
Athlete 1: Offense; Athlete 2: Defense
Athletes will face each on opposite sides 10 yards apart.

Execution: At the start of a whistle or cue, both athletes sprint a 5-yard shuttle 5–5.

Athlete 1 then tries to sprint past the midline as fast as possible before Athlete 2 tags him before passing the midline after they both do a 5-yard shuttle.

After the 5-yard shuttle, Athlete 1 can juke/cut, etc. to get to the midline to fake out Athlete 2 before being tagged. Athletes switch between offense and defense.

Screen Shot 2020-03-03 at 2.54.44 PM
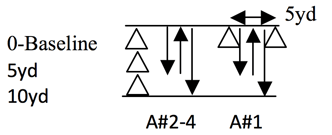
Drill 3: Shuttle Runs—Reaction 5-5-10 Shuttle

Setup: Cones are spaced 0, 5, and 10 yards apart.
Another set of cones is 5 yards apart on the baseline.

Number of Athletes: 3–4
Athlete 1: Shuttles (drill start); Athletes 2–4: Reactionary

Execution: At start of a whistle or cue, Athlete 1, facing the baseline, begins shuffling between the 5-yard cones. Athletes 2–4 stand facing the other way on the baseline waiting to react to Athlete 1. Athlete 1 can shuffle back and forth for a total of two times. However, within the two shuffle attempts, Athlete 1 can turn and sprint whenever. Athletes 2–4 must respond to Athlete 1 and turn and sprint. After Athlete 1 initiates the sprint shuttle, all athletes are now in a race to sprint a 5–5–10-yard shuttle.

Like what you've just read? Click here to subscribe to our blog!

This blog was written by Michael Blume, MS, SCCC; Athletic Performance Coach. To learn more about the NIFS bloggers, click here.

Topics: team training sports speed athletic performance drills agility coordination proprioception footwork

Readiness and Durability: Better Movement Warmups for Fitness Training

GettyImages-1191766401_low resI used to work at a golf course during my time as a teacher. It was a great way to spend my summers and be close to a game I truly enjoy playing. I mainly mowed greens and tees and dug a bunch of holes. I really enjoyed that time of my life very much. On all of the mowers there was a sign that read, “If this equipment can’t work, nor can you.” I think the message is self-explanatory: if the equipment is not properly cared for, it is a very good possibility it will stop working, leading to loss of productivity and failure to complete the job.

I believe the same can be said for our approach to preparing the body for training so that the body (equipment) can work when you need it to accomplish the job at hand. The most critical step in this process is changing the perception of the “warmup” as a secondary or unnecessary part of a training program—something you can skip if you are short on time. In actuality, warmups should be a major part of your training program (if you are truly looking for results, that is).

Long ago I adopted, both for the people I work with and for my personal workouts, a process from a great coach on preparing the body for work. It involves four exercises in four major categories of movement preparation: mobility, stability, core engagement, and loco-motor (dynamic stretches and small plyometrics). For obvious reasons, this is referred to as a 4x4 approach to physical readiness and preparation.

Mobility Drills

Mobility drills refers to the exercises aimed at gaining and enhancing the range of motion in a particular joint. With a joint-by-joint, ground-up approach, these drills typically work to tackle mobility of the ankle, hip, thoracic and cervical spine, and shoulder. Here at NIFS, we work to mobilize movement patterns that involve these joints, and others, which we evaluate in a Functional Movement Screen.

Here are just two of my favorite mobility drills:

i. 1/2K—Abducted T-Spine Rotation
ii. Dynamic Pigeon—Knee & Foot


Wistia video thumbnail


Stability Drills

These drills work to help stabilize the mobility you just gained with the preceding drills. A mobile joint is a great start, but then you must stabilize it with exercises that will aid in alignment and strength of the joint. These exercises are generally used immediately after the mobility work to help in the retention of the alignment and position we are hoping to obtain. Check out a couple of these drills that you can add to your 4x4 warmup.

i. Band Lat. Walks
ii. Split Squat w/ Band Pull-apart


Wistia video thumbnail


Core Drills

Exercises in this phase of our preparation are to “fire up” the core to stabilize the trunk before loading the body with all the great tools we use in strength training and conditioning. A common practice is to save the “ab work” for last during your training session, which is all fine and good, but adding these to your 4x4 work before a weight is lifted can help your performance. A strong, “awake” center will keep you safe during your exercises and allow you to get the most out of them at the same time.

i. Foam Roller Dead Bug with Ext.
ii. Side plank and row


Wistia video thumbnail


Loco-motor Drills

After mobilizing and stabilizing the system, now it’s time to energize it! These drills are used to increase the body and tissue temperature that will prepare your body for the strength and conditioning work that lies ahead. These drills are typically fast and fun, and can combine some dynamic stretching with basic calisthenics. These can be as simple as a jumping jack or lateral lunges, or these two gems:

i. Snowboarders
ii. Sprinter Lunge


Wistia video thumbnail

***

To prepare your body for work and to limit the chances of injury, you must perform a proper warmup. No more skipping a major part of your training session! As soon as you begin to look at the 4x4 warmup as a must-do, the harder it will be to work without it.

Like what you've just read? Click here to subscribe to our blog!

This blog was written by Tony Maloney, ACSM Certified Exercise Physiologist and Fitness Center Manager. To find out more about the NIFS bloggers, click here.

Topics: functional training core videos warmups mobility movement stability loco-motor drills