<img height="1" width="1" style="display:none" src="https://www.facebook.com/tr?id=424649934352787&amp;ev=PageView&amp;noscript=1">

NIFS Healthy Living Blog

All About Plyometrics

GettyImages-512889187
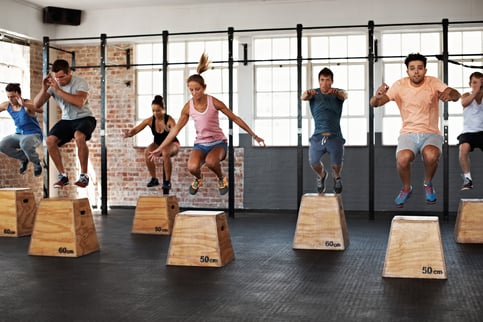
In the most basic definition, plyometrics refers to jump training. Known to be a key component of many sports, such as basketball, soccer, gymnastics, and football, plyometric training can enhance athleticism, strengthen the most powerful muscles in your body, and much more.

Here are some of the benefits of plyometric exercises, and how to safely add plyometrics to your workout routine.

The Benefits of Plyometrics

For you to propel your body off the ground and land safely, many things have to happen in your muscles, tendons, ligaments, and joints. Studies show that plyometrics can help you build muscle as effectively as conventional weightlifting, and if you combine the two, it can help you reach your goals faster than focusing on either one alone. Also, the impact your body absorbs from landing has benefits for your bones: they become stronger.

If you are an athlete, plyometrics can improve your agility and explosiveness when it comes to fast-response moves, such as sprinting, quick direction changes on the field or court, and jumping (such as going for a header in soccer).

How to Get Started with Plyometrics

If plyometrics is new to your workout, as with anything you should start small. This is especially important for plyometric exercises. Correct form is crucial, as you need to both lift your body off the ground and control the landing. This dual action makes plyometric exercises more difficult and complex than most exercises. If you have a movement deficiency, it will be magnified when the speed and power of a jump are applied to it.

When learning a new plyometric move, you should first perform the move without the jump to perfect the form, strength, and stability that is required to do it correctly. Once you have all of that, you can then add the jumping movement. Another way to start small is to choose lower-impact plyometric exercises, such as jumping jacks, jumps in place, and line hops (side to side, forward, and back).

Do not ignore the upper body: plyometric pushups and medicine ball throws are great for building explosive power above the waist. Always be aware of your form. When you become tired, your form tends to suffer, and the risk of injury increases.

Is there anyone who shouldn’t do plyometric exercises? The short answer is no, as long as your doctor has not identified a reason why you should not (such as deteriorating joints or bad knees). If you are significantly overweight, gradually adding plyometrics is the key—and stay away from high-impact moves altogether. Remember that doing too much too soon—or doing advanced exercises before you are ready for them—can stress your joints, increasing your risk of injury.

New call-to-action

This blog was written by David Behrmann, NIFS Health Fitness Instructor.To learn more about the NIFS bloggers, click here


Topics: muscles plyometric athletic performance jumping jump training athleticism

The Social Benefits of Running with a Group

DSC_4644
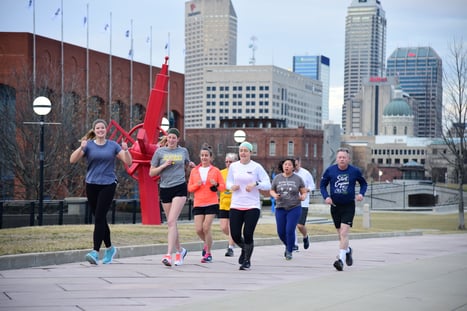
Running with others is one of the most effective strategies for creating a running habit and continuing it. The social benefits of running are among the biggest reasons why runners start and stick with running. Whether you’re running with one friend or a running group, here are some ways you can benefit from group running.

  • You’ll have group role models. People naturally start to adopt the habits of those around them. Spending time with other runners will help you form a running habit because you’ll start to mirror your running friends’ habits.
  • You’ll motivate each other. With a running group, you get regular encouragement. Members encourage each other at races and during long runs. You’ll be more motivated to stick to your training because you’ll hold each other accountable. It’s harder to skip a workout when you know others are waiting for you.
  • You’ll feel a sense of belonging. Being part of a cohesive team can you give a sense of purpose and help you make new and meaningful connections.
  • You’ll get creative stimulation. It’s fun to share ideas when running with a group. You can bounce ideas off your running friends and ask them for advice.
  • Your performance will improve. Everyone flourishes with a little healthy competition. When you’re running with others who are pushing you to run faster and harder, it’s easier to take it to the next level. When running alone, you may be tempted to cut your workout short; when others are depending on you, however, you’ll want to do the entire workout, and maybe even a little extra.
  • You can network. Running with people you know is a great way to network and build your professional relationships in an informal way. You’ll develop a camaraderie with other runners that’s difficult to replicate in an office or other work setting. Building and strengthening relationships through running may lead to a new job or other opportunities. Many runners have found new jobs or made important professional connections through running.

New call-to-action

This blog was written by David Behrmann, NIFS Health Fitness Instructor.To learn more about the NIFS bloggers, click here

Topics: motivation running group training accountability athletic performance habits social aspects networking

No Such Thing as Too Strong: Strength Training for Everyone

Screen Shot 2022-05-03 at 11.23.18 AM
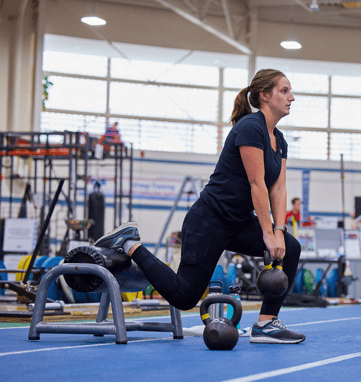
How many times have you or someone you know needed help because they were unable to open the pickle jar? Now, how many times have you heard someone get mad because the pickle jar was too easy to open. I’m guessing you haven’t. Nobody has ever complained about being too strong—a statement I like to tell people when they ask why they should start strength training. There are many benefits of strength training. As we age we lose the physical ability to carry out certain activities. Tasks that were once easy are now difficult to do alone or not at all. These are our activities of daily living. 

Activities of Daily Living

Your activities of daily living (ADLs) are your everyday activities that are essential to get you through the day: walking, getting up from chairs, carrying groceries, bringing in the bag of dog food, and so on. As a person ages, these activities get harder and harder to carry out. According to Harvard Health, it is estimated that after the age of 30, a person will begin to lose 3–5% of their muscle mass per decade. Loss of muscle mass will result in the loss of your ability to carry out your ADLs. Additionally, with loss of muscle comes the loss of muscular power, or the ability to produce force quickly. The loss of muscular power is the main contributor to the increase of fall risk as we age.

The loss of muscle mass as we age is termed sarcopenia. Age-related loss of muscle is, of course, preventable. With the correct diet, exercise plan, and regulation of hormones, a person can not only maintain but also increase their muscle mass as they age. This will ensure that you are able to maintain your ability to perform those ADLs with no trouble. Things such as yard work and playing outside with kids or grandkids are activities that should never be lost.

Athletics

Switching gears now to a different population. All aspects of strength are required to excel in a particular sport. From field sports to court sports to endurance running events, being strong will help everyone. The primary benefit that all athletes gain from strength training is an increase in joint stability. A well-structured resistance training plan will not only make the muscles stronger, but will also progress in a way to allow time to increase tendon strength at the same time. A more structurally sound joint is less likely to get injured.

Force is an influence that can change the motion of an object. Force is how we walk, jog, run, jump, change direction, and everything else we do in sport. There are two components that go into force, mass and acceleration. From a training aspect, we can manipulate these two components to match our needs. How this translates to the weight room is, we can move a light weight fast, or move as much weight as we can. Both forms of training will increase force production in their own way. Each athlete will need to train at different ends of the force curve depending on their sporting event and their biology. It is up to the strength and conditioning coach to make a plan for the individual’s needs and sport.

But I Don’t Want to Be “Bulky”

The common misconception is that resistance training will make you “bulky.” I only have one response to this question every time I get asked. I tell people to look at how track athletes and wrestlers train. These athletes are at peak performance but must maintain, and even in some cases lose, body weight. They do this by resistance training with very heavy loads for very low repetitions. This type of training increases muscular strength without increasing muscular hypertrophy (muscle size). If your goals are to increase strength and maintain your muscle mass, training with heavy loads and low volume is the route to take. This approach is also how powerlifters train. Their goal is to increase the amount they lift at a competition, but they must stay within their weight class. They cannot gain excess weight or else they will have to compete in a higher weight category.

The bodybuilders that you see at the very top level spend years and years building up their bodies to look the way they do. They train daily on individual muscle groups to sculpt their body to look perfect for the judges at a competition. Bodybuilders work in a higher-volume rep and set range than that of a strength athlete. Over an extended period of time, with the right diet, recovery habits, and in some cases the use of performance enhancers, bodybuilders are able to look the way they do when they step on stage. However, strength training two to four days a week to improve your health will not make you look like a “bulky” bodybuilder.

Strength Training Is for Everyone

Being strong is never a quality that someone wishes they did not have. A simple strength training regimen will not make you bulky, or weigh you down for everyday tasks. It will make you stronger and healthier. It will give you confidence to do new things, or things that you have been unable to do or wish you could do. Strength training will give you the ability to play with your kids, and then your grandkids after that in the same way. Not everyone wants to be a bodybuilder or a powerlifter, but everyone wants to feel good in their own skin. After all, nobody has ever complained about being too strong. 

Like what you've just read? Click here to subscribe to our blog!

This blog was written by Evan James, NIFS Exercise Physiologist EP-C, Health Fitness Instructor, and Personal Trainer. To learn more about the NIFS bloggers, click here.

Topics: muscle mass muscle building strength training athletic performance ADLs

The “Triple-A” Way to Dominate Your Athletic Off-Season

GettyImages-1277242858For many athletes and recreational athletes, the arrival of winter and cold weather usually signifies the end of their athletic season. Once the bulk of your outdoor sport competition has concluded or slowed down, reflections of the past year take place. You may have run a personal record in your first 5K, mini, or full-marathon; had your best record in your tennis league; or had the lowest scoring average over a spring and summer for golf. Whatever your sport is or whatever you worked on that previous off-season, the wheels start churning in your mind about how you might be able to continue that improvement for the next season.

As with most things in the athletic world, improvements we make start to get more challenging each year. When you were new to a sport or competition, you might have seen rapid increases in your skills and abilities. But as you progress further, these improvements can become more minuscule and harder to obtain. Below is my “Triple-A” approach to help structure your off-season and make the next year better than the last.

1. Analyze

When you look back at your season, the easiest thing to do will be to remember and reflect on some of your best performances. This is great. Keep those memories and the feelings you had when you performed at your highest level in the back of your mind and use them as motivation for consistency.

But also reflect on some of your competitions where you just didn’t “have it.” These seem to be the ones that most people, myself included, remember most clearly. The goal isn’t to dwell on them, but to think to yourself about what you could have done better. Are there any common “problems” when you compare any of your subpar performances? If so, head to step 2 and see if there might be a way you can address it.

2. Assess

You’ve taken some time to look back on your less-than-optimal performances from last year, so now what? The next step is to try and see whether there is a way to quantify that issue in an assessment or testing window. Obviously, every individual will have their own unique situation, but here are some examples of things I have encountered in years past within certain sports and how you might be able to assess them:

  1. Lack of sprint speed or lateral quickness (tennis, soccer): Can be tested using 40/20-yard dash or 5-10-5 (see this blog).
  2. Knee pain (running, golf): Could be an issue with ankle/hip mobility or strength related. Schedule a Functional Movement Screen (FMS) or fitness assessment.
  3. Low energy at the end of training sessions or competition (all sports): Many factors could play into this, but nutrition is always a big culprit. Meet with our dietitian, Lindsey Recker (lrecker@nifs.org).

This will take a little work on your part, but help is always available from the NIFS Fitness Center staff. If you don’t assess, training is a guess.

3. Apply

Now the fun begins. Once you have pinpointed where some of your performance faults have occurred, it’s time to get to work. Your training program should consist of exercises or nutritional practices that are aimed at improving your subpar areas. If you lack speed or agility, add multidirectional running drills. If you want to improve your club head or racquet speed, add rotational power drills. If your pre-practice or competition meals don’t give you the energy you need, start formulating a plan that meets those needs.

As I said before, each individual has their own needs. A cookie-cutter “Triple A” approach may yield some improvements, but those serious about making improvements to their athletic skill set will invest a little more time and energy in finding out where the problems are and take a systematic approach to improving them.

Like what you've just read? Click here to subscribe to our blog!

This blog was written by Alex Soller, Athletic Performance Coach and NIFS trainer. To find out more about the NIFS bloggers, click here.

Topics: off-season athletes student athletes athletic performance assessment performance

Flight School: Training to Improve Your Vertical Jump for Sports

GettyImages-1291852744
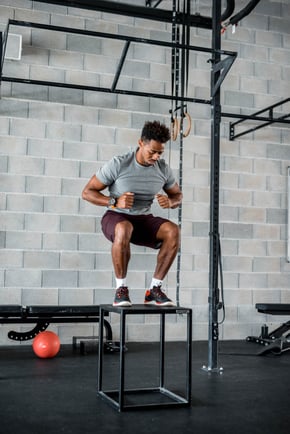
When watching elite athletes during competition, there are many athletic traits and features that we novices or amateurs marvel at. We think to ourselves, “If I did something like that, I wouldn’t walk for a week!” Seeing an NFL running back or wide receiver make a cut at full speed, a baseball player hitting a 400-foot home run, or a powerlifter deadlifting the weight of a Volkswagen Beetle are feats that just leave you in awe.

One of my favorites is to watch the jumping ability that is on display in countless basketball, football, and many other sporting events. Nothing seems to get fans and folks like myself more fired up than to watch an NBA player effortlessly float in the air and dunk on an opponent, or an NFL receiver jump up over two or three defensive players and come down with the football. No doubt, the combination of high-level athletic ability and hard work has paid off for many of these professional athletes with what seems like superhuman abilities. There is a reason that we see these men and women on TV and pay to see them during competition. The capabilities of the human body are crazy!

Improve Your Jump to Improve Your Sport

So, many of you reading this are probably not professional athletes. You might be former high school or college student athletes who have since “retired” from your respective sport. Like many of us, the “athlete” in us never really goes away. We find other sports or competition to feed that drive that we had as we grew up by playing recreational-league sports like basketball, flag football, or soccer, or have picked up new sports such as golf (like this guy) or tennis. And if you’re anything like me, you want to try and continue to improve in your new sport as much as possible.

Regardless of where you are in the timeline of your athletic journey, the vertical jump and vertical power will always play an integral role in your performance. Basketball and volleyball are the most obvious sports that are reliant on these abilities, but golfers, tennis players, and athletes in any other sport that utilizes rotational aspects would benefit highly by increasing their vertical jump. I mean, who wouldn’t want to hit the golf ball farther or add a few more miles per hour on their tennis serve?

When it all comes down to it, the amount of force we can put into the ground will dictate a lot of the athletic actions that happen with our bodies.

Three Jump Training Styles

Below I break down three different types of jump training styles that will put you on your way to soaring above the competition.

Body Weight

This is the most common type of jump training that you will see. Utilizing only the weight of your body, you perform these plyometric jump movements with little or no equipment. In the video below, you will see three movements starting from easiest to most advanced. These include the following:

  • Wall Touches
  • Box Jumps
  • Depth Jumps


Resisted Jumps

Now we get into some of the less common vertical jump training options. Resisted jumps add some type of downward-pulling resistance that will make your jump seem more difficult and hopefully help you generate more effort into the movement. The movements in the video below include the following:

  • Medball Powerball
  • DB Resisted Jumps
  • Band Resisted Jumps


Assisted Jumps

The third variation is assisted jumps. In my opinion, these are the most enjoyable. The goal here is to feel like there is a trampoline-effect going on where you just seem to spring up into the air. Most (if not all) variations will utilize a band. The three movements I have chosen for you are the following:

  • Banded “Belt” Jumps
  • Band Rack Pogos
  • Band Rack Squat Jump


All in all, the vertical jump is a very important skill to improve and master with regard to overall athletic ability. When it all boils down, the amount of effort you put into the training will dictate the results you get. Doing the majority of your jumps at 50 percent effort will yield an improvement in just that: jumping at 50 percent. Try to maximize your effort with each set and repetition where you are working at or above 90 percent effort, whether that be because of doing lower repetition ranges (1–5 reps) and/or making sure that you are fully recovered between sets (about 1–3 minutes’ rest).

Give great effort, get great results!

Like what you've just read? Click here to subscribe to our blog!

This blog was written by Alex Soller, Athletic Performance Coach and NIFS trainer. To find out more about the NIFS bloggers, click here.

Topics: resistance videos sports body weight athletes athletic performance lifetime sports exercise bands vertical jump vertical power jumping jump training

Testing Progress Toward Your Athletic Performance Goals

GettyImages-1067160268
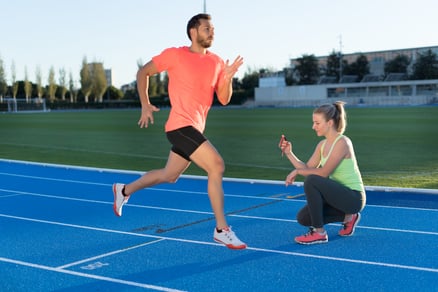
In a world where people want results in an instant and take drastic measures to achieve those results as fast as possible, developing strength, power and athleticism in a long-term aspect is often overlooked. For any fitness-related result or outcome, improvements take time. Fat loss, overall strength and/or power in any particular lift, speed, and agility are all seeds that needed to be watered for a while before noticeable and permanent changes are evident.

In an athletic realm, this leads to the importance of the “testing” process and the use of that process over the course of months, semesters, and years. As a young athlete or athlete fresh out of high school entering the college world of sports and strength and conditioning, this is how you monitor your success and validate that the training and improvements you are making are the things that are actually working. Numbers do not lie. If your times in specific agility drills or weights have increased in certain lifts, obviously you have made improvements. If those numbers have not changed or have decreased, you need to address methods of training or overall compliance/intensity with the program.

Below are five performance tests that measure multiple aspects of your overall athletic profile.

40-Yard Dash

The 40-yard dash, or “40,” is one of the most common drills we use to measure straight-line speed. Sure, many sports are played in a multidirectional way, but overall top speed is an important puzzle piece. Setting up and performing this drill is relatively simple; however, you may need two people to help with the timing.

First, set up two cones exactly 40 yards apart. From here, go to the starting line and sprint from start to finish. The clock or stopwatch should start on your very first movement from the starting line and stop when your body crosses the finish line.

5-10-5 Shuttle

The shuttle run is one of my personal favorites. It allows you to see an athlete’s explosiveness and change-of-direction skills. With lateral movements being so important in many sports, this gives you a good idea of where an athlete stands. To set up the 5-10-5 Shuttle, you need three cones spaced out evenly at 5 yards apart. The athlete starts at the middle cone with their hand on the ground. They run to the right or left cone and touch the ground (5 yards), across the whole setup and touch the ground (10 yards), and sprint through the middle cone (5 yards). Timing of this test starts when the athlete’s hand raises up from the ground and finishes when they cross the middle cone.

Vertical/Broad Jump

Jumping ability is another “power” aspect that translates very well into success on the field or court. The vertical jump test is generally performed with a Vertec, or a piece of equipment where you stand underneath and jump to touch as many of the rings overhead as you can. Other than obtaining the Vertec, the test is fairly simple. First, you want to measure your standing reach, or simply the height that you can reach with your arm outstretched overhead. As I mentioned before, you jump and hit as many of the rings on the Vertec as you can. When the maximal height has been reached, you subtract the standing reach number to get the vertical jump height.

Another great way to measure power would be with the standing broad jump. For this, all you need is a tape measure that is on the floor with a starting line for the athlete. To perform, the athlete starts behind the starting line and jumps out as far as possible and lands under control. The length of the broad jump is measured wherever the back of the athlete’s shoe lands.

Bench/Squat/Trap Bar Deadlift

In the preceding sections we looked at sprint and jump measurements, but we can’t leave out our strength numbers. Like the great Louie Simmons of Westside Barbell said, “Weak things break.” Truer words have never been spoken. Because of this, we want to measure those strength gains with every opportunity that we have. For me, my main three strength lifts that I measure are the bench press, the squat (front squat or back squat, depending on the athlete), and trap bar deadlift. These are three main staples in my programming and I always want to see if the way that I’m implementing them in workouts is yielding the best results.

These may look a little different for you. You may choose DB Bench Press, Pull-Ups, Farmer’s Carries, or something similar. My recommendation is to be sure that whatever you are testing are things that you are continually working on. It’s tough to test a back squat if you haven’t back squatted in 8–10 weeks.

Overall, the moral of the story is testing to see whether what you are doing is helping you achieve your goals is vital. Without testing you are just guessing. Remember, numbers do not lie!

Like what you've just read? Click here to subscribe to our blog!

his blog was written by Alex Soller, Athletic Performance Coach and NIFS trainer. To find out more about the NIFS bloggers, click here.

Topics: strength goals speed athletic performance fitness goals fitness assessment agility testing fat loss

Plyometric Building Blocks: Creative Movements and Injury Prevention

GettyImages-601905120As an athlete there is no substitute for the ability to produce power and be explosive during your sport. From competitive weightlifters and NFL-caliber football players to distance runners, producing (and absorbing) high impacts is crucial for succeeding in your sport as well as staying healthy throughout your competition season. Are you incorporating any of these exercises into your current program?

Creative Movements

Finding plyometric, or more simply “plyo” exercises, has become relatively easy. They have become one of the staples of social media and other internet posts because of their ability to morph into unique movements that will get many likes and retweets. Many performance coaches are looking to become the first person to introduce a movement or show a variation that no one has seen, and plyo exercises allow for a lot of creativity to fit a certain sport or activity.

But should you choose a movement you have never seen and implement it into your program? My answer? It depends. The movement may benefit you in some way, but you must also ask yourself whether it is training a specific area that you are targeting and whether the movement itself is safe. Plyo exercises are meant to be very explosive. They are designed to tap into the high potential of the motor units of the muscle fiber, which are essentially the driving forces from the brain to the muscle. The goal is to reach these high levels of effort (85–100%) during repeated bouts, with the goal of the body adapting to those high levels with an increased recruitment of those high-level motor units. The more we express their abilities, the easier it becomes for us to do, leading to more power.

Injury Prevention in Plyometrics

Now you have to ask yourself a question: Can you perform a movement at full effort while being safe? If you are unsure, here are a few building blocks to consider when choosing a movement.

The Landing

Whenever I teach lower-body plyo movements, the first thing we learn is the landing. Regardless of the sport, landing on the ground always presents a potential risk due to the heavy forces that are coming down. Always be aware of your knees and make sure they are always stable when your feet hit the ground. Avoiding an inward collapse of the knees is a great place to start by making sure your hips are engaged, which will increase the stabilization of the knees.

A good place to start is a simple Box Drop drill. Step up onto a box that is about 12–18 inches high. Step off and land on the ground with flat feet, knees outward with a slight forward lean of the chest. This will start the healthy promotion of safe and soft landings.

Effort

I touched on this above, but effort is a nonnegotiable variable during plyometric movements. Your body and muscles have to have a reason to increase their power-producing capabilities. If you approach a plyo exercise with low effort or the “going through the motions” mindset, it will be a waste of time. For example, say you have a maximal broad jump of 10 feet. During training, the ideal distance you would jump might be around 8+ feet depending on the number of repetitions you are going for. Do you think that jumping to 5 feet during your training sets would tax your body to make improvements on that maximal 10-foot jump? Unlikely. Train with high effort and energy and you will be rewarded.

Simplicity

My final building block is to not overcomplicate things. It is so easy to get caught up in doing an exercise because it looks similar to movements you might perform on the field or court, but my advice is to step back and ask yourself whether there is more thinking involved during the movement, or are you allowed to focus on one aspect and give all you have for the sets and reps you are going for. If a plyo exercise you find has 3, 4, 5, or more aspects, “paralysis by analysis” will definitely kick in. Choose movements that do not require a lot of thinking and allow you to attack every rep.

BE POWERFUL!

Like what you've just read? Click here to subscribe to our blog!

This blog was written by Alex Soller, Athletic Performance Coach and NIFS trainer. To find out more about the NIFS bloggers, click here.

Topics: injury prevention plyometric sports student athletes athletic performance team sports

Three Drills to Develop Athletic Agility

GettyImages-871413050
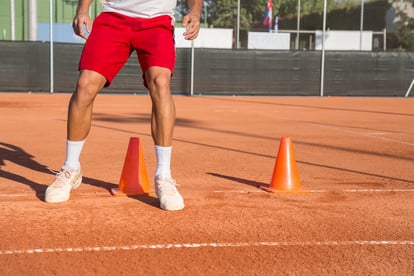
Agility drills basically represent an obstacle. Athletes who can respond faster to starts, stops, and change of direction earlier than the obstacle will have a practical advantage on the playing field. This blog highlights three of my favorite agility drills that can be built into your team’s conditioning routines. The benefits of these runs, jumps, and cuts include increases in reactionary speed, coordination, footwork, and body awareness. Athletes need to be able to change direction rapidly under control without decreases in speed.

You will need a good strength base before doing any high-intensity agility drills. These three drills are great for giving athletes the ability to keep their eyes on the play while knowing what is around them. Adding teammates to the mix always makes it fun and competitive.

Enjoy the drills!

Screen Shot 2020-03-03 at 2.54.12 PM
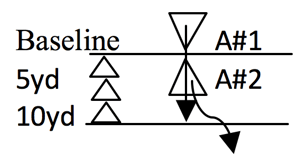
Drill 1: Offense/Defense—Partner Reaction Acceleration Tag

Setup: Cones are spaced 10 yards apart with a middle cone at the halfway point.

Number of Athletes: 2
Athlete 1: Offense (starts the drill); Athlete 2: Defense (reacts and chases)

Execution: Both athletes start on the ground head to head on the baseline. Athlete 1 starts the drill and is allowed two fakes before they must stand, turn, and sprint 10 yards. Athlete 2 reacts and chases Athlete 1 once they stand and turn and has 10 yards to catch and tag Athlete 1 in a sprint fashion.

Screen Shot 2020-03-03 at 2.54.22 PM
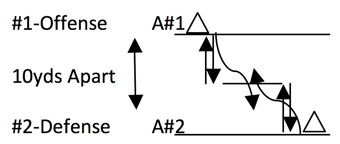
Drill 2: Cat & Mouse—5-5 Shuttle Reaction Tag

Setup: Cones are spaced 10 yards apart with a middle cone at the halfway point.

Number of Athletes: 2
Athlete 1: Offense; Athlete 2: Defense
Athletes will face each on opposite sides 10 yards apart.

Execution: At the start of a whistle or cue, both athletes sprint a 5-yard shuttle 5–5.

Athlete 1 then tries to sprint past the midline as fast as possible before Athlete 2 tags him before passing the midline after they both do a 5-yard shuttle.

After the 5-yard shuttle, Athlete 1 can juke/cut, etc. to get to the midline to fake out Athlete 2 before being tagged. Athletes switch between offense and defense.

Screen Shot 2020-03-03 at 2.54.44 PMDrill 3: Shuttle Runs—Reaction 5-5-10 Shuttle

Setup: Cones are spaced 0, 5, and 10 yards apart.
Another set of cones is 5 yards apart on the baseline.

Number of Athletes: 3–4
Athlete 1: Shuttles (drill start); Athletes 2–4: Reactionary

Execution: At start of a whistle or cue, Athlete 1, facing the baseline, begins shuffling between the 5-yard cones. Athletes 2–4 stand facing the other way on the baseline waiting to react to Athlete 1. Athlete 1 can shuffle back and forth for a total of two times. However, within the two shuffle attempts, Athlete 1 can turn and sprint whenever. Athletes 2–4 must respond to Athlete 1 and turn and sprint. After Athlete 1 initiates the sprint shuttle, all athletes are now in a race to sprint a 5–5–10-yard shuttle.

Like what you've just read? Click here to subscribe to our blog!

This blog was written by Michael Blume, MS, SCCC; Athletic Performance Coach. To learn more about the NIFS bloggers, click here.

Topics: team training sports speed athletic performance drills agility coordination proprioception footwork

How to Build Training Programs for Competitive Athletes (Part 2)

In part 1 of this blog, I explained training periodization, and talked about the first two macrocycles: off-season and pre-season. Now I’ll talk about the remaining macrocycles: in-season and post-season.

In-Season

ThinkstockPhotos-100324402.jpgOnce the competitive season begins, scheduling time to get in to lift is a lot more difficult due to the practices, games, and travel that are happening. To me, in-season lifting is sometimes undervalued in the competitive/athletic world because of the fact that the primary focus is to win games or matches, not lift weights. However, I believe that this is one of the most important (if not the most important) times during the year because of what lifting can do for the athlete throughout the competitive season and into the off-season.

The goal of in-season lifting is simple: maintain what you have built in the off/pre-season and make sure that no muscular imbalances develop. This is not a time to try and increase your squat or bench by 50 pounds. It is a time to make sure that your body stays healthy and you are able to preserve the muscle, strength, and power that you have built throughout your season. Doing this will not only keep you healthier for your sport, but will also set you up for better long-term development during the subsequent off-season. Think about it: If you lose the vast majority of strength, power, and muscle mass you’ve built over the in-season, you are basically starting at square one when the season is over. If you are able to preserve 85% of that strength and power, you are starting further along than you were the year before, which allows you to make bigger gains.

Recommendation:

Training Frequency: 2 days per week
Mode: Medium Sport Specificity
Volume: Low

Post-Season

When your competitive season comes to a close, there should be some time to relax and recover from it. Take time and reflect on how you performed and what you could have done to be better in different aspects of your activity. Start creating a plan on how to improve those things once your training ramps up again.

As for training during this period, it should still happen. Your body is still recovering, but you want to make sure you do not totally fall off the map by not doing any type of exercise or physical activity. This is a perfect time to play or participate in some other sports or change up your weightlifting routine. You basically have free reign on your choices under one circumstance: get away from your actual sport/complete lifting routine.

This macrocycle does not last long, but it is an important one. You have been competing for months and want to avoid being burnt out on the sport you love, so getting away will be good. Do something different; just be active. After 3 to 4 weeks of light activity, you can begin your off-season program and start the quest to better yourself for the next competitive season.

Recommendation:

Training Frequency: 2 to 4 days per week (light activity)
Mode: Low Sport Specificity
Volume: Low-Medium

***

Overall, there is no exact science that is going to work perfectly every time when you are building your own training programs. You will always need to make tweaks, even to the best programs around. This blog provides the framework for developing a solid program, but the devil is in the details. You want to make sure that you have everything planned out as you progress through the competitive season. Some things may not go as planned, but that is okay. The ultimate goal is to make you the best athlete you can be in the sport or activity you are doing!

Like what you've just read? Click here to subscribe to our blog!

This blog was written by Alex Soller, NIFS Athletic Performance Coach. To find out more about the NIFS bloggers click here.

Topics: NIFS mini marathon training weightlifting competition post-season programs off-season athletes athletic performance

The Importance of a Maintenance Phase for Athlete Training

In NFL and college football, each week, a star player is hit with a sidelining injury. Possibly lost for multiple weeks, months, or at worst, the whole season. Injuries that are usually the result of bad luck or not being as physically prepared as they could have been. Hopefully your team, **knock on wood**, does not or will not have to deal with this at any point during their season. My team, my beloved Detroit Lions, look like a dumpster fire for reasons other than injuries.

The physicality of football increases every year. The players are getting bigger, faster, and stronger in training facilities across the country getting ready for that next season. Guys are always looking to take that next step during the offseason to ensure that they are a better player than they were the preceding year. Countless hours are spent in the gym and on the field trying to achieve this goal. Some training programs start the day after a season is over, whether it be after week 17 in the regular season or if your team wins the Super Bowl. It’s no secret that being a professional or collegiate athlete is a year-round commitment. 

Changing Training After the Season Begins

But what kind of training do players do after their season begins? Do they continue to train five or six days a week like they did in the offseason? Of course not. With large time commitments for practice, watching film, and simply resting, an athlete must shift their focus to making sure all of that hard work is not wasted over the course of the season. The most effective way to salvage the progress that you have made over the past five or six months is to enter a maintenance phase.

A maintenance phase is one phase or “macrocycle” (a large portion of a training year) that you should use during the start and duration of each athletic or competitive season. As mentioned before, this phase is used to preserve the strength, power, and muscle mass that was built in the many months prior to the season. 

What Does a Maintenance Phase Look Like?

Some characteristics of a maintenance phase include the following:

  • 2 (±1) workouts per week
  • 45 to 60-minute sessions
  • 2 (±1) sets per exercise. Main exercises should focus on strength, power (plyometrics, Olympic lifting, core lifts [bench, squat, deadlift]), and functional mobility.
  • Promoting overall health
As you can see, these phases don’t take much time, but could pay huge dividends throughout your season. The ultimate goal for many (if not all) sports, like the NFL, is to make the post-season. The teams that always seem to perform the best in those scenarios are the ones that are the healthiest or freshest. Continuing to lift throughout your competitive season will help you maintain the overall function of your body instead of gradually losing it throughout the season. As a wise man (Dr. Alan Mikesky) once said, “If you don’t use it, you lose it.”

Impact on Future Seasons

Don’t underestimate the importance of a maintenance phase, due to the implications that it could have on subsequent seasons. Think about this scenario:

Imagine you start training for your freshman year of college football squatting a maximum (1RM) of 315 pounds. After 4 months of preseason training, your 1RM has gone up to 365 pounds. Once the season starts, you stop lifting weights and focus on football. Three months later when the season is finished, you hit the weight room for the first time. Your 1RM squat is back to 315 pounds. Your body had no reason to keep the neural drive of the muscles because you no longer required it to. You start your offseason conditioning program and increase your squat back up to 365 pounds and exceed those numbers by squatting 380. Once your sophomore season starts, you stop lifting weights once again. At the end of the season, your 1RM squat is back to 315. 

This is a vicious cycle that never allows for any solid progression. You start from square-one every year. Now think about the same scenario with a few changes:

Imagine you start training for your freshman year of college football squatting a maximum (1RM) of 315 pounds. After 4 months of preseason training, your 1RM goes up to 365 pounds. Once the season starts, you begin an in-season maintenance phase. You lift two days per week, making sure your squat loads are significant enough to maintain your 1RM (80-95%). Three months later when the season is finished, you hit the weight room for the beginning of your offseason training program. Your 1RM squat is 355. Although you dropped 10 pounds, it is not as significant as the 50-pound loss from the previous scenario. From your offseason program, your 1RM increases from 355 to 410. Once your sophomore season starts, you begin another in-season maintenance phase. At the end of the season, your 1RM has only dropped to 405. 

***

As you can see, progression of strength (and power with other lifts) has to be maintained year round. This goes for all athletes throughout their seasons. If they want to continue to improve, they must prevent the loss. It is as important of a cycle of training as any. Without a properly structured in-season maintenance phase, you will be starting from the same place every time you start a new offseason training program.


This blog was written by Alex Soller, NIFS Athletic Performance Coach. To find out more about the NIFS bloggers click here.

Like what you've just read? Click here to subscribe to our blog!

Topics: training weightlifting strength power professional athlete muscle mass post-season athletic performance