<img height="1" width="1" style="display:none" src="https://www.facebook.com/tr?id=424649934352787&amp;ev=PageView&amp;noscript=1">

NIFS Healthy Living Blog

The Why and How of Training Your Hip Adductors

GettyImages-1308568450Everyone needs strong hips. Athletes need them to perform a wide variety of movements within a given sport. Aging adults need them to help reduce the risk of falls. When we think about the hip, most people think about the glutes and abductors. You can look in any gym and see a handful of people with a band around their knees performing a plethora of movements working the glutes and abductors. However, the most neglected muscle is the one on the inside of the thigh: the adductor.

Anatomy and Function of the Adductor

The adductor muscle is situated in both the medial and posterior compartments of the upper leg. It attaches to the hip bone and to the linea aspera of the femur. The primary role of the adductor is to adduct and internally rotate the thigh at the hip joint. It also plays an important role in hip extension and stabilizing the pelvis along with the glutes and hamstrings.

Why You Should Be Training the Adductors

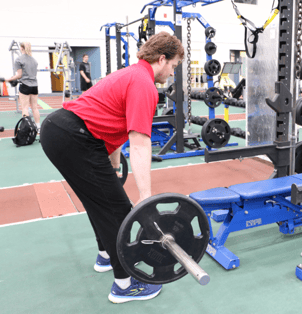
The adductors are a secondary muscle group that assists the larger muscle groups during compound exercises such as squats and deadlifts. However, there are important benefits to focusing accessory movements on the adductors. As I mentioned, the adductor plays a role in hip extension and stabilization of the pelvis. Hip extension is one of, if not the most powerful movements of the body. It is how we jump, stand, walk, run, and sprint. If we neglect the adductor muscles, we are missing out on added stabilization of the pelvis during all these movements.

Groin strains are the most common among athletes who are sprinting, cutting, and changing directions. Throughout these movements, the adductors take on a large load of eccentric forces. This means that just like the hamstrings during a heel strike, these muscles are force absorbers. A muscle is more likely to tear or strain if it is not strong enough to absorb an increasing amount of force. Strengthening the adductors can reduce the likelihood of a groin strain.

The adductors not only stabilize the pelvis, but they also control pelvic rotation. This is highly important for sports such as baseball, softball, golf, hockey, or tennis. All of these sports rely highly on the rotational power of your hips for swinging and throwing. Weak adductors will not help you hit farther or throw harder.

Movements for the Adductors

  • Adductor Machine: Not all gyms or facilities have one of these machines. However, if you do have access to one, it’s the simplest way to directly train the adductors.
  • Adductor Foam Roller Hold: Although you do not get the same overloading stimulus as the adductor machine, the foam roll hold could be a substitute for the machine. For this variation, all you need is a foam roller, or an object similar in width and it needs to be solid. In a seated or lying position, bend your knees to 90* and place the foam roller between your knees and squeeze. This is an isometric movement that you can make harder by holding for a longer duration. 
  • Banded Adduction: For this you will need a super band and a place to anchor the band close to the ground. To perform this movement, you will be in a standing position with your side to the band. Wrap the band around the inner foot and step out until you feel tension on the band. From your starting point, let the band pull your foot away. Stand tall and bring your foot back to the center.
  • Lateral Lunge: This is a great movement for any skill level because it can be progressed and regressed. To perform a body-weight lateral lunge, start with both legs together. Step one foot out and begin to bend that knee and start to sit your hips back. Push off that leg and bring both feet together. To progress this movement, simply add weight.
  • Copenhagen Plank: For this movement you will need a bench or a box. You will start in a side plank position with your top foot on the bench and your bottom leg either straight or bent. From this position, you will pick your hip up and hold.
  • Medicine Ball Scoop Pass: For the rotational action of the adductors, we will perform a rotational throw. With a medicine ball in both hands, shift your weight to the outside foot. From this position, push off the outside foot and rotate the hips, and then the shoulders, and throw the ball at the wall.

New call-to-action

This blog was written by Evan James, NIFS Exercise Physiologist EP-C, Health Fitness Instructor, and Personal Trainer. To learn more about the NIFS bloggers, click here.

Topics: injury prevention muscles senior fitness training exercises athletes hips hip mobility fall prevention

Movement Pattern Variations: The Hip Hinge

The fourth and final movement pattern of this blog series is the hip hinge. If you have not read it already, head to the original blog post, Optimal Movement Patterns for Building Muscle, which gives an overview of the four-movement patterns that everyone should be training. In this post, I go over the hip hinge movement pattern.

Screen Shot 2023-05-11 at 12.06.35 PMThe Hip Hinge Pattern

The hip hinge movement pattern is a compound movement that works the muscles of the low back, glutes, and hamstrings. These muscles are also known as the “go” muscles. The hinge pattern is an essential movement for your activities of daily living such as bending over, getting up from the floor, and walking. It is also essential to train this pattern to strengthen the muscles of the lower back around the spine. These muscles, as well as the glutes and hamstrings, can become very weak if you work a desk job or are sedentary for most of your day.

Training the hip hinge movement pattern to a full range of motion can also improve the flexibility in your hips and hamstrings. Learning how to hinge properly should be an essential aspect of your training from the beginning. Within your training plan, you can break this movement down into bilateral and unilateral patterns, just like the squat pattern. Bilateral means both legs working at the same time, and unilateral means one leg at a time. Utilizing both bilateral and unilateral will ensure you are not creating any imbalances between your legs. You can also isolate the muscles utilized in the hip hinge pattern, the hamstrings, and the glutes.

Hip Hinge Variations

Bilateral

  • Barbell Deadlift
  • Kettlebell Deadlift
  • Hex Bar Deadlift
  • Barbell Romanian Deadlift
  • Dumbbell Romanian Deadlift
  • Barbell Goodmornings
  • Seated Goodmornings
  • Hip Thrusts
  • Glute Bridges
  • Kettlebell Swings

Unilateral

  • Kickstand Deadlift
  • Single-leg Romanian Deadlift

Hamstring Isolation Movements

  • Prone Leg Curl
  • Seated Leg Curl
  • Banded Leg Curl

Glute Isolation Movements

  • Glute Kick Backs
  • Hip Abduction (band or machine)
  • Glute Ham Raises
  • Glute Focus Back Extensions

Get Help with Your Training Program

For more information on how to properly progress and structure a training program, visit our staff at the track desk to schedule a private session. We are more than happy to help at any time, and as part of your membership here at NIFS, you receive complimentary workout programs. Our Health Fitness professionals tailor all programs to your fitness goals.

New call-to-action

This blog was written by Evan James, NIFS Exercise Physiologist EP-C, Health Fitness Instructor, and Personal Trainer. To learn more about the NIFS bloggers, click here.

Topics: range of motion glutes hips ADLs movement patterns hinge training program lower back

Hip Thruster vs. Squat: Which Is Best for Glute Hypertrophy?

GettyImages-1147025300
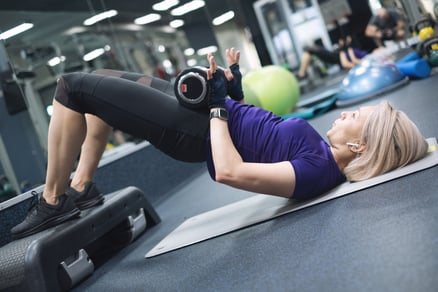
Squatting has always been the go-to exercise for those who want to make glute gains. You have probably heard someone say, “If you want to get better glutes, squatting is the way to go.” Recently, though, hip thrusters have gained momentum as the best exercise for glute development. Although, there is no concrete evidence that one is better than the other, some studies have been done (also here). Hopefully by the end of this blog, you will have a better understanding of the similarities and differences between these two exercises.

Glute Activation During Squats

During squats, the upper gluteal muscles help stabilize the pelvis as you walk out from the rack position. During the eccentric(downward) portion of the squat, only 20 to 30 percent of maximum voluntary contraction (MVC) was shown. At the bottom part of the squat, only 10 to 20 percent of MVC for glute activation was shown through EMG activity. The interesting part is that the bottom part of the squat is where everyone assumed you get the most glute activation, when in reality it is the lowest activation part. The concentric (pushing up) portion of the squat is where glute activation was seen to be the highest, at 80 to 120 percent. This makes sense because the main role of the glutes is to extend the hips.

Glute Activation During Hip Thrusters

During the hip thrust exercise, at the beginning phase, the glutes are relatively off because there is no external force placed on them. Because the first motion of the hip thrust is a concentric action (hip extension), the glutes begin to activate right away. It was measured to be at a range of 120 to 200 percent of glute activation during the concentric phase of the exercise. Another reason why MVC was higher is that the repetitions fairly quickly maintain a constant tension on the glutes.

Biomechanics of Squat and Hip Thruster

Screen Shot 2019-10-24 at 12.08.28 PMBiomechanically these two exercises are different because the squat is performed in the vertical plane whereras the hip thruster is performed in the horizontal plane. This difference allows for different forces on the body. In a squat, the glutes must fire to create hip extension torque, but they must also fire in order to create hip external rotation torque to prevent knee valgus (knee buckle). In a hip thrust, the glutes fire to create hip extension torque, but they must also fire in order to create posterior pelvic tilt torque to prevent anterior tilting of the pelvis and lumbar hyperextension.

With the squat, the limitation can be due to back strength, which you do not have with the hip thruster. On the other hand, glute strength is the limiting factor during the hip thruster. During a squat, you are typically able to get more hip flexion to avoid this issue.

The Verdict

For full range gluteal strength, a more complete neurological stimulus, and full development of the upper and lower gluteal fibers, you’ll want to perform both the squat and the hip thrust. Either exercise alone won’t suffice. The good news is that you don’t have to choose between squats or hip thrusts for maximal glute development; you should perform both movements.

Like what you've just read? Click here to subscribe to our blog!

This blog was written by Pedro Mendez, CSCS, FMS, Health/Fitness Instructor and Strength Coach at NIFS. To learn more about the NIFS bloggers, click here.

Topics: fitness center exercises muscle mass glutes hypertrophy building muscle squat hips

Get Moving with Improved Hip-Mobility Warmups

Whether or not you exercise, hip mobility plays a factor in your everyday life. Within the exercise realm, good hip mobility can be the difference between being “in the game” and just watching from the sidelines. In day-to-day life, hip mobility factors into nearly all movements, including climbing stairs, sitting and standing, and walking. If you find yourself wondering whether you could benefit from improved hip mobility, the answer is a resounding “Yes”! While understanding the importance of hip mobility is key, designing a routine that is appropriate for your needs and goals takes precedence.

Benefits of Improved Hip Mobility

If I were to pinpoint a few benefits of improved hip mobility, I would first look at the basic elements and emphasize the benefits of improved balance. Although you do not stand on one foot on a regular basis, you do, however, get in and out of your car, which requires a degree of balance. As hip mobility deteriorates, you may find it harder and harder to get out of your car.

A second area to look at is hip-strength imbalances in the body. This can become a more advanced quickly, so lack of hip mobility can lead to an abnormal strain on other muscle groups. An example of this is that an individual who sits all day may develop weak hip muscles (like the psoas, iliacus, and rectus femoris), which in turn could lead to the hamstring getting overworked.

Lastly better hip mobility can lead to fewer injuries and decreased overall pain due to hip tightness. Those who are running a marathon might discover tightness in their hips that could be remedied through a well-thought-out hip-mobility warmup.

Improving Your Hip-Mobility Warmups

IMG_4979
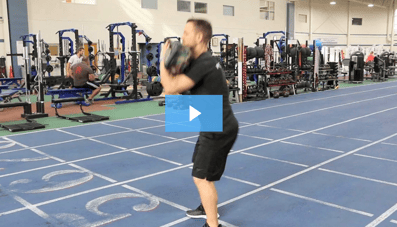
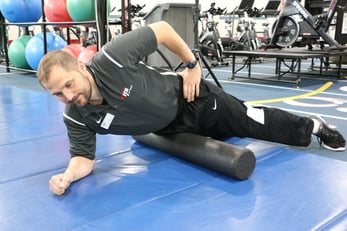
Most workout formulas include a warmup process. If hip mobility is a focus, your workout would benefit from a few additions to the routine. Foam rolling, which has been around for a while, is a great way to get blood circulating to the muscles and decrease soreness (if you worked them out prior). Spending a few minutes to roll out the trigger spots (areas of higher tenderness) will help you feel better, and you will be able to exercise on a more consistent basis.

IMG_4983Second, I would suggest a dynamic movement stretch (rather than traditional static stretching) to help not only stretch the muscle, but also warm up the body for more movement. “The World’s Greatest Stretch” (yes, that’s really its name) takes the exerciser into a lunge position, rotating and opening up the torso to the ceiling. Why is this called the “World’s Greatest Stretch?” For starters, you are able to stretch not only your hip flexors, but also your hamstrings and torso. As you do the stretch, both sides back to back, you notice that the stretch allows you to flow, dynamically, which is a great way to get your body ready for movement.

IMG_4990
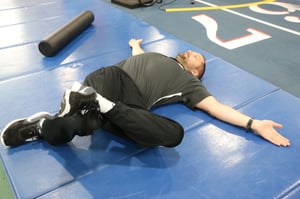
Finally, another great stretch to do is simply called a Hip Internal Rotation Stretch. While lying on your back, cross one leg over the other, allowing the hips to lean to one side and getting a decent stretch.


Address Your Hip Problems Now

Some hip problems are not from a lack of trying. Physiologically, there are many reasons your hips might hurt. If you feel as though you are having excessive pain in your hips, you might need to consult with someone who can help you. Overall balance issues, unnecessary pain, and muscle imbalances can all become bigger, life-altering issues down the road, so take care of them before they become bigger issues.

We want you to feel good! Come see a NIFS staff member at the track desk to schedule a complimentary FMS Screen to determine ways we can best help you with your exercises. Remember to warm up properly and stretch when appropriate, strengthen your weaknesses to see real improvement, and consult a professional to help you develop your plan.

Like what you've just read? Click here to subscribe to our blog!

This blog was written by Thomas Livengood, NIFS Health Fitness Instructor and Personal Trainer. To read more about the other NIFS bloggers, click here.


Topics: staying active workouts injury prevention balance pain warmups mobility stretch hips hip mobility

Marching Orders: Creating Stability Using Marching Exercises

Screen Shot 2019-03-19 at 11.38.50 AM
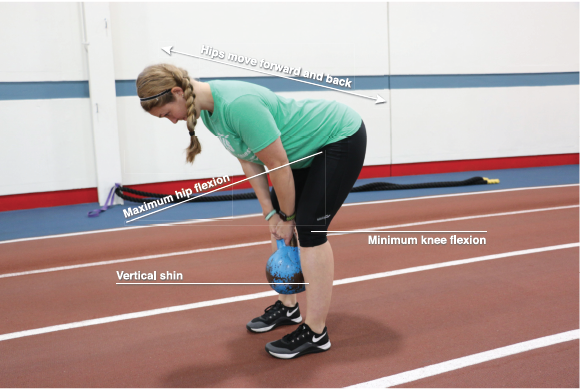
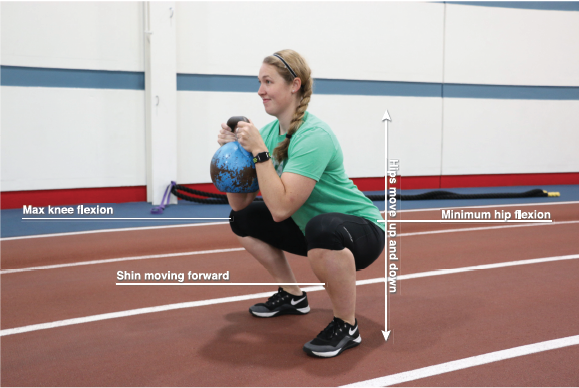
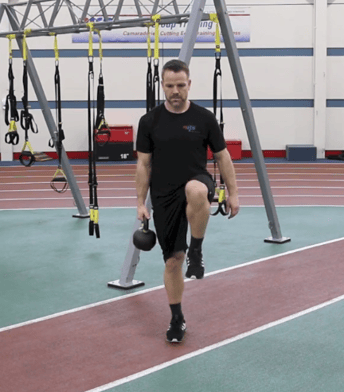
Humans have the ability to become and remain stable throughout any movement, from walking, to lunges, to power cleans. Increased stability typically correlates with increased performance.

There are countless methods, tools, and tricks of the trade to find and keep stability, and one that I think provides so many benefits at any level of fitness is the marching pattern. No, that is not a typo; marching is exactly what I mean. You know, that movement you see members of the band doing at halftime. Marching, at its core (I meant to do that), creates stability just when you get into the marching position. Then you can increase the results by changing your body position and adding load to make it a hugely effective exercise for increasing stability.

Why March?

There are many reasons why you should try marching:

  • It’s a fundamental movement that can be done at any age.
  • Marching can serve as a lead-up to so many more advanced movements.
  • It creates stability on both sides of the body (hip flexors and glutes).
  • Marching develops balance while increasing core stability.
  • The exercise helps the aging athlete avoid shuffling when walking, which can lead to falls.
  • It helps increase performance in single-leg movements.

Videos of Exercises

Here are videos of some marching-based exercises you can do:

  • Bridge marching
  • Resisted bridge marching
  • Sandbag bridge marching
  • Airex pad marching
  • KB Standing marching suitcase, racked, overhead
  • Miniband resisted marching
  • Sandbag rotation marching

Stability equals strength, and we can all stand to be stronger in the movement patterns that are huge parts of our lives outside of the gym. Add marching to your program to be "life strong,” and enjoy moving for a lifetime.

Like what you've just read? Click here to subscribe to our blog!

This blog was written by Tony Maloney, ACSM Certified Exercise Physiologist. To find out more about the NIFS bloggers, click here.

Topics: fitness center core exercises videos stability hips marching

Back to Exercise Basics: The Hip Hinge

In my previous “Back to Exercise Basics” posts, I broke down the push-up and then the squat, focusing on the individual aspects that form a properly performed fundamental movement. Now it’s time to take a look at the movement pattern that is considered by many to be the granddaddy of all movement patterns: the hip hinge.

Most movement in athletics (and in life) stems from a hip hinge. It is a base position that is the ultimate power generator. The hinge can be found in most movements and is a super important position and pattern no matter who you are and what your athletic event is, sports or life. Quite often, many individuals confuse the hinge with the squat; and although they are both lower-body movements, they couldn’t be more different. This confusion between the two generally leads to “squat-heavy” kettle swings, poor positioning for a deadlift, and lackluster power expression.

How the Hip Hinge and Squat Differ

So if you can live with my stick-figure drawings, take a look at how these movements are different:

Cara_hinge

HIP HINGE

  • Max hip flexion with minimum knee flexion
  • Hip dominant
  • Hips go back and forward
  • Vertical shin

Cara_squat_kb

SQUAT

  • Max knee flexion with minimum hip flexion
  • Quad dominant
  • Hips go up and down
  • Shin moves forward

The differences between the two should be pretty clear when looking at them side by side, even with these crude drawings.

Videos: How to Master the Pattern

But the hip hinge can be one of the toughest things for a coach to teach, and a tough pattern for a new mover to perfect. Of course, using an FMS to evaluate your ability to perform a hinge pattern is a key first step. But after that, how can you master this pattern? Here are a few drills that can set you up for success, as well as some variations of a hip hinge that you can add into your current program.

VIDEO #1: Set It Up

  • Karate-chop hips—Rock and lock—Charlie
  • Short-stop hand slide
  • Broad jump freeze


VIDEO #2: Grease the Pattern

  • Wall butt touch
  • Band distracted hinge
  • KB front-loaded hinge
  • Foam roller single-leg hinge


VIDEO #3: Variations

  • KB deadlift
  • Hip thruster
  • SaB deadlift
  • Landmine single-leg/straight leg/Deadlift


Just as with the push-up and the squat, we are merely scratching the surface here of both the position and the breakdown of the hinge pattern and the many ways to use and improve this ever-important fundamental pattern. But I feel good that the information covered here can at minimum get you underway toward being a hero for the hip hinge.

Get More Help from NIFS

Want more tips and information? Schedule a personal workout plan appointment with a NIFS instructor and cover cutting-edge drills and techniques to make you the best mover you can be.

Like what you've just read? Click here to subscribe to our blog!

This blog was written by Tony Maloney, ACSM Certified Exercise Physiologist and Fitness Center Manager. To find out more about the NIFS bloggers, click here.

Topics: NIFS fitness center functional movement functional movement screen exercise basics hips