<img height="1" width="1" style="display:none" src="https://www.facebook.com/tr?id=424649934352787&amp;ev=PageView&amp;noscript=1">

NIFS Healthy Living Blog

Go from Sore to SOAR! Preventing Soreness and Injury in Your Workouts

GettyImages-1072667146A common nuisance to almost all fitness enthusiasts is the overall lethargic feeling you get from being extremely sore due to a challenging workout. Sometimes this is a deterrent to those looking to develop a consistent workout pattern, and can be especially bothersome if you haven't experienced this phenomenon before.

Does being sore mean that you should take more time off from fitness to recover, or would your time be better used if you could minimize soreness through workout planning and management? Beneath all of the reasons to either work out or stay home is your desire to see results. So this blog looks at ways in which you can shorten your down time due to soreness and eventually soar to new heights with your workout programming.

Pre-Workout Rituals to Minimize Soreness

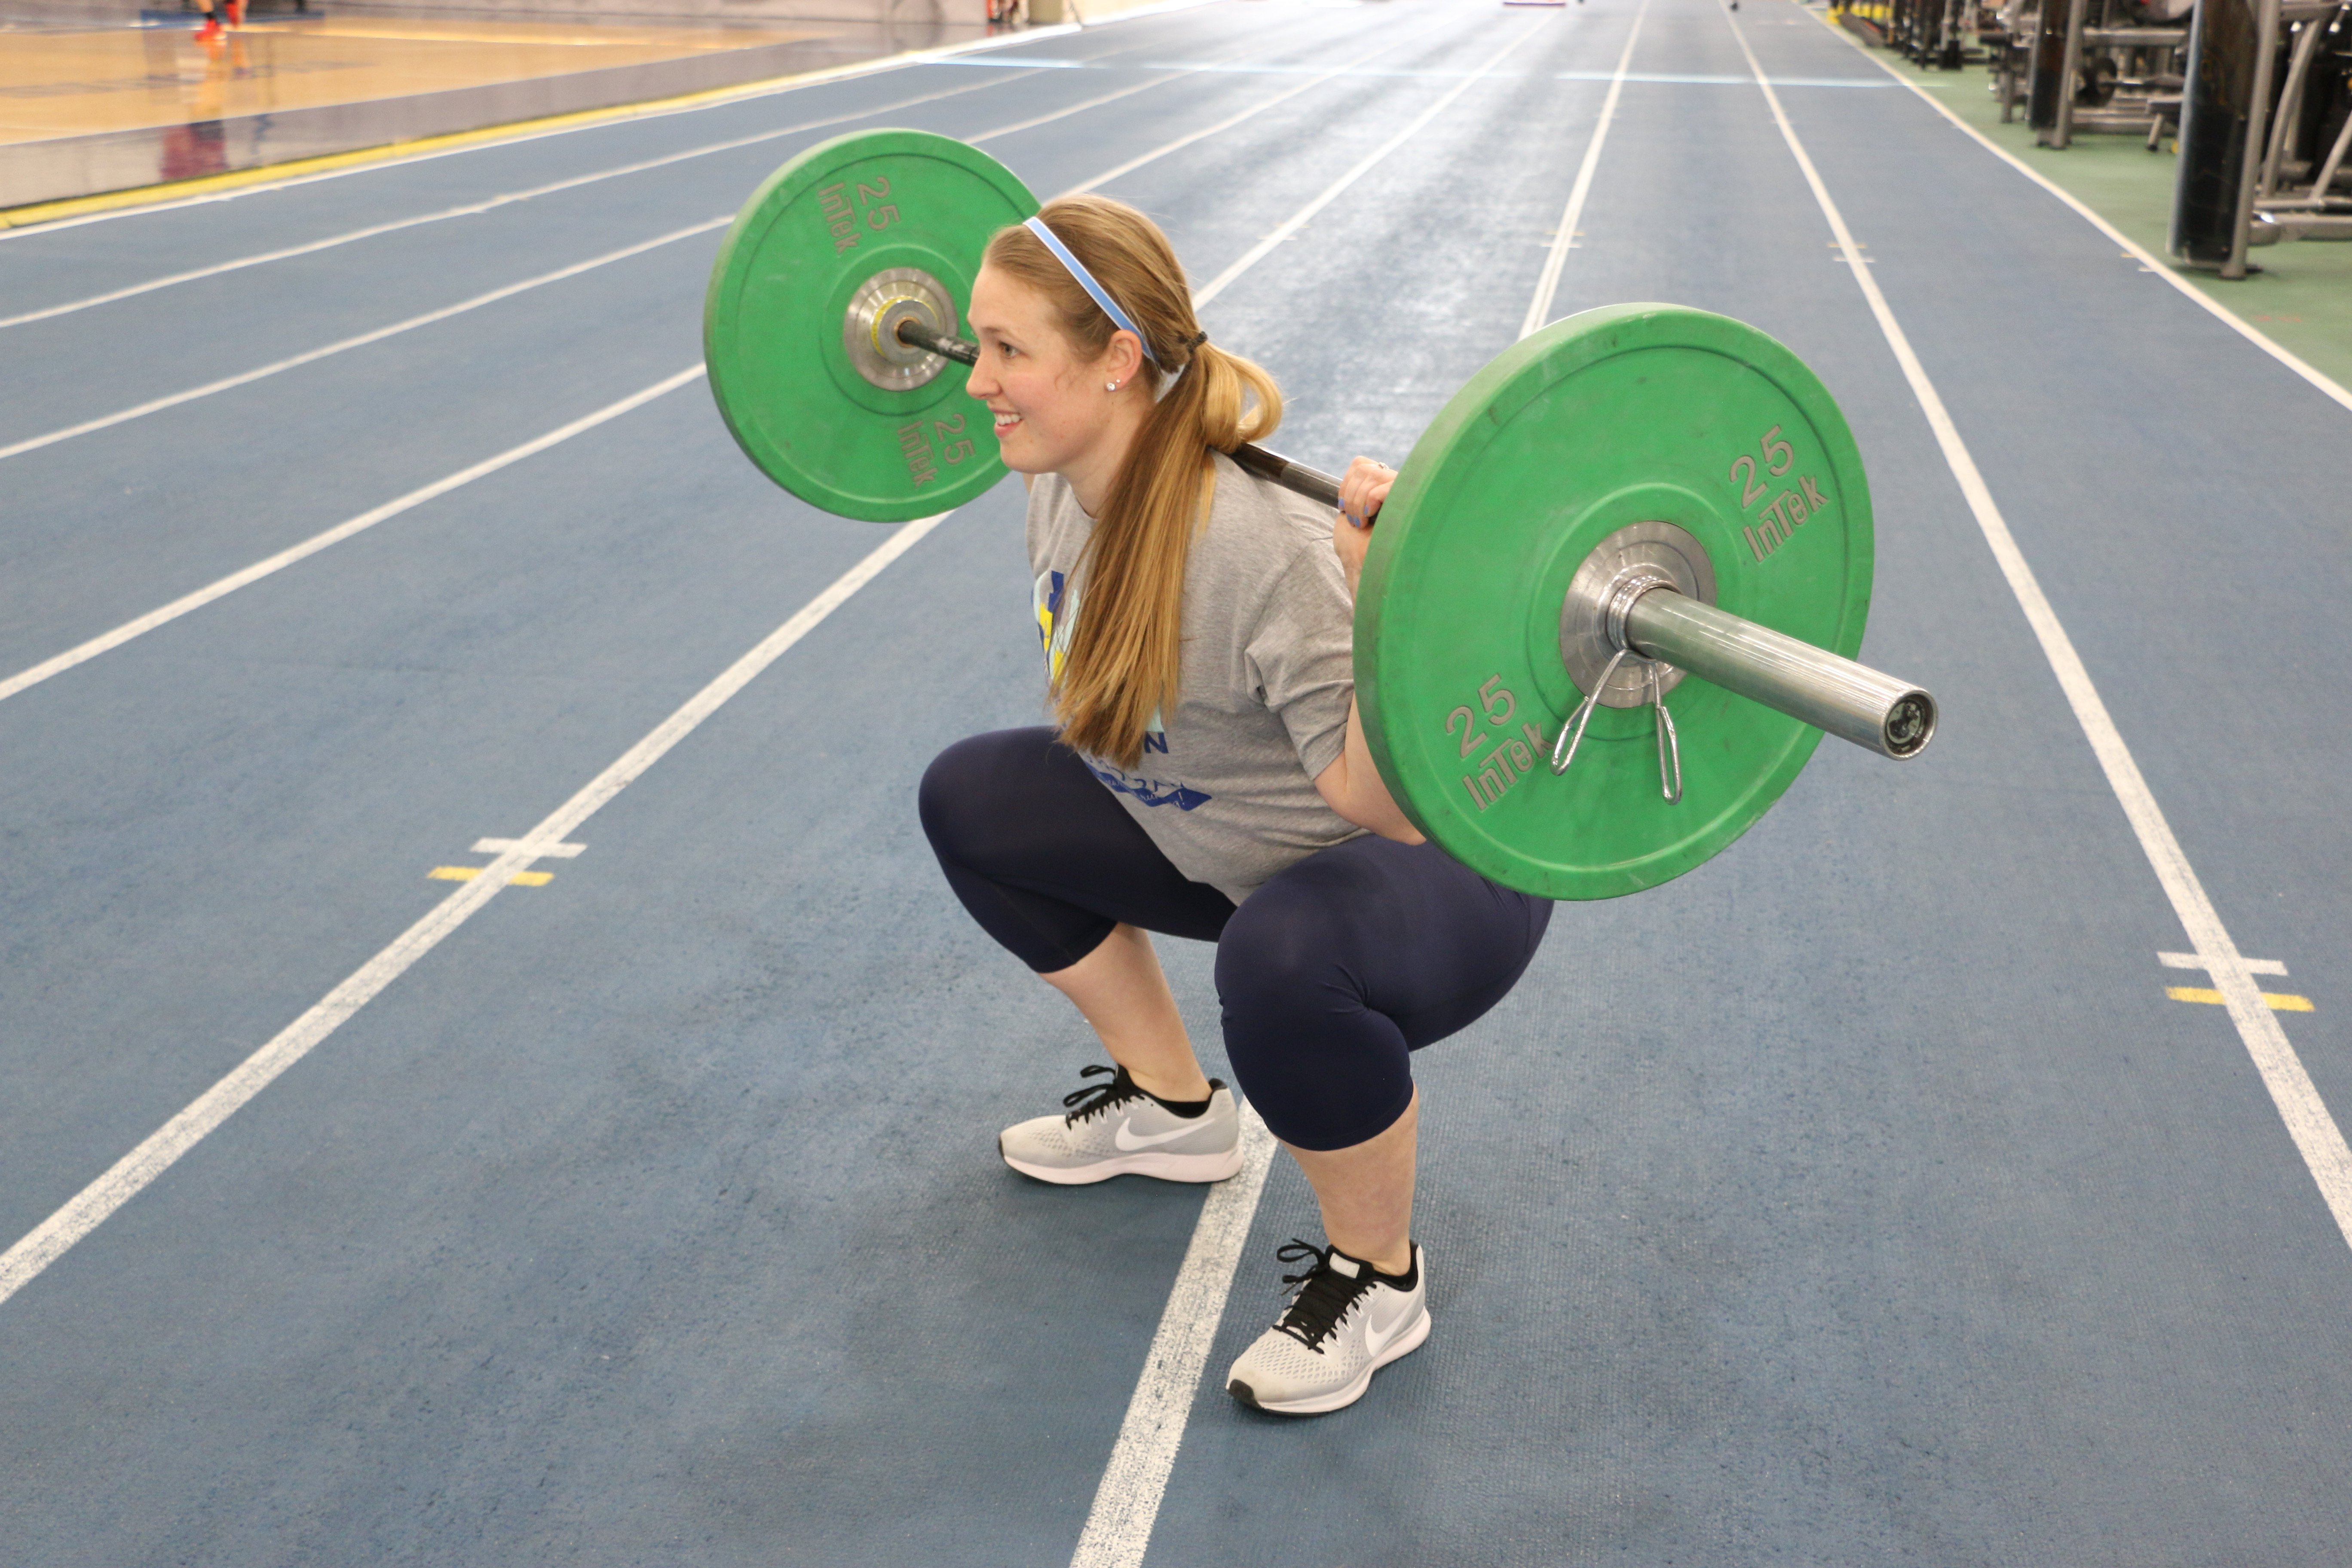
We all have been sore from working out at some point. Being able to get back to the gym and work out again is key to not only keeping on track for goals, but also to set important habits. Excuses for not being at the gym can vary and many may be valid, but being sore from a previous workout is becoming less and less common because of our pre-workout rituals, which now include, but are not limited to, the following:

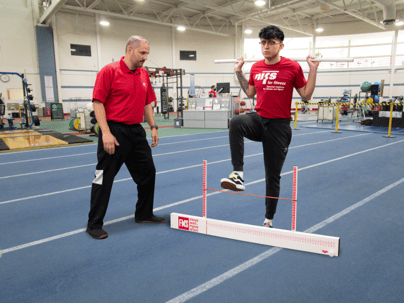
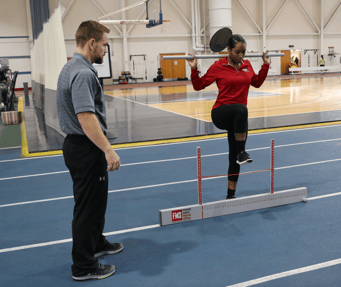
  • FMS corrective exercises (prescribed by a NIFS Health Fitness Specialist)
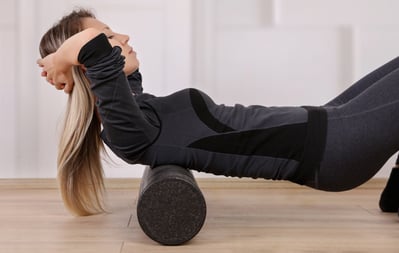
  • Foam rolling
  • Dynamic warmups (think about track stretches)
  • Even the whirlpool and sauna

With proper usage, these tools are designed to make you not only better at all aspects of fitness, but also safer as you grow into your workout. At NIFS, one of our focuses is on being an all-around fitness center, which includes these aspects. Getting screened with the Functional Movement Screen and talking to a NIFS staff member about your goals is one step toward a better overall experience at the gym.

Planning Your Workout Program for Injury Prevention

Another area to consider is your workout program. Would your weekly times and days allow for a six-day workout split (for example, Monday is chest day, Tuesday is legs, etc.), or would another path that includes total-body workouts make more sense? The answer depends on several things, including your personal goals, your workout experience, previous injuries, and workout frequency allotted. What you want to steer away from is overtraining a specific muscle to the point where it potentially can become injured. This would be more likely if you were to max out on squats six days per week for the next month.

How to plan this program isn't a road you have to travel alone because NIFS offers workout plans (included with membership) to those looking to take their fitness to the next level. Set up a time to meet with a staff member to get started right away.

Take Advantage of Information and Resources from NIFS

In today's world of technology, information is now readily available at your fingertips. You might do an internet search for a TRX exercise and find tens of thousands of websites and videos. NIFS has you covered here, too, as a resource to help you become more engaged in fitness. Posting weekly, the NIFS social media team has not only videos, but also great blogs regarding how to effectively work out, but also how to recover from a tough exercise. If meeting a trainer is a little intimidating, social media such as Instagram and Facebook can be a great way to not only learn, but also get to know NIFS staff who are here to help you.

Now that you have some ideas to help you on your fitness path, there's only one thing left to do: get back to the gym. Meet with a NIFS staff member to set up your complimentary assessments (BOD POD, Fit3D, and FMS). Set up a workout plan that is based on YOUR goals, that makes sense for the amount of time you have to work out, and is centered on your starting point. Expect accountability, encouragement, and growth. Come to NIFS and SOAR!

Like what you've just read? Click here to subscribe to our blog!

This blog was written by Thomas Livengood, NIFS Health Fitness Instructor and Personal Trainer. To read more about the other NIFS bloggers, click here.

Topics: Thomas' Corner workouts injury prevention personal training BODPOD warmups assessments fit3d functional movement screen soreness social media

The Functional Movement Screen Exercises in Depth

Screen Shot 2021-09-27 at 1.55.13 PMIn my last blog I briefly described the importance of the Functional Movement Screen to determine where one should begin with their workout program. The score that an individual receives determines whether they are ready for certain movements. In this blog I will go more in depth about the actual purpose of each test of the FMS, what the scores mean, and the reliability of the FMS.

The Purpose of the FMS

The FMS was created to measure motor control of movement patterns, quickly identify pain or limitations that need to be addressed, and to set a baseline for movement competency within the body. Being able to determine asymmetries in the body will help the tester figure out which movement has the greatest deficiency and which movement needs the most help. The FMS consists of seven movement patterns that are performed without warmup. The reason is that we want to see what a person’s movement capacity is at its natural state.

FMS-logo

The Exercises That Are Part of the FMS

Here is more detail on each of the exercises that are part of this screening:

  • Deep Squat: This test shows us the most about how a person moves. The reason is that it allows us to see total extremity mobility, postural control, and pelvic and core stability. If you think about it, everyone at some time in the day performs a squat, whether that is sitting down, playing sports, picking up something off the ground, and so on. When the dowel is overhead, this requires mobility and stability of the shoulders, and the pelvis must provide stability and control while performing the squatting motion.
  • Screen Shot 2019-10-08 at 11.56.10 AM

    Hurdle Step: This test demonstrates how well someone is able to walk (locomotion) as well as accelerate. The hurdle step is a great assessment to determine any kind of compensation the body performs while you take a step forward. This movement also lets us know how well a person is able to stabilize and control oneself while in a single-leg stance. If pelvic and core control is lacking with this, the person will not be able to stabilize themselves properly and will most likely begin to shift too much or lose alignment.
  • Inline Lunge: This test helps demonstrate the ability that one has to decelerate. This is important because we as humans need to be able to decelerate every day, whether that be in sports or just daily living activities. It also allows the tester to observe the rotational and lateral movement capacity of someone. Pelvic and core control and stability is extremely important to be able to perform this movement properly. Since this test requires the person to be in a split stance, the tester can also see how well a person is able to get into hip, knee, and ankle flexion when lunging down and determine whether there is a mobility or stability issue.
  • Shoulder Mobility: This test helps show the relationship between the scapular-thoracic region, thoracic spine, and rib cage. A person with good thoracic extension typically does well on this test. One side should demonstrate internal rotation and extension and adduction, and the other side should demonstrate external rotation, flexion, and abduction.
  • Active Straight-Leg Raise: This test helps demonstrate many things, even though it might seem very basic. With the leg that is coming up, we typically want to see a good range of hip flexion. On the leg that stays down, we typically look for how good the range of hip extension is. Another variable that I like to look at is how well their core stability is. If they are not able to keep their back flat on the floor, this lets me know that the person is not able to own that position and needs help with core stability.
  • Trunk Stability Push-up: This test often gets mistaken as being an assessment for upper-body strength. This is not the case, though. The actual purpose of this assessment is to measure the stability of the core. If the spine or hips move during the push-up movement, this is usually an indication of other muscles compensating for the lack of core stability.
  • Rotary Stability: This tests for rotary stability in multiple planes. Core, pelvis, and shoulder girdle stability are what is being assessed. This also allows us to measure the ability of a person to crawl. Being able to demonstrate proper weight shift in the transverse plane and also coordination during the stabilization and mobility of this movement will help determine whether a person is ready for more complex movements.

FMS Scoring

I will keep this section short and sweet and explain the basic fundamental purpose of the scoring and what each number means. The FMS scoring ranges from 0–3, so there are 4 possible scores that a person can get. A 0 indicates that there was pain during the movement. A score of 1 usually indicates that the person was not able to complete the full movement properly or was not able to get into the correct position to execute the movement. A score of 2 indicates that the person was able to complete the movement but had to compensate somehow to actually execute it. A score of 3 indicates the movement is optimal and no compensations were detected.

Reliability of the Test

Many research studies have been done to determine the reliability of the FMS in recent years. The main findings that have been discovered are that the FMS can accurately identify people with a higher chance of an injury. The three groups at a higher risk are professional football players, male marine officer candidates, and female collegiate basketball, soccer, and volleyball players.

People always ask me what score determines an elevated risk for injury on the FMS. What most studies suggest is that a score of 14 or lower gives a person a 1.5 times higher risk for injury than a person who gets a score higher than 14. This does not mean that if you score lower than a 14, you should be frightened; again, most studies done are with a specific population (stated above). More studies are needed on the general population, but what is certain is that the FMS is a great tool for personal trainers, athletic trainers, physical therapists, and strength and conditioning coaches to use on their populations to get a better understanding of how well a person moves.

If you are interested in completing an FMS screening at NIFS, click here for more information.

Like what you've just read? Click here to subscribe to our blog!

This blog was written by Pedro Mendez, MS, CSCS, and Health Fitness Instructor.

Topics: NIFS injury prevention pain exercises functional movement assessments movement functional movement screen

Train Like an Athlete with Help from NIFS

GettyImages-969284736I am often asked what kind of workout program I follow, and my response is always, “I follow a program that gets me faster, stronger, and more athletic.” When people hear this, they assume that I am some kind of athlete and that they won’t be able to work out the way I do since they are not “athletes.” This is a huge misconception that I have noticed throughout the years that I have been working out. What people do not understand is that we are all athletes in our own way, and can actually train like one in order to get faster, stronger, and more athletic.

Find Out Where You’re Starting From

For me the key is to understand where you are at in terms of movement. Many programs out there assume that you move perfectly, so starting them might not necessarily be the best if you have not had the training experience needed to actually perform those movements. A good assessment to determine whether you have any compensatory patterns or movement deficiency is the Functional Movement Screen (FMS). With the FMS, we can narrow down exactly which corrective exercises are needed to get a person ready for the complex movements that might be programmed.

Start with Exercises That You’re Ready For

Once you have determined where you are at movement wise, it’s important to start with exercises that your body is ready to handle at that time. Possibly regressing a complex exercise like the Barbell Back Squat to a simpler exercise like the KB Goblet Squat or 2KB Squat will allow you to own that movement better and in turn will prepare you to progress back to the complex movement faster while performing it better.

Perform Athletic Movements

Training like an athlete does not necessarily mean you have to match their intensity or lift the same amount of weight as they do. But it can mean performing the same movements, such as these:

  • Warm-up routine
  • Power exercises
  • Squat variation
  • Horizontal upper-body push variation
  • Split squat or half-kneeling variation
  • Vertical/horizontal upper-body pull variation
  • Supine/prone abdominal exercise variation
  • Accessory exercise

These are exact movements that I program for my athletes. The cool thing is that anyone can do these movements as long as the right exercise is prescribed. No two athletes that I have trained move the same, and there are many that actually need to start with the most basic forms of movement (body squat, hands elevated push-ups, etc.). I am sure many of you have performed these “basic” exercises in the past. These exercises are often considered “too easy” at times, but if they are performed correctly, it can be a challenge even to athletes.

You Can Get Help from NIFS Trainers

I get it, it can be very intimidating for a beginner or even an experienced lifter to train like an athlete if they don’t know exactly how to go about starting a program like that. Luckily, here at NIFS, our trainers are well equipped with the materials and knowledge to get anyone who is looking for a new challenge started toward being faster, stronger, and—most importantly—more athletic.

Like what you've just read? Click here to subscribe to our blog!

This blog was written by Pedro Mendez, CSCS, FMS, Health/Fitness Instructor and Strength Coach at NIFS. To learn more about the NIFS bloggers, click here.

Topics: NIFS training athletes personal trainer functional movement screen fitness assessment

Happy Playmore: 5 Movement Tips to Stay on the Golf Course Longer

GettyImages-961002976It’s finally that time of year again—time to hit the links and chase a little ball all over a well-manicured green space with the hopes of golf immortality. If you are like me, you have a love/hate relationship with the sport of golf, but I look forward to my weekly round with friends to take on challenging courses and ultimately myself.

All levels of golfers are continually looking for ways to improve something in their game and to get out there more and more to test their skills. But are you taking the necessary steps to make sure you are able to lace up the spikes, strap on the glove, and swing a club anywhere from 70 to 100 times in a 3- to 4-hour span? We can plan practice like crazy on the short game, driver, and flat-stick, but if you can’t move well, or if you have an injury, you won’t be booking that tee time.

As an avid golfer myself, and an aging one at that, I have found some ways to ensure I can enjoy the game that frustrates me so much at times but provides aspects you just can’t get anywhere else. That’s why we play. Here are some tips to help you play longer and, ultimately, better.

Get Screened

Do you know whether you are moving well? Do you know whether you have some mobility issues in key joints for the golf swing, or imbalances? If you do, are you performing specific strategies to help correct and enhance any movement problems you may have? You wouldn’t expect a Corvette to drive at a high performance level if it had square tires, would you? But often we golfers expect to play in the 70s with glaring movement issues and become rather frustrated when we do not. See a certified pro, like all the coaches at NIFS, and get an FMS (Functional Movement Screen) completed to see if there are any movement deficiencies that could be holding you back on the course. You will receive an in-depth report of how you are moving and a bunch of strategies to help make your movement better. Our coaches take the approach of Gray Cook: that when you move well, you will move often; and in this case, moving better means more golf.

Emphasize Mobility

If you want to hit the ball farther, and more often, you have to emphasize mobility exercises and drills in your fitness routine when you are not playing, especially mobility of the thoracic spine. The rotation of the golf swing comes mainly from your ability to “turn” through the T-spine, or upper back area. The larger the turn, the greater the potential swing speed you can create, which can lead to bigger drives and adding yards to all of your clubs. You will receive drills from your coach after completing your FMS, and you can also read more on the importance of T-spine mobility from experts like Greg Rose and others at the Titleist Performance Institute. In most if not all athletic environments (life being one of those), it truly has to start with mobility. The more mobility you have, the more potential you can unleash.

Train the Frontal and Transverse Plane

Working in a fitness facility I witness on a daily basis a lack of training emphasis on the frontal and transverse planes of motion. We are a pretty straightforward kind of fitness planet, and not in a good way. And many times I field questions about an injury that happened on the golf course from individuals who have never trained outside of walking in a straight line, or straight presses and pulls. They are confused that they move explosively in a plane of motion they never train and somehow get hurt. The golf swing happens in the frontal and transverse planes of motion, so you need to train with movements that challenge you in those planes. Countless exercises and drills can get you out of the sagittal plane (forward and back), and prepare and load your body to take on a big swing as well as provide the endurance to perform many swings. Here are a few of the classics:

Warm Up Properly

This really should go without saying, yet I have to: WARM UP BEFORE YOU PLAY! Racing to the course, pulling the bag out of the trunk, stepping to the first tee, and hitting the big dog after a few practice swings is a sure-fire way to at best play poorly, and at worst suffer a big injury that takes you out for the season. Take the time to show up a little earlier and warm-up properly. As I typically do, I reference the experts. I learned this quick and effective warmup from Jason Glass that I use every time. If you don’t dig this one, that’s fine; just do something to prepare your body to perform for that 3- to 4-hour round of golf.

RICE After the Round

If you don’t know by now, RICE stands for Rest, Ice, Compression, and Elevation. You don’t have to suffer a trauma to enlist and perform this concept. Ice can go a long way in the recovery process, and that is the goal here, to recover quickly and get back on the course. You don’t think the pros finish up, go get some dinner, and hit the rack, do you? No way! They recover properly so they can swing well every time they step on the course. Take time to perform a light stretch after a round, jump in the hot tub, or ice down sore muscles after you are done enjoying this great sport. It will get you back out quicker and you will be playing longer.

Like what you've just read? Click here to subscribe to our blog!

This blog was written by Tony Maloney, ACSM Certified Exercise Physiologist and Fitness Center Manager. To find out more about the NIFS bloggers, click here.

Topics: NIFS injury prevention golf recovery mobility movement functional movement screen

Win the Day, Not the Lottery: Daily Success in Fitness Training

GettyImages-1083000206So often in life people like to look at things as win or lose. But what if you switched your perspective to thinking of making progress by winning each day? With this simple shift, your days can be filled with more positivity and success instead of the typical mindset of losing or not being good enough.

Assess Your Current Fitness Level

So how can you take this approach into your fitness training? It starts with acceptance. Where are you at today? Maybe start by doing a simple fitness test:            

EXERCISE DURATION  # of Reps Completed
Pushups 1 minute  
Situps 1 minute  
Box step-ups 1 minute  
Squats 1 minute  
TRX Row 1 minute  
Burpees 1 minute  


Set Realistic Fitness Goals

After you complete the test and track your results, set attainable goals in your mind. Maybe you want to increase each number by 3 to 5 reps a month from now. That doesn’t sound too bad, right? We often set ourselves up for “losing” or “failure” by creating goals that aren’t realistic.

The chance of winning the lottery in your lifetime is expected to be 1 in 175,000,000. If you set up your goal to win, how much money would you lose trying to buy all the lottery tickets just to achieve this goal? You might argue that the lose outweighs the win. The same is true in fitness training. People often think that doing more will get them to their overall desired results, but often this approach burns them out quickly, making the overall goal not attainable, and they give up on it after a short period of time.

The Mindset of Fitness Training

Here are some things to keep in mind.

“Progress over perfection leads to winning every workout!”

If you set yourself up to start at the bottom and slowly add each time you work out, you will notice progress at each session. With new growth comes new excitement. Aim for progressing in your workouts for a daily feeling of winning, instead of an overall outcome of burnout and losing.

Proper form leads to winning longer!

Practicing proper form can be a huge challenge for many people. Slowing down in general can get uncomfortable, but breaking out of your comfort zone can reduce injuries and lead to success in your fitness progress for a longer duration.

When you practice quality in addition to your quantity goals, you are making double the progress. Have you ever asked a trainer to take a look at some of your basic movements, like a pushup or squat? A lot of details go into these exercises without weight that you might not even realize, let alone the additional details you need to think about when adding weight. A Functional Movement Screen might be a great way to receive feedback about your form to help give you additional knowledge and tools for personal fitness growth.

Don’t forget recovery!

People often forget about the importance of recovery and how it actually allows us to win. Without allowing the body time to heal, you are putting negative strain on the body and brain, leading to not just physical injuries but also a lot of stress and anxiety, which also spirals into even more problems such as future disease.

Being mindful of how much stress you put your body under and balancing it out with how well you recover with days off, diet, and foam rolling and stretching is a huge fitness bonus!

Like what you've just read? Click here to subscribe to our blog! 

This blog was written by Brittany Ignas, BS in Kinesiology, 200 Hour Yoga Alliance Certified, Stott Pilates Certified, and Fitness Coordinator. To find out more about the NIFS bloggers, click here.

Topics: goal setting recovery mindset assessment fitness goals functional movement screen

Tricks of the Trade: Exercise Coaching Cues to Avoid Injury and Pain

IMG_7980
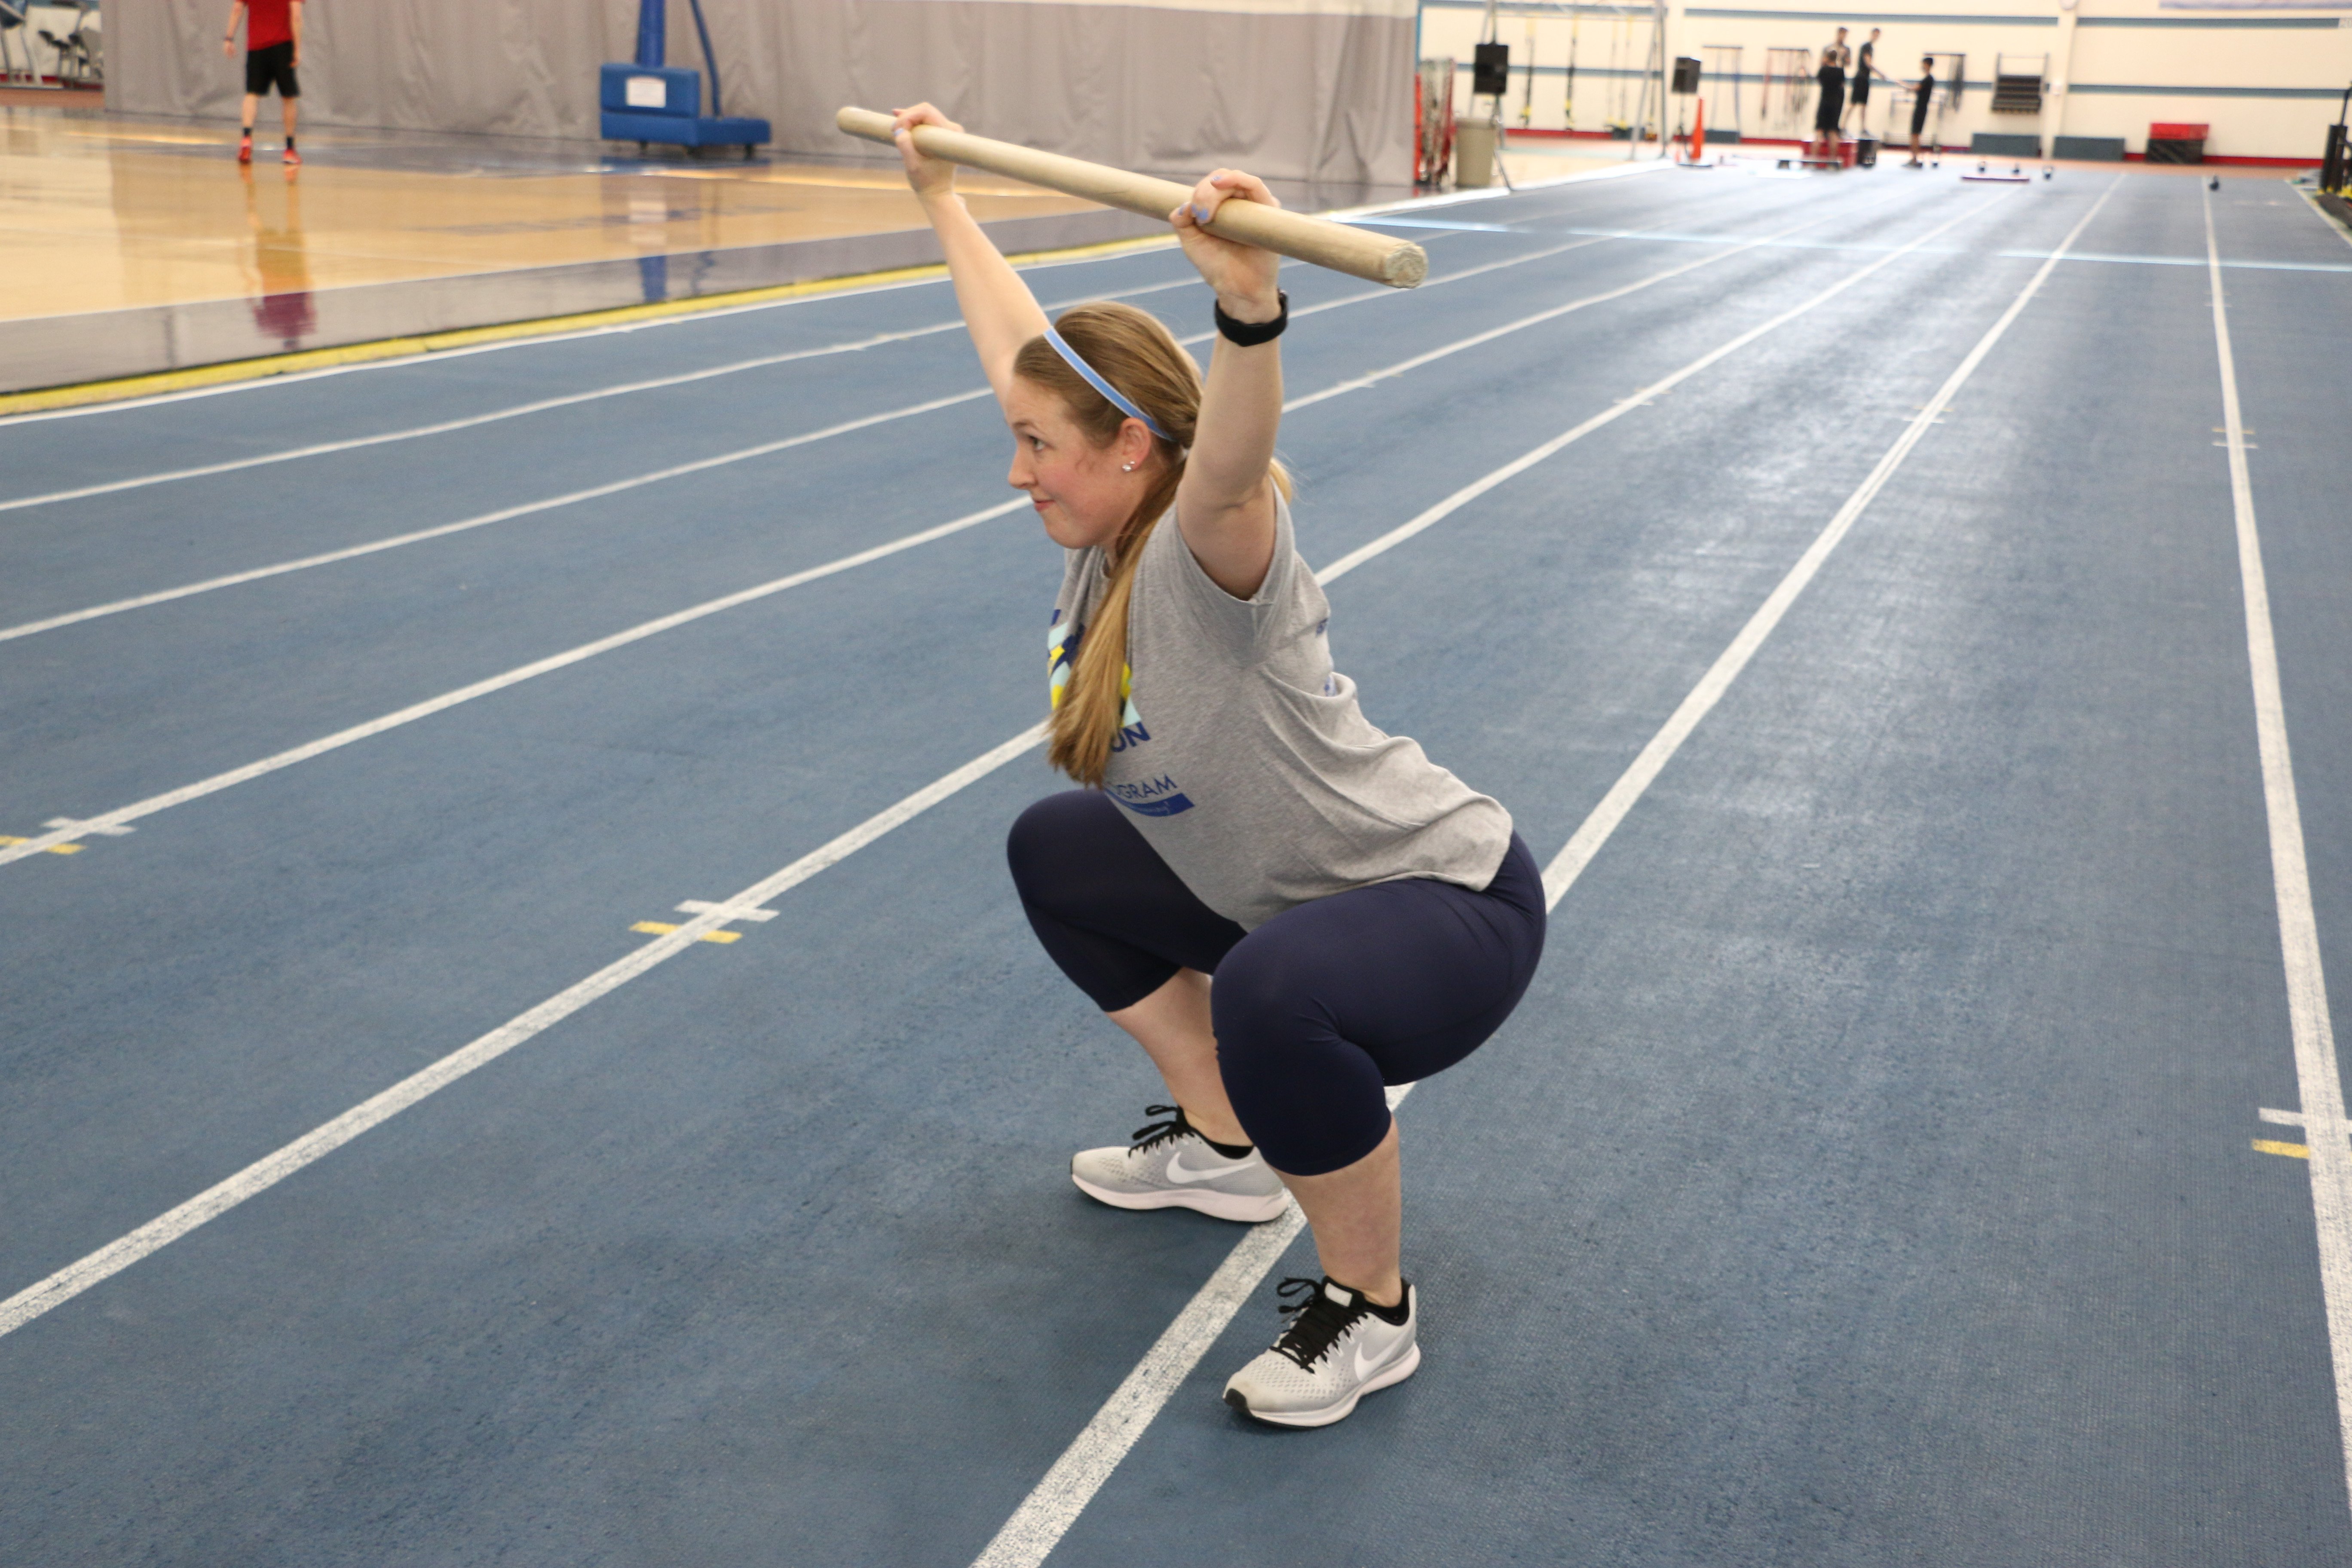
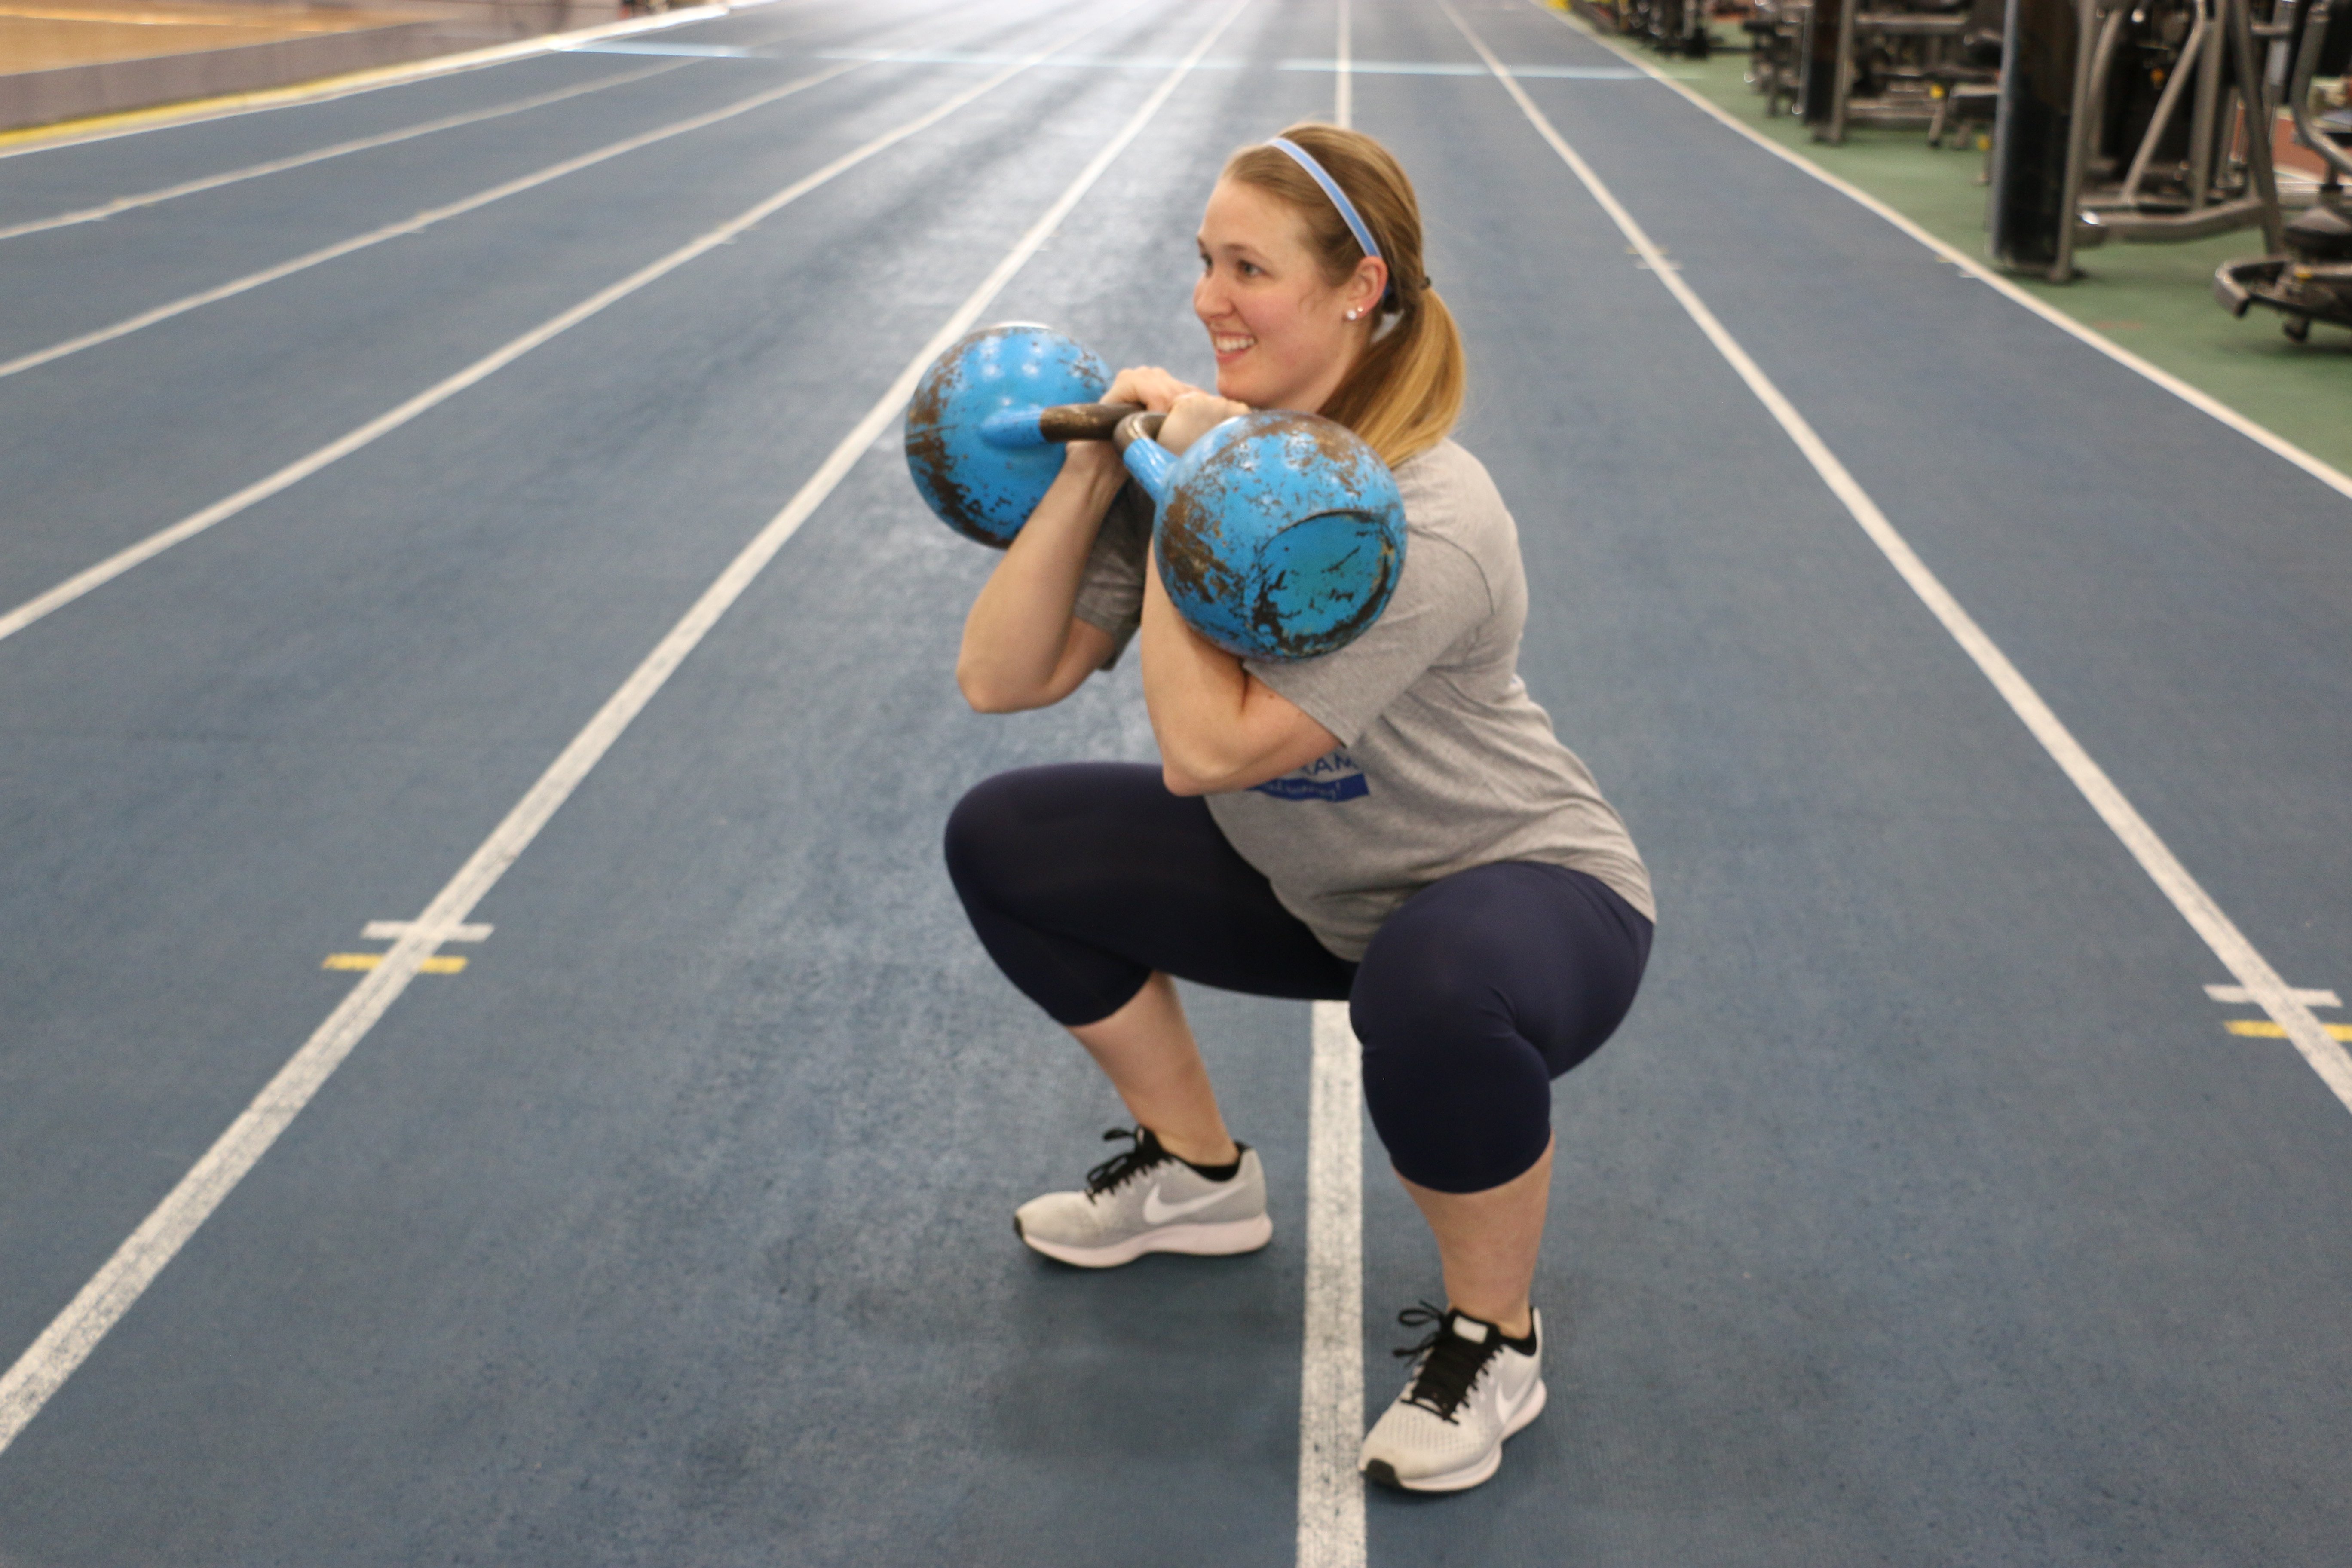
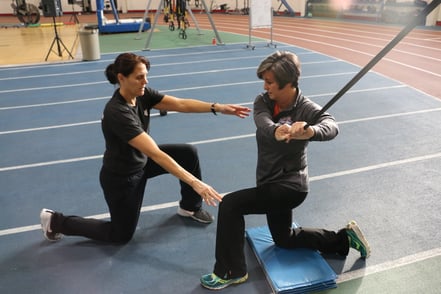
Coaching cues can really make a big difference in the outcome of your workouts. Sometimes it means the difference in whether you get injured during an exercise. Or are you even working the muscles you originally intended to use? Without cues, it would be foolish to have a client jeopardize their health because they saw someone else do a movement incorrectly or think they read it in a magazine or online. This is not to say that there are not many ways one can do to their exercises, or modifications to spice up their workout plan, but you need to make sure you aren’t compromising yourself and goals in the process.

I aim to clarify several cues you might have heard a trainer speak to their client, or have read about in a magazine or online. With this knowledge, hopefully you will have an opportunity to make more informed and educated decisions about the exercises you are doing in the fitness center.

Wall Sit Knee Pain

A great exercise to utilize on leg day is the tried-and-true wall sit. Due to the nature of the exercise and positioning of the body, it can cause a real strain on the knees.

Dissecting the exercise shows which muscles are active during a wall sit. This includes the gluteus, hamstrings, quads, and calves. The movement is basically a static squat while pressed against a wall, utilizing the principles of isometrics. Lowering the body to a position in which the knee is bent at 90 degrees and the back and head are flat against the wall is ideal.

Knee pain can be a side effect; if so, using caution is always rule #1. To help alleviate some discomfort, some cues to consider include the following:

  • Make sure your feet are flat on the floor.
  • Move your feet away from the wall.
  • Widen your stance a little.
  • Slightly point your toes outward at an angle.

You will still be using the same muscles, but the emphasis will shift away from the knees and more into your powerful glutei muscles. I also cannot stress it enough: keep your head back against the wall and your cervical spine in a neutral position. For an added challenge, you can try being in a wall-sit position, then add in a bicep curl to accentuate the movement.

Overhead Shoulder Press Pain

Yet another staple exercise you will see in the gym is the overhead press. There are many variations to consider, some with free weights and some with selectorized machines. Both ways, potentially, will get the job done, if done properly. The shoulder press is performed by pressing one or two dumbbells or a barbell overhead (if using free weights), or with a designated overhead press machine from your favorite selectorized machine line.

A typical issue that arises during a shoulder press is general overall pain in the shoulder itself, and sometimes discomfort in the upper middle back. If there are no underlying issues with the shoulder, this might only be a technique issue that could be resolved with proper cueing. You can discover whether you do have an underlying shoulder problem by completing a Functional Movement Screening (FMS) at NIFS.

Cues to consider here include the following:

  • Never allow the bar to travel behind your head or neck.
  • Try to keep your elbows forward of your shoulders as you press overhead.
  • Lower the weight until your hands are about at eye level, then press.
  • Use dumbbells only when your skill and experience level allows for it.

Lifting really heavy weight, such as during Olympic lifting, can also be hazardous and warrant special consideration. Sometimes an injury occurs during an overhead Olympic movement, but often injuries happen when a weight is being lowered to the starting position, safely to the ground.

Dropping weights from overhead is permissible when the weight being used gets to a range that cannot be safely managed on the descent. At this point, it is advisable to drop the weight, but there is a right and wrong way to drop. Consulting with an Olympic lifting coach or professional along with experience is the best way to learn how to drop the weights in a controlled and safe manner. Ideally, you are going to be safe, and the equipment maintenance guy appreciates your courteous and safe lifting efforts.

Screen Shot 2019-01-29 at 10.30.09 AM

Lat Pulldowns, the Safe Way

Our final cue is for the Lat Pulldown, which is a variation of a pull-up, using a selectorized machine. Although the motion and muscles are the same, the lat pulldown is an easier way to get good repetitions at an otherwise challenging movement. This doesn’t mean you can flub the exercise at the expense of your health.

Ever since the beginning of strength training, an iconic image in the gym is the “behind the neck or head” lat pulldown. A trainer who cares about you will tell you not to do this movement because it’s bad. “But why not?” you may ask. Without a doubt this is a high-risk exercise, but not for the reason you might be thinking. The equipment you are using is checked, double-checked, and deemed safe, but there is always a chance that the cable will give way, causing the bar or handle to come at your noggin at a high rate of speed. We can all agree that a behind the neck lat pull down is not worth a concussion (or worse).

Here are some cues for a safer lat pulldown:

  • Grab the bar or handle with hands evenly spaced,
  • Pull the bar or handle down to around eye level in front of the body and control the motion both on the way up and back down.

Many people may have other perceptions, but safety is the number-one priority when you are a personal trainer.

***

Do you have a trainer who has given you cues for exercise? Cues can really make a big difference. If you are interested in safer, more effective exercise, and learning about how your body works in exercise, contact a NIFS personal trainer or health fitness specialist to schedule a meeting to discuss your goals, questions, and next steps to a better workout. Getting the most out of your time at the gym also makes sense. Now get back to work!

Muscleheads rejoice and evolve!

Like what you've just read? Click here to subscribe to our blog!

This blog was written by Thomas Livengood, NIFS Health Fitness Instructor and Personal Trainer. To read more about the other NIFS bloggers, click here.

Topics: Thomas' Corner injury prevention pain personal training exercises coaching functional movement screen cues

What Is "Good Posture" (and How Is It Related to Movement)?

GettyImages-955753008“Stand up straight!” and “Don’t slouch!” are just a couple of variations on the same advice we’ve all likely heard at least once. I apologize if I’m bringing up bad memories of being scolded for less-than-perfect posture, but this read might give you a few reasons why those remarks might have been useless after all. That’s right, folks. We’re diving into the widely covered topic of posture: What it is, whether there is such a thing as “good” posture, and what you can do to optimize your posture at any given point.

What Is Posture and How Is It Related to Movement?

If you look up the definition of posture, you’ll find different definitions depending on where you look. One, from Oxford, says “The position in which someone holds their body when standing or sitting.” Another variation, from Merriam Webster, says it is “The position or bearing of the body whether characteristic or assumed for a special purpose.” Which one is correct? Well, I’m not sure either is incorrect, but I do have a preference for the Merriam Webster version. Why? Because it assumes that your posture at any given time is serving a particular purpose, whether that’s standing, sitting, walking, picking up an object, or performing any other bodily movement.

Your posture is ever-changing depending on the task you need to perform, so we might be missing the point entirely by getting caught up in analyzing a snapshot of what your posture looks like while you are sitting or standing still. As it turns out, it's fairly difficult to agree on what the ideal static posture actually is. Given the variance in how different individuals’ bodies are built, it seems pointless to assign a perfect static posture across the board. Not to mention, there is little evidence that supports the claim that “bad” posture or asymmetries put you at greater risk for pain. Perhaps our thought process is backward. What happens when you have pain in your back? Your posture changes! Wouldn’t it be reasonable that consistent, chronic pain could be the cause of postural adaptations that become your new normal?

Maybe our efforts should initially be focused on moving very well in a variety of ways. Moving well means maintaining the position of your body throughout a given movement or task. If you can train to move with quality in a variety of situations, it might allow for new options for movement to complete a given task, instead of repeatedly compensating. Having a variety of movement options available to you can prevent a default to the same repetitive movement patterns over and over again.

Increasing Your Movement Options

So, how do we increase the amount of movement options that are available to us? Practice, practice, practice. Yes, the dreaded p-word. The only way to learn something is to repeatedly do it, and do it correctly. And then do it correctly again. And again.

How do you know if you’re moving correctly? Have somebody watch you, of course. Without the guidance of an experienced professional who is competent with how the human body should move—whether that’s a physical therapist, personal trainer, strength coach, or other professional—you will have no outside perspective on what your body is actually doing.

Take something as simple as foot position. Just recently, I corrected somebody’s foot position from being “pigeon-toed” to being more “neutral,” with the toes pointing straight ahead. “I feel like my feet are duck-footed now!” I heard her exclaim. This is a common occurrence. When correcting somebody’s position to be more appropriate for the goal of the task, all of a sudden they feel way out of line. When your body resorts to only one option to complete a variety of movements, exposing it to a brand-new option will feel completely foreign.

Even those of us who are trained in technically correct strategies for movement can’t view ourselves from the outside. So, either we need to analyze some video footage, or more appropriately, employ an outside source as an unbiased third-party reviewer to say whether we’re moving the way we should.

Get a Movement Assessment

FMS-New
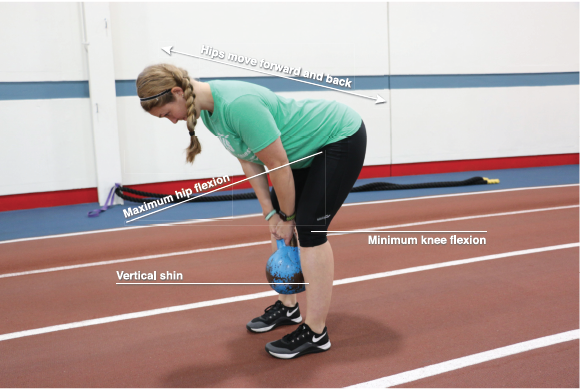
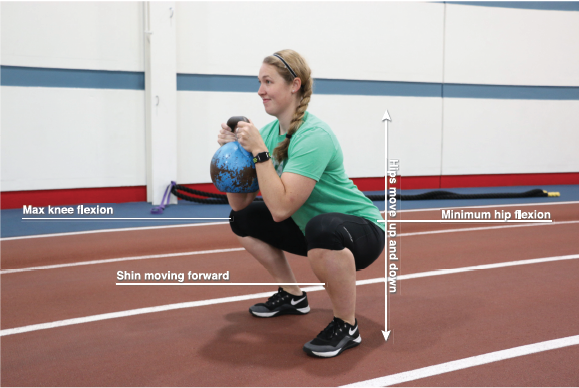
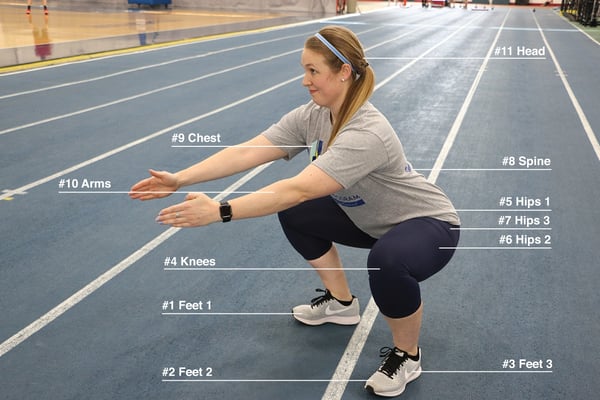
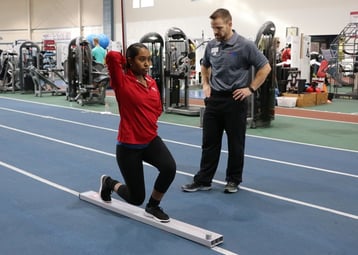
If you’re generally healthy and pain-free, you can consult with a competent trainer to do some sort of an assessment on your strategies for movement. Each individual uses preferred methods to assess movement, whether that is a Functional Movement Screen like we offer here at NIFS, a more general flexibility screen, or an even more in-depth orthopedic analysis. All have their limitations, but you can learn a lot if you know what to look for, regardless of the testing system.

One of my favorite big-bang movement assessments is watching somebody march in place. I have an opportunity to watch the strategy they use for shifting weight back and forth between sides, I can see somebody’s ability to extend one hip while flexing the other hip under the load of gravity, I can assess an individual’s thorax position during this activity, and I can even watch what’s going on with the upper extremities in response to a stepping pattern.

As long as the observer knows what to look for, the test or system of analysis becomes less important. What does take priority is the ability of your trusted expert to provide you with the strategies you need to maintain your position, or posture, throughout your daily life. Ultimately, however, it is up to you to employ those strategies and, yes, even practice them consistently so they can become your new normal, as if movement dysfunction never even existed!

To schedule an FMS with a NIFS certified instructor please click below to learn more.

Learn More

This blog was written by David Schoch, CSCS, and FMS. To learn more about the NIFS bloggers, click here.

Topics: NIFS posture movement healthy lifestyle functional movement screen

Back to Exercise Basics: The Hip Hinge

In my previous “Back to Exercise Basics” posts, I broke down the push-up and then the squat, focusing on the individual aspects that form a properly performed fundamental movement. Now it’s time to take a look at the movement pattern that is considered by many to be the granddaddy of all movement patterns: the hip hinge.

Most movement in athletics (and in life) stems from a hip hinge. It is a base position that is the ultimate power generator. The hinge can be found in most movements and is a super important position and pattern no matter who you are and what your athletic event is, sports or life. Quite often, many individuals confuse the hinge with the squat; and although they are both lower-body movements, they couldn’t be more different. This confusion between the two generally leads to “squat-heavy” kettle swings, poor positioning for a deadlift, and lackluster power expression.

How the Hip Hinge and Squat Differ

So if you can live with my stick-figure drawings, take a look at how these movements are different:

Cara_hinge

HIP HINGE

  • Max hip flexion with minimum knee flexion
  • Hip dominant
  • Hips go back and forward
  • Vertical shin

Cara_squat_kb

SQUAT

  • Max knee flexion with minimum hip flexion
  • Quad dominant
  • Hips go up and down
  • Shin moves forward

The differences between the two should be pretty clear when looking at them side by side, even with these crude drawings.

Videos: How to Master the Pattern

But the hip hinge can be one of the toughest things for a coach to teach, and a tough pattern for a new mover to perfect. Of course, using an FMS to evaluate your ability to perform a hinge pattern is a key first step. But after that, how can you master this pattern? Here are a few drills that can set you up for success, as well as some variations of a hip hinge that you can add into your current program.

VIDEO #1: Set It Up

  • Karate-chop hips—Rock and lock—Charlie
  • Short-stop hand slide
  • Broad jump freeze


VIDEO #2: Grease the Pattern

  • Wall butt touch
  • Band distracted hinge
  • KB front-loaded hinge
  • Foam roller single-leg hinge


VIDEO #3: Variations

  • KB deadlift
  • Hip thruster
  • SaB deadlift
  • Landmine single-leg/straight leg/Deadlift


Just as with the push-up and the squat, we are merely scratching the surface here of both the position and the breakdown of the hinge pattern and the many ways to use and improve this ever-important fundamental pattern. But I feel good that the information covered here can at minimum get you underway toward being a hero for the hip hinge.

Get More Help from NIFS

Want more tips and information? Schedule a personal workout plan appointment with a NIFS instructor and cover cutting-edge drills and techniques to make you the best mover you can be.

Like what you've just read? Click here to subscribe to our blog!

This blog was written by Tony Maloney, ACSM Certified Exercise Physiologist and Fitness Center Manager. To find out more about the NIFS bloggers, click here.

Topics: NIFS fitness center functional movement functional movement screen exercise basics hips

Back to Exercise Basics: The Strong Squat

We here at NIFS are what you can call “pattern people”; meaning our team of instructors focuses on fundamental movement patterns and how we can enhance them to allow for better function and goal achievement. Of course we start this process by having our members complete a Functional Movement Screen (FMS). The first assessment takes a look at the Squat pattern. Second in our series focusing on exercise basics, the squat will be the topic here, including how you can build a better one.

The Keys to a Great Squat

As we continue our focus on movement competency prior to attempting the most challenging exercise known to man (I still see this happening every day, in the gym and all over Facebook), we begin by taking a look at the major keys to a great squat. Much like the push-up described in a previous post, the squat is a super-versatile movement with so many real-life and performance applications in which it plays a role. From sitting into a chair (and standing up from that chair) to setting a PR in the back squat in your next powerlifting competition, the squat is a very powerful and functional movement we should all be training. Quite a few things are going on in a great squat; it employs core joint mobility in the ankles and hips, core stability, and motor control. These far-reaching aspects of movement are challenged and improved when incorporating a properly performed squat into your routine.

Cara_squat

Squat Pattern Checklist

Refer to the following checklist to ensure that you get the most out of your squat pattern by performing it correctly. Just as you learned to squat, check it off from the ground up:

  1. Feet 1: Just beyond shoulder-width apart
  2. Feet 2: Slightly angle outward
  3. Feet 3: Weight over the heels and spread the floor
  4. Knees: Tracking over toes
  5. Hips 1: Hips push back to begin movement
  6. Hips 2: At or below parallel
  7. Hips 3: Hips and knees flexing at same time
  8. Spine 1: Angle of spine and tibia are the same
  9. Chest: Keep up, proud chest
  10. Arms: (top of press) Push-up to straight-arm position
  11. Head: Keep gaze straight ahead

Squat Variations

Here are just a few variations you can try after mastering the pattern. Remember, do the basic stuff really well before moving on to the really hard stuff.

Overhead w. Dowel IMG_1201

2KB Front Squat

IMG_1211

BB Back Squat

IMG_1217

Like what you've just read? Click here to subscribe to our blog!

This blog was written by Tony Maloney, ACSM Certified Exercise Physiologist and Fitness Center Manager. To find out more about the NIFS bloggers, click here.

Topics: exercises powerlifting squat pattern functional movement joints assessment squat functional movement screen

Don't Skip the Warm-up: Injury Prevention and Workout Performance

GettyImages-658858192You might think that skipping the warm-up when you work out isn’t that serious. You only have so much time to get your work out in, so you think, “My warm-up was walking in here,” and “I don’t have enough time!”

Warming up is a significant component of your fitness routine, and skipping it could result in unpleasant and dangerous results. Muscle strains, muscle injury, and pain are just a few of them. In all honesty, a proper warm-up will actually advance your workout performance!

The Warm-up: Basics

A warm-up is a short workout time at the beginning of your exercise session. Warming up is generally low intensity and gets your body ready for the upcoming exertion.

The point of executing a warm-up is to increase your heart rate, raise your core body temperature, and increase the blood flow to your muscles. Cold muscles and other connective tissues do not stretch very easily. Adding in a warm-up can literally warm up those muscles and allow for them to relax, giving them a better chance to work better.

When you skip the warm-up, it makes you body more susceptible to sprained muscles, cramps, and other injuries. These injuries could actually prevent you from exercising altogether until you recover, and this is the opposite of the healthy lifestyle you are trying to live.

It can take the body about three minutes to realize that it needs to move more blood to your muscles. The ideal warm-up time is anywhere between five and ten minutes.

The Warm-up: Strategy

Now that I have explained the importance of warming up, let me share with you how I personally prepare myself, as well as each of the members I work with.

A proper warm-up is about more than just “warming up the body”; it is about preparing the body for an all-out training attack that is going to enhance your metabolism. I like to look at the warm-up as a preparation phase for what is to come. The three key components I like to focus on are the following:

  • Tissue quality
  • Corrective exercise
  • Mobility and activation

Tissue Quality

The majority of chronic joint pain or overuse injuries are caused by tightness and restrictions in the muscles above or below the area in question. In other words, it’s not about the victim…it’s about the culprit!

I struggle with knee pain that is often caused by restrictions in the tissues of my front/inner/outer thighs. Back pain can often be caused by restrictions in your glutes and hamstrings, along with shoulder pain associated with thoracic spine (T-Spine), chest, and lats.

Over time, we can develop scar tissue, adhesions, and knots and trigger points due to high-intensity training, overuse, and/or extended periods of sitting. My personal struggle is all the years I played high school, college, and professional basketball. The best way I know how to address my areas of pain is to self-massage the areas that may be sore and tight using good strategies I have learned from one of our massage therapists here at NIFS.

Corrective Exercise

We all experience “issues” with body mechanics and functional movement capabilities. For some the issues could be lack of flexibility, while others may experience balance and mobility issues. There could even be a difference between sides, with the right side being “stronger” than the left side.

The FMS (Functional Movement Screen) is a ranking and grading system that documents movement patterns that are key to normal function. By screening these patterns, FMS readily identifies functional limitations and asymmetries. These issues can reduce the effects of functional training and physical conditioning and distort awareness.

The FMS scoring system is directly linked to the most beneficial corrective exercise to restore mechanically sound movement patterns. Exercise professionals monitor the FMS score to track progress and identify those exercises that will be most effective in restoring proper movement as well as building strength in each individual.

To recap the importance of the FMS:

  • Identify functional limitations and asymmetries that have been linked to increased injury risk.
  • Provide exercises to restore proper movement and build stability, mobility, and strength to each individual.

Mobility and Activation

A mobility and activation circuit truly prepares your body for a maximum-performance workout. Mobility describes the ability of a joint, or a series of joints, to move through an ideal range of motion. Mobility requires an additional strength, stability, and neuromuscular control component to allow for proper movement. Activation is often paired with mobility because many mobility exercises activate key, and often dormant, pillar stabilizers in your hips, core, and shoulders.

Not JUST a Warm-Up

So, the next time you decide to skip your warm-up or think you don’t have enough time, remember that a warm-up is imperative for injury prevention and your long-term health, fitness, and weight-loss goals. Don’t do yourself an injustice by not warming up.

Like what you've just read? Click here to subscribe to our blog!

This blog was written by Ashley Duncan, Weight Loss Coordinator. To find out more about the NIFS bloggers, click here.


Topics: weight loss workouts injury prevention warming up functional movement screen