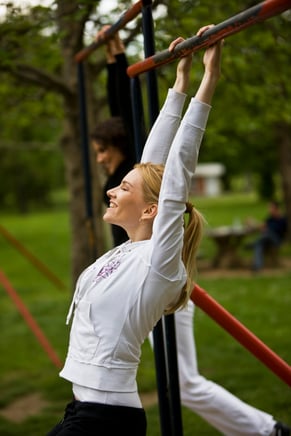
<img height="1" width="1" style="display:none" src="https://www.facebook.com/tr?id=424649934352787&amp;ev=PageView&amp;noscript=1">

NIFS Healthy Living Blog

Just Hanging Out for Shoulder Health and Pain Relief

GettyImages-172901773How many times have you looked around a room full of people and seen nearly everyone buried in their phones? Their shoulders are slumped forward and their head is hung low. Or maybe you’re at work, and everyone’s busy composing emails with that same forward head position? Chances are, it won’t be long before you notice this posture elsewhere, and it can wreak havoc when it comes to the health of your shoulders.

Although it varies from year to year, research has found that the prevalence of reported chronic shoulder pain in the United States ranges anywhere from 23% in 18–24-year-olds to just over 50% in those 55 to 64 years old. This can be the result of a variety of factors such as previous acute injury, musculoskeletal imbalances, or dysfunctional movement patterns and compensations that over time accumulate to cause pain.

What Does the Good Doctor Say?

Dr. John M. Kirsch is a practicing orthopedic surgeon with over 30 years of experience in treating patients with wide-ranging issues when it comes to the shoulder girdle. He is the author of Shoulder Pain? The Solution & Prevention, in which he details exercise and rehabilitative exercise protocols to help alleviate or eliminate shoulder pain. He found that in 90% of his patient population who were expected to have shoulder surgery, prescribing one movement as an alternative actually eliminated their pain altogether. And this movement is the brachial dead hang.

What Is a Brachial Dead Hang?

A brachial hang describes a vertical hanging pattern from a fixed point. Think back to when you were a kid on the playground. We climbed up and down structures and swung from the monkey bars during recess. This was routine. This hanging movement acts to positively change the structure of the shoulder girdle itself. Evolutionarily speaking, we were literally built to hang; it goes hand in hand with our physiology. However, when we spend years and years hunched over, gravity, along with lifestyle changes, makes it easier for the shoulder to be chronically stuck in an anterior, rolled-forward position. This can not only exacerbate any underlying shoulder injury, but can also cause dysfunction of its own, leading to potential impingements and pain.

The act of hanging works to reverse this shackled pattern that arises over time. It also aids in spinal decompression, encouraging appropriate space between the ribs, and allowing for more effective breathing mechanics as well.

How Do You Build Hanging into Your Routine?

If you’ve never hung from a pull-up bar before, the goal is to start small and gradually work your way up to supporting your full body weight. Specifically, start with a box underneath you so that you will have your feet touching the ground. Gradually let your body weight carry you down while keeping your feet on the ground, and support as much of your weight on the bar as you can tolerate. Hold this position for 10 seconds, resting for as long as needed, before trying another 10-second hang.

Dr. Kirsch has recommended hanging for up to 1.5 minutes per day, in whatever increments you can tolerate. This could be bouts of 10, 15, or 30 seconds depending on your grip strength. So the next time you’re in the gym or passing your local park, try giving a dead hang a shot. It could help quiet down some of those cranky shoulders.

Like what you've just read? Click here to subscribe to our blog!

This blog was written by Lauren Zakrajsek, NIFS Health Fitness Instructor, Personal Trainer, and Internship Coordinator. To learn more about the NIFS bloggers, click here.

Topics: shoulders stretching pain exercises posture spine

The Functional Movement Screen Exercises in Depth

Screen Shot 2021-09-27 at 1.55.13 PMIn my last blog I briefly described the importance of the Functional Movement Screen to determine where one should begin with their workout program. The score that an individual receives determines whether they are ready for certain movements. In this blog I will go more in depth about the actual purpose of each test of the FMS, what the scores mean, and the reliability of the FMS.

The Purpose of the FMS

The FMS was created to measure motor control of movement patterns, quickly identify pain or limitations that need to be addressed, and to set a baseline for movement competency within the body. Being able to determine asymmetries in the body will help the tester figure out which movement has the greatest deficiency and which movement needs the most help. The FMS consists of seven movement patterns that are performed without warmup. The reason is that we want to see what a person’s movement capacity is at its natural state.

FMS-logo

The Exercises That Are Part of the FMS

Here is more detail on each of the exercises that are part of this screening:

  • Deep Squat: This test shows us the most about how a person moves. The reason is that it allows us to see total extremity mobility, postural control, and pelvic and core stability. If you think about it, everyone at some time in the day performs a squat, whether that is sitting down, playing sports, picking up something off the ground, and so on. When the dowel is overhead, this requires mobility and stability of the shoulders, and the pelvis must provide stability and control while performing the squatting motion.
  • Screen Shot 2019-10-08 at 11.56.10 AM

    Hurdle Step: This test demonstrates how well someone is able to walk (locomotion) as well as accelerate. The hurdle step is a great assessment to determine any kind of compensation the body performs while you take a step forward. This movement also lets us know how well a person is able to stabilize and control oneself while in a single-leg stance. If pelvic and core control is lacking with this, the person will not be able to stabilize themselves properly and will most likely begin to shift too much or lose alignment.
  • Inline Lunge: This test helps demonstrate the ability that one has to decelerate. This is important because we as humans need to be able to decelerate every day, whether that be in sports or just daily living activities. It also allows the tester to observe the rotational and lateral movement capacity of someone. Pelvic and core control and stability is extremely important to be able to perform this movement properly. Since this test requires the person to be in a split stance, the tester can also see how well a person is able to get into hip, knee, and ankle flexion when lunging down and determine whether there is a mobility or stability issue.
  • Shoulder Mobility: This test helps show the relationship between the scapular-thoracic region, thoracic spine, and rib cage. A person with good thoracic extension typically does well on this test. One side should demonstrate internal rotation and extension and adduction, and the other side should demonstrate external rotation, flexion, and abduction.
  • Active Straight-Leg Raise: This test helps demonstrate many things, even though it might seem very basic. With the leg that is coming up, we typically want to see a good range of hip flexion. On the leg that stays down, we typically look for how good the range of hip extension is. Another variable that I like to look at is how well their core stability is. If they are not able to keep their back flat on the floor, this lets me know that the person is not able to own that position and needs help with core stability.
  • Trunk Stability Push-up: This test often gets mistaken as being an assessment for upper-body strength. This is not the case, though. The actual purpose of this assessment is to measure the stability of the core. If the spine or hips move during the push-up movement, this is usually an indication of other muscles compensating for the lack of core stability.
  • Rotary Stability: This tests for rotary stability in multiple planes. Core, pelvis, and shoulder girdle stability are what is being assessed. This also allows us to measure the ability of a person to crawl. Being able to demonstrate proper weight shift in the transverse plane and also coordination during the stabilization and mobility of this movement will help determine whether a person is ready for more complex movements.

FMS Scoring

I will keep this section short and sweet and explain the basic fundamental purpose of the scoring and what each number means. The FMS scoring ranges from 0–3, so there are 4 possible scores that a person can get. A 0 indicates that there was pain during the movement. A score of 1 usually indicates that the person was not able to complete the full movement properly or was not able to get into the correct position to execute the movement. A score of 2 indicates that the person was able to complete the movement but had to compensate somehow to actually execute it. A score of 3 indicates the movement is optimal and no compensations were detected.

Reliability of the Test

Many research studies have been done to determine the reliability of the FMS in recent years. The main findings that have been discovered are that the FMS can accurately identify people with a higher chance of an injury. The three groups at a higher risk are professional football players, male marine officer candidates, and female collegiate basketball, soccer, and volleyball players.

People always ask me what score determines an elevated risk for injury on the FMS. What most studies suggest is that a score of 14 or lower gives a person a 1.5 times higher risk for injury than a person who gets a score higher than 14. This does not mean that if you score lower than a 14, you should be frightened; again, most studies done are with a specific population (stated above). More studies are needed on the general population, but what is certain is that the FMS is a great tool for personal trainers, athletic trainers, physical therapists, and strength and conditioning coaches to use on their populations to get a better understanding of how well a person moves.

If you are interested in completing an FMS screening at NIFS, click here for more information.

Like what you've just read? Click here to subscribe to our blog!

This blog was written by Pedro Mendez, MS, CSCS, and Health Fitness Instructor.

Topics: NIFS injury prevention pain exercises functional movement assessments movement functional movement screen

Ankle Mobility: Lower-Leg Stretches to Improve ROM and Decrease Injury

GettyImages-867056016-1
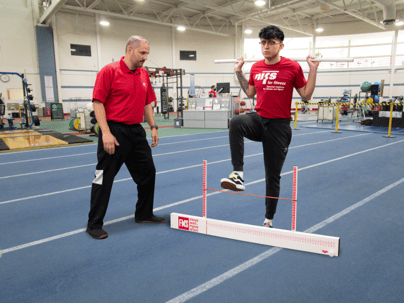
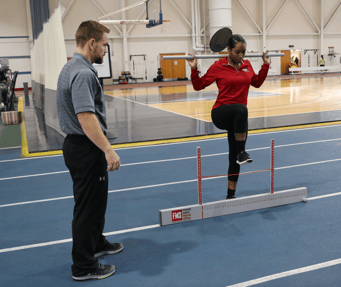
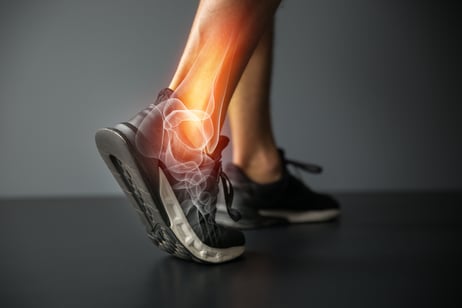
Whether you are a seasoned workout veteran or the new face in the gym, there’s no denying that lower-leg pain can be a huge deterrent for exercise (and day-to-day life, for that matter). Some pains are dictated by the range of motion in the ankle. Due to several factors including previous injuries and wear and tear, physiological problems from the various shoes people wear, and the types of exercises people punish their bodies with, we see individuals every day who have a hard time performing some of the more basic exercises such as squats and deadlifting.

To hopefully achieve a better, safer exercise with less pain, it’s helpful to incorporate ankle mobility warmups into your routine and to be conscious of testing and retesting range of motion to monitor your progress. Here I cover some tests that are useful for checking your ankle mobility and some warmup stretches to get you heading in the right direction.

Testing Ankle Mobility

For testing and retesting your ankle mobility, NIFS uses a test that is included in the Fundamental Capacity Screen simply referred to as the Ankle Clearing Screen. What we want to see is whether your ankle mobility is capable and safe to perform a specific movement pattern. If not, we need to strategize ways to improve ROM and decrease chances for injury.

Dr. John Rusin describes a test you can do at home in which you stand, facing a wall, with your foot four inches away from the edge of the wall. While keeping your heel on the ground, try to touch your knee to the wall. It’s not as easy as it might seem, but being able to touch your knee to the wall is a sign of a healthy, mobile ankle. If you can’t do it and you want to improve, we have some work to do!

Stretches for Ankle Mobility

There are many stretches for ankle mobility that can help boost your ability. Starting with a simple ankle stretch at the wall, begin by pressing against the wall, keeping your heels flat on the floor. The more your body gets used to this movement, the farther you will be able to move your feet back (as long as your feet are flat on the ground). Holding for several seconds on each side, try to do this stretch daily or as often as you like to help get the ball rolling.

A similar way to stretch the ankle would be a self-stretch from a half-kneeling position. This is a simple yet effective movement that improves your flexibility over time. While keeping your foot flat, rock forward until you feel a stretch, then return to the starting position. Move your foot farther away from your body or closer to your body for a couple nice change-ups to the routine.

Lastly, if you were interested only in the exercise aspect and can’t find time to stretch, you can still do a squat pattern. The TRX Deep Squat is a good beginner squat that will help reestablish ankle mobility and train your body to work through the entire squat range of motion. Even sitting in the squat position feels good and helps the body get used to the pattern. Without weight to affect the body positioning, you will find this to be lower impact and a great jump off into doing traditional squats with great form.

Get Help from NIFS

Ankle mobility is where everything in the whole kinetic chain starts. If you have poor ankle mobility, chances are you aren’t going to be able to do the squats or hip hinge patterns effectively, which our bodies need to get stronger. This ripple effect passes all the way to the upper half of the body.

If you want more information or would like help improving your ankle mobility, please reach out to NIFS and one of our Health Fitness Specialists will help guide you in the right direction. Fundamental Capacity Screens are complimentary. Check with a NIFS staff member to see whether this type of testing is right for you.

As always, muscleheads evolve and rejoice!

Like what you've just read? Click here to subscribe to our blog!

This blog was written by Thomas Livengood, NIFS Health Fitness Instructor and Personal Trainer. To read more about the other NIFS bloggers, click here.

Topics: Thomas' Corner injury prevention range of motion pain mobility assessments stretches ankle mobility lower leg

Get Moving with Improved Hip-Mobility Warmups

Whether or not you exercise, hip mobility plays a factor in your everyday life. Within the exercise realm, good hip mobility can be the difference between being “in the game” and just watching from the sidelines. In day-to-day life, hip mobility factors into nearly all movements, including climbing stairs, sitting and standing, and walking. If you find yourself wondering whether you could benefit from improved hip mobility, the answer is a resounding “Yes”! While understanding the importance of hip mobility is key, designing a routine that is appropriate for your needs and goals takes precedence.

Benefits of Improved Hip Mobility

If I were to pinpoint a few benefits of improved hip mobility, I would first look at the basic elements and emphasize the benefits of improved balance. Although you do not stand on one foot on a regular basis, you do, however, get in and out of your car, which requires a degree of balance. As hip mobility deteriorates, you may find it harder and harder to get out of your car.

A second area to look at is hip-strength imbalances in the body. This can become a more advanced quickly, so lack of hip mobility can lead to an abnormal strain on other muscle groups. An example of this is that an individual who sits all day may develop weak hip muscles (like the psoas, iliacus, and rectus femoris), which in turn could lead to the hamstring getting overworked.

Lastly better hip mobility can lead to fewer injuries and decreased overall pain due to hip tightness. Those who are running a marathon might discover tightness in their hips that could be remedied through a well-thought-out hip-mobility warmup.

Improving Your Hip-Mobility Warmups

IMG_4979
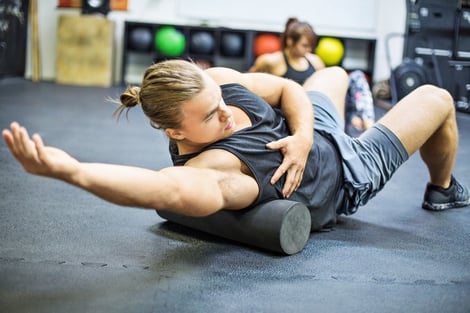
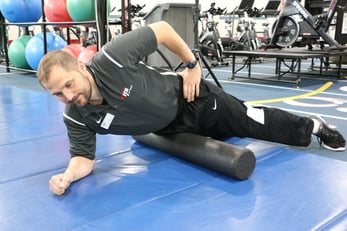
Most workout formulas include a warmup process. If hip mobility is a focus, your workout would benefit from a few additions to the routine. Foam rolling, which has been around for a while, is a great way to get blood circulating to the muscles and decrease soreness (if you worked them out prior). Spending a few minutes to roll out the trigger spots (areas of higher tenderness) will help you feel better, and you will be able to exercise on a more consistent basis.

IMG_4983Second, I would suggest a dynamic movement stretch (rather than traditional static stretching) to help not only stretch the muscle, but also warm up the body for more movement. “The World’s Greatest Stretch” (yes, that’s really its name) takes the exerciser into a lunge position, rotating and opening up the torso to the ceiling. Why is this called the “World’s Greatest Stretch?” For starters, you are able to stretch not only your hip flexors, but also your hamstrings and torso. As you do the stretch, both sides back to back, you notice that the stretch allows you to flow, dynamically, which is a great way to get your body ready for movement.

IMG_4990
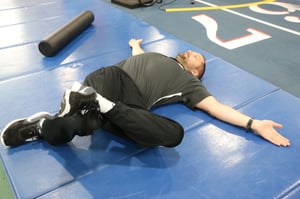
Finally, another great stretch to do is simply called a Hip Internal Rotation Stretch. While lying on your back, cross one leg over the other, allowing the hips to lean to one side and getting a decent stretch.


Address Your Hip Problems Now

Some hip problems are not from a lack of trying. Physiologically, there are many reasons your hips might hurt. If you feel as though you are having excessive pain in your hips, you might need to consult with someone who can help you. Overall balance issues, unnecessary pain, and muscle imbalances can all become bigger, life-altering issues down the road, so take care of them before they become bigger issues.

We want you to feel good! Come see a NIFS staff member at the track desk to schedule a complimentary FMS Screen to determine ways we can best help you with your exercises. Remember to warm up properly and stretch when appropriate, strengthen your weaknesses to see real improvement, and consult a professional to help you develop your plan.

Like what you've just read? Click here to subscribe to our blog!

This blog was written by Thomas Livengood, NIFS Health Fitness Instructor and Personal Trainer. To read more about the other NIFS bloggers, click here.


Topics: staying active workouts injury prevention balance pain warmups mobility stretch hips hip mobility

3 Simple Rules to Train When You Have Pain

GettyImages-1017760106
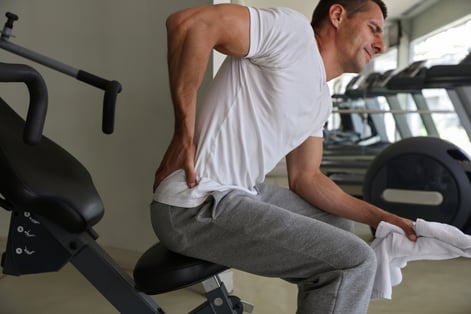
How many people do you know who suffer from a form of back pain? I’d be willing to wager it’s at least one person, and perhaps that person is you. The prevalence of nonspecific lower-back pain alone is estimated at 60-70% throughout the lifespan of a citizen of the United States and other industrialized countries. If you fall into this category or know somebody who does, first direct them to my previous blog about warming up with back pain to get started. Once you’ve made your way through that, keep reading to find out how to design a great workout even if you’re in pain.

For some, the idea of working out with pain is strictly off limits for fear of further injury. For others, the workout must be completed as planned, no matter how intense the pain might be. As usual, the solution will likely require a balanced approach between these two ideals. Unless your pain is an emergency (and this article might give you an idea of whether or not it is), there is likely something productive you can achieve by not skipping your scheduled workout. For one, if one of your goals is to establish a new habit or routine, making it to the gym for some self-love might just keep you on track. Self-love can mean foam rolling or other soft-tissue work, properly prescribed corrective-based activities or stretching, walking, or virtually ANYTHING that helps you feel better. The bottom line is that it must provide a feeling of relief.

Great, so you’ve made it to the gym and you’re feeling better than when you walked in thanks to some well-thought-out pain-relief techniques, or maybe just 10 minutes in the sauna. In any case, you’re ready to sweat and help that heart of yours pump some blood. Before you get too carried away, there are some general rules I like to follow if I know somebody has a history of, or is presently experiencing, back pain symptoms.

1. If It Hurts, Don’t Do It

This one sounds too simple to be genuine advice, and I’ll admit I stole it straight from my own father’s dad-joke arsenal. I’d say, “Dad, it hurts when I do this,” and he’d invariably respond, “Then don’t do that.” Of course, the older I get, the more I realize how wise much of his advice was, especially that nugget. If there is a particular movement or activity that you know for a fact will reproduce your pain symptoms, simply avoid it, at least until your symptoms go away. You can almost always find an alternative exercise to accomplish what you wanted, especially with the staff here at NIFS ready to provide you with such options. Regardless, no exercise is worth potentially worsening your symptoms, causing an even greater setback, or worse, leading to yet another injury.

2. Keep the Weight Off Your Back

The last thing you want to do while experiencing back pain symptoms is to make it any worse, and I see the risk as far outweighing the reward in having a barbell or any other load compressing your spine directly. You’d also be wise to approach higher-impact activities such as running and jumping with a fair amount of caution. Although not directly loading the spine, the landing portion of these high-impact activities requires a fair amount of compression throughout the body, particularly through the spinal segments. If a contributing factor to your flare-up of pain was a lack of integrity in your core strength and control, these higher-impact activities become even more risky.

3. Use Perfect Form

This should be a no-brainer, even when you’re not in pain. However, it becomes vital when the fear of pain is on your mind. Use this time to make sure every aspect of your movement is as close to perfect quality as you can get it. When in doubt, refer back to Rule #1. A great way to monitor your form closely is by either performing each repetition with an extremely slow tempo, or doing some static holds (unless you have high blood pressure or higher risk for aneurysm), meaning holding still during the repetition. Performing your repetitions in this manner will also require you to use significantly less weight, therefore limiting another risk factor. Many of our members take advantage of completing a Functional Movement Screen, which allows one of our trained fitness professionals to analyze your movement on a fundamental level. This is included as part of your membership at no extra cost, and it can provide essential strategies for you to make sure you’re moving to the best of your body’s abilities.

You may have noticed this post is largely about what not to do instead what you should be doing. That’s because each presentation of pain is completely different from another, and should be approached individually, and with care. No two humans are the same, which is what makes us fascinating creatures, but it also provides a challenge of finding the proper activities for each unique case. This is true no matter what your current physical condition is, but requires special attention when you’re limited by increased symptoms of pain. Whatever the case, movement will almost always be the answer to returning to your “normal” self; it’s just a matter of what type and how much.

Like what you've just read? Click here to subscribe to our blog!

This blog was written by David Schoch, CSCS, FMS, and Healthy Lifestyle Coordinator. To find out more about the NIFS bloggers, click here.

Topics: injury prevention pain lower back pain back pain

Warming Up with Back Pain

GettyImages-936117924How many times have you had every intention of heading to the gym either before or after work, only to be deterred by nagging back pain? Maybe you woke up feeling stiff and sore, or maybe you had a long day at work and had a flare-up of pain. Either way, you’re far less motivated to be active when in pain, which quickly turns into a slippery slope. Pain is often a signal that something is not right, and your body will likely encourage behaviors that relieve your pain or prevent it from worsening. If your pain increases with movement, the likelihood of you working out becomes very low. The less you move, the better you feel, and voila, your back pain “magically” goes away!

How long will that last, though, until yet another flare-up digs its claws painfully into your spine? Unfortunately, we have yet to discover a sensor for detecting such episodes, but in the meantime we can do everything possible to prevent it from happening. The first step has to incorporate some semblance of movement. I can’t tell you how many times I’ve had a client come to me with a flare-up of pain. Virtually every single time, there is a significant reduction in pain after simply taking some really good breaths and/or actively moving through a safe range of motion. “My back was really achy/stiff/tight/sore/etc. when I came in, but now it feels great!” Some version of this is music to my ears, because now that individual is likely to be far more motivated to complete the workout.

The How

To know exactly what movements or warm-up activities you should be doing, the first step should be to determine whether your pain is something that is chronic (more than a week or two), or extremely severe. In either case, you might need to seek a trusted physical therapist or other healthcare professional to dig a bit deeper into your pain. However, if you’re simply in need of a consistent routine to optimize your warm-up, there are three main activities that can benefit virtually any generally healthy gym-goer.

1. 90/90 Hip Lift (adapted from the Postural Restoration Institute)

  1. Lie on your back and place your feet flat on a wall, or place your heels on a box of appropriate height. Your knees and hips should be bent to 90 degrees.
  2. Lift only your tailbone, keeping your back flat against the surface on which you’re laying. Visualize tucking your tail between your legs, as though you are a dog that just got in trouble. You should feel your glutes and hamstrings engage.
  3. Holding this position, fully exhale through your mouth so as to push your ribs down into your back. You might place your hands on your ribs to better feel them lowering as you exhale. You should feel a very strong contraction in your abdominals, especially on your sides.
  4. After a full exhale, lightly inhale through your nose, keeping your ribs in the “down” position that you achieved after your exhale. Your goal is to maintain the engagement in your abdominals as you breathe in through your nose.
  5. Repeat this for 4 to 5 full exhales, and do 2 to 3 sets overall.

KEY POINT: The first priority here is to be in the correct position. If the body parts aren’t aligned properly, the muscles you want to be working won’t have any leverage to work. Feeling your hamstrings and glutes engage along with your abdominals, particularly on your sides, is a good sign you’re in the right position. It’s also entirely possible that you could be in the correct position, but not “feel” either of those areas working. That’s okay, just keep practicing and you’ll start to feel it soon. It never hurts to take a video of yourself just to double-check.

2. Hands and Knees Rib Lift

  1. Start on your hands and knees, with your palms directly under your shoulders and your knees directly under your hips.
  2. Tuck your tailbone between your legs, as though you are a dog that just got into trouble.
  3. Push your palms through the floor or table to spread your shoulder blades, opening up some “space” in your upper back. Your spine will have a moderate curve to it, as pictured, and you should feel your abs around your ribs engage.
  4. Holding this position, exhale fully out of your mouth as though you are fogging up a mirror.
  5. Pause for a moment after you finish exhaling, note the activity in your abdominals, and inhale through your nose, keeping your abdominals engaged by pulling your ribs up into your spine.
  6. Repeat this for 4 to 5 full exhales, and do 2 to 3 sets overall.

KEY POINT: Avoid shrugging your shoulders toward your ears as you push your palms through the floor. You also want to make sure you’re not using those 6-pack abs (rectus abdominus) in this activity. You want to be focused more on the abs attached directly to the ribs, on the sides of your belly. There’s a time and a place for the 6-pack abs, but this is not one.

3. Spiderman Stretch with Rotation

  1. Start on hands and knees as in the Hands and Knees Rib Lift.
  2. Bring one foot forward and to the outside of your hand on the same side.
  3. Keep your forward foot flat, and take your hand on that same side up to the ceiling, reaching long through your fingertips.
  4. Fully exhale through your mouth as you reach up to the ceiling, inhale through your nose while reaching, then return to start.
  5. Repeat 8 to 10 times with each arm and leg.

KEY POINTS: Make sure you’re reaching straight up to the ceiling. Don’t rotate for the sake of rotation. Reach long through your fingertips as high as you can while you’re pushing away from the floor with your support arm.

Ask a Trainer

Try these out the next time you have some soreness or stiffness coming into the gym. Even if you don’t, these three activities will very much set the tone for your entire workout if performed properly. As always, if you’re unsure, just ask! Any one of our trainers will be happy to help you out, or find the person who can.

Happy moving!

Like what you've just read? Click here to subscribe to our blog!

This blog was written by David Schoch, CSCS, and FMS. To learn more about the NIFS bloggers, click here.


Topics: stretching pain warmups back pain

Fight Back Against Back Pain: Fitness and Wellness Solutions

GettyImages-866081050
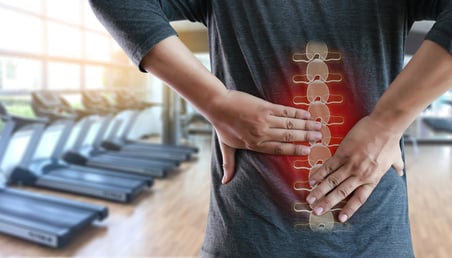
With millions of people around the world suffering from back pain, is there any hope for relief outside of traditional methods? Low back pain can be excruciating and immobilizing, but there is still hope. When dealing with any pain or injury, exercising might be the last thing that crosses your mind, especially if it’s chronic low back pain (CLBP). However, that’s exactly what is recommended and what can help.

Research is revealing that people who exercise and stay flexible are better able to manage pain than those who are sedentary. So my charge to anyone reading this, whether or not you are living with low back pain, stay proactive and make health and fitness a priority. Rather than be forced into reacting to an injury that might have you sidelined for months, take a step toward low back pain relief.

The Impact of Lower Back Pain

Alarming statistics reveal that the single leading cause of disability globally is none other than low back pain. According to the American Chiropractic Association, “Back pain is experienced by 31 million people at any given moment.” After all, it is the third most common complaint during doctor visits and accounts for more than 264 million lost work days annually.

What Causes Low Back Pain?

Low back pain can flare up and subside in the blink of an eye. Often there is no warning and there are no other accompanying symptoms. Pain can occur in varying intensities and pain levels. It is important to take back pain seriously because it is your body trying to tell you that there is something wrong and that you need to make a change. Common causes include the following:

  • Muscle strain/sprain
  • Muscle spasms
  • Bulging discs
  • Arthritis
  • Skeletal irregularities

What You Can Do: Fitness and Wellness Ideas

Fortunately, there are several precautionary steps that you can take to prevent low back pain episodes as well as further injury. Keep in mind that humans are complex beings and it is important to address overall health.

  • Start and maintain an exercise program. Our NIFS staff can work individually with members to develop a proper strength-training program that addresses cardiovascular fitness as well as flexibility and mobility.
  • Maintain a healthy weight. According to the National Arthritis Foundation, “Every pound of excess weight exerts about 4 pounds of extra pressure on the knees.” Therefore losing a few pounds can take pressure off the back and knee joints.
  • Limit and manage stress levels. Paying attention to stress levels can help you avoid behaviors that lead to obesity such as overeating and a sedentary lifestyle. If stress levels stay low, it can help improve overall health.

Always keep in mind that we are complex beings and it is important to address our overall health needs. It might take multiple methods to address back issues, but why not jump ahead and try to prevent them through proper health and wellness strategies? Visit www.nifs.org to find out more information, see the up-to-date Group Fitness Schedule, and start your fitness journey now.

Like what you've just read? Click here to subscribe to our blog!

This blog was written by Cara Hartman.To find out more about the NIFS bloggers, click here.

Topics: stress group fitness muscles weight management pain fitness and wellness lower back pain low back pain arthritis

Tricks of the Trade: Exercise Coaching Cues to Avoid Injury and Pain

IMG_7980
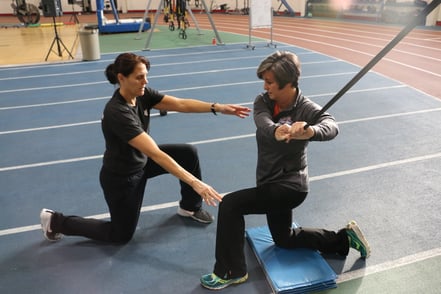
Coaching cues can really make a big difference in the outcome of your workouts. Sometimes it means the difference in whether you get injured during an exercise. Or are you even working the muscles you originally intended to use? Without cues, it would be foolish to have a client jeopardize their health because they saw someone else do a movement incorrectly or think they read it in a magazine or online. This is not to say that there are not many ways one can do to their exercises, or modifications to spice up their workout plan, but you need to make sure you aren’t compromising yourself and goals in the process.

I aim to clarify several cues you might have heard a trainer speak to their client, or have read about in a magazine or online. With this knowledge, hopefully you will have an opportunity to make more informed and educated decisions about the exercises you are doing in the fitness center.

Wall Sit Knee Pain

A great exercise to utilize on leg day is the tried-and-true wall sit. Due to the nature of the exercise and positioning of the body, it can cause a real strain on the knees.

Dissecting the exercise shows which muscles are active during a wall sit. This includes the gluteus, hamstrings, quads, and calves. The movement is basically a static squat while pressed against a wall, utilizing the principles of isometrics. Lowering the body to a position in which the knee is bent at 90 degrees and the back and head are flat against the wall is ideal.

Knee pain can be a side effect; if so, using caution is always rule #1. To help alleviate some discomfort, some cues to consider include the following:

  • Make sure your feet are flat on the floor.
  • Move your feet away from the wall.
  • Widen your stance a little.
  • Slightly point your toes outward at an angle.

You will still be using the same muscles, but the emphasis will shift away from the knees and more into your powerful glutei muscles. I also cannot stress it enough: keep your head back against the wall and your cervical spine in a neutral position. For an added challenge, you can try being in a wall-sit position, then add in a bicep curl to accentuate the movement.

Overhead Shoulder Press Pain

Yet another staple exercise you will see in the gym is the overhead press. There are many variations to consider, some with free weights and some with selectorized machines. Both ways, potentially, will get the job done, if done properly. The shoulder press is performed by pressing one or two dumbbells or a barbell overhead (if using free weights), or with a designated overhead press machine from your favorite selectorized machine line.

A typical issue that arises during a shoulder press is general overall pain in the shoulder itself, and sometimes discomfort in the upper middle back. If there are no underlying issues with the shoulder, this might only be a technique issue that could be resolved with proper cueing. You can discover whether you do have an underlying shoulder problem by completing a Functional Movement Screening (FMS) at NIFS.

Cues to consider here include the following:

  • Never allow the bar to travel behind your head or neck.
  • Try to keep your elbows forward of your shoulders as you press overhead.
  • Lower the weight until your hands are about at eye level, then press.
  • Use dumbbells only when your skill and experience level allows for it.

Lifting really heavy weight, such as during Olympic lifting, can also be hazardous and warrant special consideration. Sometimes an injury occurs during an overhead Olympic movement, but often injuries happen when a weight is being lowered to the starting position, safely to the ground.

Dropping weights from overhead is permissible when the weight being used gets to a range that cannot be safely managed on the descent. At this point, it is advisable to drop the weight, but there is a right and wrong way to drop. Consulting with an Olympic lifting coach or professional along with experience is the best way to learn how to drop the weights in a controlled and safe manner. Ideally, you are going to be safe, and the equipment maintenance guy appreciates your courteous and safe lifting efforts.

Screen Shot 2019-01-29 at 10.30.09 AM

Lat Pulldowns, the Safe Way

Our final cue is for the Lat Pulldown, which is a variation of a pull-up, using a selectorized machine. Although the motion and muscles are the same, the lat pulldown is an easier way to get good repetitions at an otherwise challenging movement. This doesn’t mean you can flub the exercise at the expense of your health.

Ever since the beginning of strength training, an iconic image in the gym is the “behind the neck or head” lat pulldown. A trainer who cares about you will tell you not to do this movement because it’s bad. “But why not?” you may ask. Without a doubt this is a high-risk exercise, but not for the reason you might be thinking. The equipment you are using is checked, double-checked, and deemed safe, but there is always a chance that the cable will give way, causing the bar or handle to come at your noggin at a high rate of speed. We can all agree that a behind the neck lat pull down is not worth a concussion (or worse).

Here are some cues for a safer lat pulldown:

  • Grab the bar or handle with hands evenly spaced,
  • Pull the bar or handle down to around eye level in front of the body and control the motion both on the way up and back down.

Many people may have other perceptions, but safety is the number-one priority when you are a personal trainer.

***

Do you have a trainer who has given you cues for exercise? Cues can really make a big difference. If you are interested in safer, more effective exercise, and learning about how your body works in exercise, contact a NIFS personal trainer or health fitness specialist to schedule a meeting to discuss your goals, questions, and next steps to a better workout. Getting the most out of your time at the gym also makes sense. Now get back to work!

Muscleheads rejoice and evolve!

Like what you've just read? Click here to subscribe to our blog!

This blog was written by Thomas Livengood, NIFS Health Fitness Instructor and Personal Trainer. To read more about the other NIFS bloggers, click here.

Topics: Thomas' Corner injury prevention pain personal training exercises coaching functional movement screen cues

Foam Rolling: The Next Big Thing in Pain Relief and Injury Prevention

GettyImages-686409390For the majority of my athletic and fitness career, getting sore from activities, workouts, practices, or games has not only been a sign that work has been done, but also a rite of passage. The saying, “no pain, no gain” came about as a result, and the world would judge successful workouts on soreness.

Those days have come and gone, and fitness professionals have come to the understanding that the old saying definitely needs updating. While getting a great workout and being sore is fine, being able to prevent injury, decrease soreness, improve mobility, and increase blood circulation are things we would like to incorporate into our wellness on a daily basis. One thing that I have found in my fitness journey is that you can get a great workout today, and with proper foam rolling (also known as self-myofascial release), you can get back after it tomorrow.

A Brief History of Foam Rolling

Foam rolling might seem like it’s a fairly new concept, but the idea has been around quite a while within manual physical therapy circles and with nontraditional medicine practitioners. In the late 19th century, physicians were using manual therapy to improve blood circulation and lymph flow. Although there are almost no studies that show that foam rolling had any benefits, the people that these techniques were being implemented on seemed to see the benefit.

Fast-forwarding to modern times, we have seen a boom in various industries associated with massage and related therapies. Individuals are seeing great results from meeting with these professionals and become interested not only in the tools they are using, but also in figuring out ways to implement similar techniques and experiences as a way to a quick-fix home remedy. Thus was born the foam roller, which now comes in many sizes, lengths, and shapes, and can be supplemented with everything from heat and ice to vibration discs.

How to Start Foam Rolling

Here are some quick tips and ideas to get you on your way.

  • Choosing a density: Pick a foam roller density that matches your comfort level. The softer foam rollers are geared more for beginners who might be sensitive and unable to cope with the discomfort a denser foam roller brings. As you become more accustomed to foam rolling, you may increase the foam roller density to your desired comfort level. As with getting a deep-tissue massage, it might feel uncomfortable at the time, but you may feel great right away, and tomorrow you will feel like a million dollars!
  • Rolling before and after bed: NIFS Personal Trainer Kris Simpson, a huge proponent and practitioner of foam rolling, says, “Foam rolling before bed is a great way to relieve muscle tension and stress from a long day. You will sleep better while being better rested, in turn giving you a head start on the following day. Again foam rolling in the morning would help get the blood flowing after a long, unrestful sleep.”
  • Finding a pattern: Another NIFS Trainer, Cara Hartman, uses foam rollers with her athletes. She has all of her clients and athletes follow a pattern that makes sense. “We like to start lower posterior (calves) and work our way up (hamstrings, glutes, back, etc). Smaller muscles can be rolled with a little creativity. If you find yourself unable to perform a movement, try putting the foam roller against the wall and rolling vertically as opposed to horizontally.”
  • Watch our video on how to properly foam roll.

As you work to get better at foam rolling, understand that it is very similar to everything you do in life. It will be most difficult the very first time you do it, but it will get a little easier each time you try it. I have a personal philosophy regarding foam rolling:

“If you want to maintain current mobility and flexibility, foam roll one time per day. If you want to increase mobility and flexibility, foam roll more than one time per day (the only limit is how much time you have to devote to your wellness). And if you want to get worse, do nothing!”

Foam Rolling at NIFS

NIFS has multiple foam-rolling stations designated to give you as many opportunities to roll as you need. There are multiple lengths and densities as well as a specialty roller made by Rollga. If you would like a quick tutorial and to talk about foam rolling with staff, please stop by the track desk and see one of the Health Fitness Specialists on staff. Get on a roller today, feel great tomorrow!

Evolve and rejoice

Like what you've just read? Click here to subscribe to our blog!

This blog was written by Thomas Livengood, devoted NIFS Health Fitness Trainer and Manager and avid blog writer. Missed by his NIFS family and members.

Topics: fitness center Thomas' Corner injury prevention pain mobility foam rolling circulation

It's a Marathon, Not a Sprint: Running Shouldn’t Be Painful

GettyImages-958722754Running a marathon can be a very positive, rewarding experience or a very painful, negative one. THE CHOICE IS YOURS!

How I Got Started with Marathons

I began running as a feel-good stress release in 2009, but never knew that stress release would turn into my stressor. After my mom was diagnosed with breast cancer, I turned to running at times to just get away from my daily life for a few moments and enjoy some fresh air and a good sweat. I loved this workout a few times a week.

In 2016, I was ready to set a goal. I signed up for my first half marathon, but forgot to sign up for a training plan to go with it. As my mind was set to long distances to achieve my goal, I began running more and more. Before I even completed my half marathon, I realized I was ready to do a full marathon, so I signed up spontaneously to run 26.2 miles and completed my first marathon in Washington, D.C., in February 2016. Two months later, I crossed the finish line of a half marathon, which was my original goal.

If you were to ask me how I felt about my experience, I'd honestly tell you: painful, awful, and sore. Thankfully I didn't get any injures, but like most runners, I ran a lot and neglected cross training, because I preferred the “runner's high.”

Why I Quit

I continued this training process through 2016, and by the end of that year I was done and burnt out. My body was depleted of important nutrients, my muscles were constantly sore from neglecting proper recovery, and I never knew how much mental tension I had been putting myself through by pushing my body to get what I thought was "faster and stronger."

In 2017, my running for hours had now turned into recovering for hours. I picked up a consistent yoga practice, started meditation classes, was visiting a doctor to replenish my depleted body, focused on strength with pilates and circuit training classes, and was only doing low-impact cardio. 

How I Got Back into Running—the Right Way

As I began stressing out my body less, my passion for running was still in the back of my mind. In 2018, I began running long distances again, but with newly gained knowledge of proper fuel, proper recovery, and proper cross training. It's so weird waking up not sore after a long run, or enjoying friends and family instead of wanting to sleep all the time due to fatigue, and I love it!

Practicing mindfulness is so important when setting a big goal. In society, we often want to get to the reward faster instead of enjoying the process in the present. Attempting to run a half or full marathon does not have to be a painful experience. Running a half or full marathon does not have to result in injury and burnout. The choice is yours!

Tips for Running

  • Follow your training plan. As endurance picks up, so does your ego as a runner. When you get a short run, just do it and enjoy it! There will be plenty of long runs you can save your energy for to reduce burnout and achieve success.
  • Warm up. Our bodies are not meant to go from 0 to 100 percent effort for extended periods of time, which is a common mistake by runners that leads to injury. Spend time prepping your muscles and your mind for success. If you remember that your goal is to get to the finish line, you'll remember to warm up so you can get there pain free.
  • Cool down. Just as we aren't supposed to go from 0 to 100, 100 to 0 is just as harmful. Allow yourself time to deep-breathe and restore your muscles. When running for distance, the blood starts to pool toward your legs. Doing yoga or total-body corrective exercises and stretching will help reduce injury by properly recirculating blood to aid in healing muscles.
  • Cross train. Running is a cardio-based exercise that requires strength. If you only run, you are often getting weaker because you are burning off the muscles that will support you. Adding two to three strength-only days is crucial for not just the muscles’ health, but also the health of your joints and bones.
  • Know your limit. Be okay with accepting that you accomplished something amazing! If it's a hot day and your plan is to run 5 miles, but you can go only 3, that’s okay! Over-stressing the body can lead to many health consequences. Loving your body’s health as first priority will keep you injury free and a well-oiled machine.

So, don’t be afraid if your goal is to run a half or full marathon. Train with the people who have experienced the not-fun, painful part of running and want it to be filled with fun based on knowledge and past experience. The choice is yours to set your goals. The choice is yours to listen and follow your coach to achieve those goals.

Screen Shot 2018-07-11 at 2.45.21 PMNIFS Fall Marathon Training Program prepares you for the Monumental Marathon on November 3, 2018 by providing you with a 12-week training program and weekly long runs with a training coach. Training starts August 15th-November 3rd. Wednesdays 6am OR 6pm and Saturdays at 7am. Find out more and get registered today!

Like what you've just read? Click here to subscribe to our blog!

This blog was written by Brittany Ignas, BS in Kinesiology, 200 Hour Yoga Alliance Certified, Stott Pilates Certified, and Fitness Coordinator. To find out more about the NIFS bloggers, click here.

Topics: goal setting running marathon training half marathon injuries pain mindfulness