 In a world where people want results in an instant and take drastic measures to achieve those results as fast as possible, developing strength, power and athleticism in a long-term aspect is often overlooked. For any fitness-related result or outcome, improvements take time. Fat loss, overall strength and/or power in any particular lift, speed, and agility are all seeds that needed to be watered for a while before noticeable and permanent changes are evident.
In an athletic realm, this leads to the importance of the “testing” process and the use of that process over the course of months, semesters, and years. As a young athlete or athlete fresh out of high school entering the college world of sports and strength and conditioning, this is how you monitor your success and validate that the training and improvements you are making are the things that are actually working. Numbers do not lie. If your times in specific agility drills or weights have increased in certain lifts, obviously you have made improvements. If those numbers have not changed or have decreased, you need to address methods of training or overall compliance/intensity with the program.
Below are five performance tests that measure multiple aspects of your overall athletic profile.
40-Yard Dash
The 40-yard dash, or “40,” is one of the most common drills we use to measure straight-line speed. Sure, many sports are played in a multidirectional way, but overall top speed is an important puzzle piece. Setting up and performing this drill is relatively simple; however, you may need two people to help with the timing.
First, set up two cones exactly 40 yards apart. From here, go to the starting line and sprint from start to finish. The clock or stopwatch should start on your very first movement from the starting line and stop when your body crosses the finish line.
5-10-5 Shuttle
The shuttle run is one of my personal favorites. It allows you to see an athlete’s explosiveness and change-of-direction skills. With lateral movements being so important in many sports, this gives you a good idea of where an athlete stands. To set up the 5-10-5 Shuttle, you need three cones spaced out evenly at 5 yards apart. The athlete starts at the middle cone with their hand on the ground. They run to the right or left cone and touch the ground (5 yards), across the whole setup and touch the ground (10 yards), and sprint through the middle cone (5 yards). Timing of this test starts when the athlete’s hand raises up from the ground and finishes when they cross the middle cone.
Vertical/Broad Jump
Jumping ability is another “power” aspect that translates very well into success on the field or court. The vertical jump test is generally performed with a Vertec, or a piece of equipment where you stand underneath and jump to touch as many of the rings overhead as you can. Other than obtaining the Vertec, the test is fairly simple. First, you want to measure your standing reach, or simply the height that you can reach with your arm outstretched overhead. As I mentioned before, you jump and hit as many of the rings on the Vertec as you can. When the maximal height has been reached, you subtract the standing reach number to get the vertical jump height.
Another great way to measure power would be with the standing broad jump. For this, all you need is a tape measure that is on the floor with a starting line for the athlete. To perform, the athlete starts behind the starting line and jumps out as far as possible and lands under control. The length of the broad jump is measured wherever the back of the athlete’s shoe lands.
Bench/Squat/Trap Bar Deadlift
In the preceding sections we looked at sprint and jump measurements, but we can’t leave out our strength numbers. Like the great Louie Simmons of Westside Barbell said, “Weak things break.” Truer words have never been spoken. Because of this, we want to measure those strength gains with every opportunity that we have. For me, my main three strength lifts that I measure are the bench press, the squat (front squat or back squat, depending on the athlete), and trap bar deadlift. These are three main staples in my programming and I always want to see if the way that I’m implementing them in workouts is yielding the best results.
These may look a little different for you. You may choose DB Bench Press, Pull-Ups, Farmer’s Carries, or something similar. My recommendation is to be sure that whatever you are testing are things that you are continually working on. It’s tough to test a back squat if you haven’t back squatted in 8–10 weeks.
Overall, the moral of the story is testing to see whether what you are doing is helping you achieve your goals is vital. Without testing you are just guessing. Remember, numbers do not lie!

his blog was written by Alex Soller, Athletic Performance Coach and NIFS trainer. To find out more about the NIFS bloggers, click here.
 Conjugate training is a term coined and expanded upon by the late, great Louie Simmons, a well-known strength coach at Westside Barbell. Conjugate means to bring together, so conjugate training is literally joining together different training styles into one micro or meso training cycle. Conjugate training is bringing together training styles such as power, strength, agility, and hypertrophy into one training cycle.
 The “perfect” workout rarely happens. Every so often, you may have one of those training sessions where every block flows smoothly and programmed repetitions and sets are executed flawlessly. But for most days, there will be missed reps, you may feel more fatigued than you think you should, or the workout may not come together as you hoped it would. That is fine. Your goal should be to strive to be as close to perfect as possible, with the understanding that it may not always happen.
 Agility drills basically represent an obstacle. Athletes who can respond faster to starts, stops, and change of direction earlier than the obstacle will have a practical advantage on the playing field. This blog highlights three of my favorite agility drills that can be built into your team’s conditioning routines. The benefits of these runs, jumps, and cuts include increases in reactionary speed, coordination, footwork, and body awareness. Athletes need to be able to change direction rapidly under control without decreases in speed.
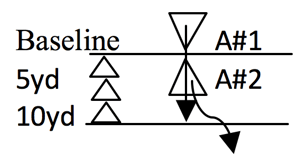 Drill 1: Offense/Defense—Partner Reaction Acceleration Tag
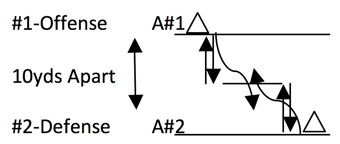 Drill 2: Cat & Mouse—5-5 Shuttle Reaction Tag
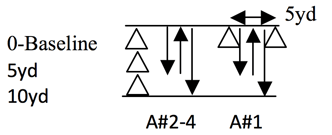 Drill 3: Shuttle Runs—Reaction 5-5-10 Shuttle