 So, if you’re like me and have been scrolling through the various social media outlets out there, you might have been seeing an uptick in a very niche fitness trend. Lately it’s all I see on TikTok, and I will admit it is intriguing watching these people on social media freeze their butts off in a cold tub of water. Often, the results are hilarious as people realize how unbearable sitting in a tub full of ice water really is. I mean look at this video and tell me whether you think this looks enjoyable. I think not, but watching these poor people suffer did have the gears turning in my mind about whether there is anything that can come out of subjecting your body to frigid temperatures, and maybe I should be partaking more regularly in these freezing experiences.
Cold Water Therapy Through the Ages
The experience of taking plunges into cold or even freezing water can be traced all the way back to nearly six millennia ago. Ice baths and cold-water immersion have been used for recovery purposes for centuries. Even as far back as 3500 B.C., the ancient Egyptian medical textbook Edwin Smith Papyrus (named for Edwin Smith, who purchased it in 1862), referring to using freezing water as a therapeutic modality. The ancient Greek physician Hippocrates in the 4th century B.C. wrote about the benefits of immersion in his work On Airs, Waters, and Places.
Looking more recently, in the 19th century, researchers looked at immersion to alleviate various ailments. Scottish physician William Cullen began prescribing cold-water therapy for patients with a wide range of symptoms including fever, inflammation, depression, and even insomnia. In the 1960s, D.H. Clark investigated cold-water immersion for post-exercise benefits. Throughout millennia and centuries, there have been numerous accounts of the benefits of immersion, both medicinal and therapeutic. But as with any modality, there is a delicate balance between the risks and the benefits.
What Are the Benefits?
Over time, a lot of work and studying has been done to investigate the benefits of cold plunges and cold-water immersion and a possible therapy for many different symptoms. There are a couple of things to consider when doing ice baths. To start, benefits of cold plunges have been studied thoroughly throughout the past couple centuries, and it has been found to reduce inflammation of sore and aching muscles, help sleep, and limit inflammatory response in the body. Anecdotally, many recreational and professional athletes swear by ice baths to help their bodies and boost their energy levels.
Know the Risks
But there are some key risks to keep in mind before plunging into freezing cold water. The biggest risk is the shock associated with plunging into cold water and the sensation that it “might take your breath away,” but a good way to combat this is focusing on breathing. Also, there is a risk for those with cardiovascular diseases as the cold water will constrict the blood vessels and create a risk for reduced blood flow. All these risks can be serious and should be discussed with a physician prior to cold-water immersion.
Something to Consider
With the introduction of cold temperatures to rehabilitate athletes and non-athletes, the benefits have proven to be significant and is something even the recreational athlete should consider.

This blog was written by Ricky Rocha, Health Fitness Specialist. To learn more about the NIFS bloggers, click here.
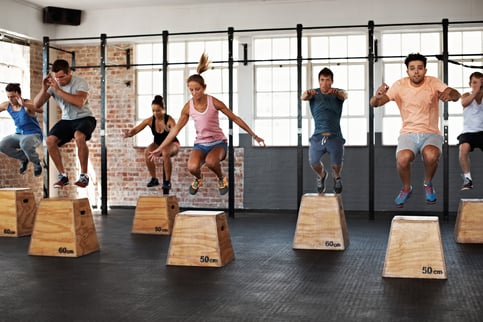 In the most basic definition, plyometrics refers to jump training. Known to be a key component of many sports, such as basketball, soccer, gymnastics, and football, plyometric training can enhance athleticism, strengthen the most powerful muscles in your body, and much more.
 Everyone needs strong hips. Athletes need them to perform a wide variety of movements within a given sport. Aging adults need them to help reduce the risk of falls. When we think about the hip, most people think about the glutes and abductors. You can look in any gym and see a handful of people with a band around their knees performing a plethora of movements working the glutes and abductors. However, the most neglected muscle is the one on the inside of the thigh: the adductor.
  The
The  Chances are if you are like me, you have been told your whole life, “Make sure you’re stretching, it’s important!” But to many, the first thought that pops into their head when they think about stretching is, “Why?” And that is a very understandable response because stretching can involve a lot of discomfort (in the beginning) and to some, it might even cause a bit of pain. But there certainly is a method to the madness, and a reason why stretching is a vital component of your fitness program and, ultimately, your lifestyle.
  Thousands of sports nutrition supplements are touted to improve strength, endurance, and a variety of other athletic factors. But do they work and are they necessary? Below are some of the most common supplements advertised for athletes, as well as what they do, how well they work, and how much is safe to supplement. It’s important to note that you should always consult your physician or a registered dietitian specializing in sports medicine before starting any new supplement.
 More and more in today’s society, people have one resource that seems like it is only getting stretched out thinner and thinner: time. Too many of us seem to be cramming more and more things into our lives, whether that be work-related events, personal interests, or family events. With this ever-growing list of things we have taking time out of our day, many have to choose between stuff they need to get done and things they want to get done. One thing we all know we should do but sometimes choose to skip because of time constraints is exercising.
 The
The 
 How I Did It