<img height="1" width="1" style="display:none" src="https://www.facebook.com/tr?id=424649934352787&amp;ev=PageView&amp;noscript=1">

NIFS Healthy Living Blog

Michael Blume

Recent Posts by Michael Blume:

Plank Progression Series

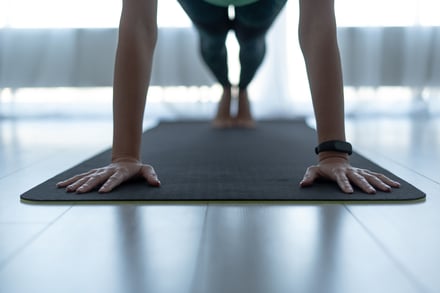
GettyImages-1168143615The plank series needs no equipment, only a wall (if you make it that far). Attempt to complete the plank series in order. Complete the plank progressive series on the days you work out at the end of your workout. If you are x2 days in a row successful and have perfect technique with the exercise, move on to the next progressive variation. You will see that the traditional plank is repeated multiple times and we will add time as you progress along over break. You do not need to do more than what is asked of you. It will be easy at first, but trust me: it gets harder by the end.

Step 1: Build Awareness

The dowel is placed along the spine and is kept in contact with three points: back of the head (not the top), thoracic region (between shoulder blades), and the sacrum (tailbone). This forces you to understand and become aware of proper alignment. Essentially, the dowel serves as your coach. If it rolls off or wobbles, you aren’t in good alignment.

Additionally, the quadruped position is great to begin to develop awareness of optimal alignment because it takes most of the load off the system while still keeping the torso in a very similar position to the abs plank. 

Once you can hold optimal position for 30 seconds, move on to step 2. 

Step 2: Lengthen the Lever Arm

The straight-arm plank is essentially a static hold in push-up position. This takes what we learned in step 1 and adds in some load due to the increased length in the lever arm. The load on the abs here is not as great as on the elbows.

If you cannot hold optimal alignment for 30 seconds, keep working here until you can. If you can maintain optimal alignment without disturbing the dowel, you are ready to move on to step 3.

As I stated above, the elbow plank with dowel increases the load on the torso even further over the straight-arm variation. In other words, it demands more strength and control of optimal alignment.

Step 3: Elbow Plank

Once you can hold this position for at least 30 seconds without much fatigue, you are ready to move on to the advanced progressions that I’ve laid out below.

If you cannot, remain here at level three until you can achieve a 30-second hold without too much fatigue.

Keep in mind that just because you are doing planks, it doesn’t mean that you can do them correctly. The dowel is a simple method of telling you how good your planks really are.

Once you’ve mastered the basic plank with the dowel, you no longer need to use the dowel.

Plank Progressions

Now that you understand what is required to perform an optimal fundamental plank, I can show you the complete progression spectrum from beginner to advanced planks. Once you can maintain optimal alignment here for required times, move on to the next level.

Screen Shot 2021-01-28 at 2.10.59 PM

Level

Plank Progression Exercise

Sets & Time

Notes

1

Half-Kneeling Elbow Plank

2x1min

On knees & elbows

2

Traditional Plank

2x :45 sec

On elbows & toes

3

Push-up Plank

2x :45 sec

Push-up position

4

Plank w/ Leg Lift

2x :20 sec

Push-up position

5

Plank w/ Arm Lift

2x :20 sec

Push-up position

6

Half-Kneeling Side Elbow Plank

2x1min (R/L)

On knee & elbow, hip up, x1 min—R/L

7

Elbow Side Plank

2x :45 sec

On elbow & foot

8

Up/Down Plank

2x :30 sec

Alternating elbow plank to push-up plank continuously

9

Decline Plank

2x :45 sec

On elbows & toes with feet elevated

10

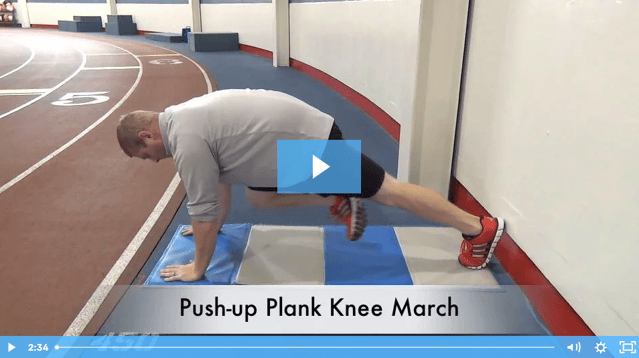
Plank w/Knee to Chest (March)

2x1 min total

Pull knee up to chest & alt R/L every 10-15 secs

11

Side Plank w/ Knee to Chest (March)

2x1 min total

Pull knee up to chest & alt R/L side after 30 secs

12

Side Plank w/ Leg Abduction

2x1 min total

Leg straight and extended upward & alt R/L side after 30 secs

13

Bird-Dog Static Plank

2x:30 sec

Push-up position, bring opposite elbow to knee touching underneath hips and hold (R/L)

14

Bird-Dog Active Plank

2x:30 sec

Push-up position, bring opposite elbow to knee touching underneath hips and then actively extend same arm/leg out and back to touching (R/L) & repeat

15

1-Arm Rotating Plank to Side Plank

2x:30 sec

Starting a traditional plank, take one arm/hand and reach for opposite armpit. Then actively rotate to a side plank and extend the arm to the sky & rotate back to plank (R/L) & repeat

16

Wall Plank


On elbows & toes—feet against the wall & elevated

17

Wall Plank w/ Knee to Chest (March)

2x 1 min total

Feet on wall—pull knee up to chest & Alt R/L every 10-15 secs

18

Wall Plank w/ Bird-Dog Static Plank

2x :30sec

Feet on wall—push-up position, bring opposite elbow to knee touching underneath hips and hold (R/L)


Like what you've just read? Click here to subscribe to our blog!

This blog was written by Michael Blume, MS, SCCC; Athletic Performance Coach. To learn more about the NIFS bloggers, click here.


Topics: workouts plank workout programs

Get Back on Track with Fitness Motivation Habits in the New Year

Live Healthier 2023-2

Like a New Year’s resolution, motivation to exercise has gradually faded. During the pandemic, it may have seemed a lot easier to exercise when you had only two choices, stay at home all day or get out and get moving. But now, many have lost their motivation to exercise again.

Five Quick Motivation Fixes

Here are some quick fixes to help get back on track with ways to improve your fitness motivation in the New Year.

Plan your exercise for when it’s easiest to do and then treat your workouts like appointments.

This might mean exercising as soon as you get up in the morning, like me, or mid-afternoon or after a day of work at home. Whenever you start your workout for the day, before temptations and obstacles begin, be organized and have a routine. Do not miss your workout session; going in with the mindset that you have to accomplish it is an excellent way to increase adherence and motivation.

Make it easy to exercise.

Do not make it a challenge to plan exercise ahead of time. For example, I lay out and pack up my workout gear in the evening as to be ready for when I go off in the morning. Do as many things as you can beforehand so that, when the time comes, starting your workout is easy. Break the process of exercising into chunks and then maximize your workout time:

  • Step 1, requiring a little bit of effort: Get changed into workout gear.
  • Step 2: Step out the door and on your way to your planned workout.

Before you know it, it’s harder to not exercise than to exercise.

Reduce your time.

Workouts shouldn’t take hours on end. No one has the time or motivation to be stuck working that long. Instead, change up your workouts with supersets. A superset is two or more exercises stacked together with little or no rest between them to create a more efficient workout. It’s your best friend during workouts because it helps you get more done in less time.

Ideal for building strength, pair two or more exercises that work opposing muscle groups, like Chest Press and Bent-over Rows.

While working the same muscle groups, for example Squats and Glute-Bridges, compound sets work on muscle endurance and are great for improving muscle definition.

Lastly, if you are working two different muscle groups like lower- and upper-body, this is considered a circuit. It’s great for burning fat. An example would be a push-up and squat, row and lunge, or RDL and Triceps Pushdowns.

Get excited to go shopping!

A huge motivation is to buy a new piece of workout gear. Get yourself excited to get back into exercise by buying something you’ve been eyeing. Workout gear could be anything, as long as it gets you excited to use it: a new watch with a GPS tracker, new workout clothes and running shoes, or even a new jump rope or dumbbells for your home gym.

Do what you enjoy.

If you find yourself wanting to jump rope or take a fitness class instead of doing burpees and bench press, it’s better to do what you want to do. Keeping it simple requires a lot less mental effort and requires minimal motivation. Repeat exercises that felt good and don’t try to force yourself to do something you think you should do.

A New Start in the New Year

It may sound cliché to say it, but make the new year an opportunity to develop a healthier lifestyle. If you don’t know the exercise lingo I used or you are a novice at working out, talk with a personal trainer or fitness professional who can help you put together workouts that are time efficient and effective routines that you’ll enjoy. By making some of the easy changes I have suggested, you can make enormous improvements in your motivation as we head into the New Year.

Like what you've just read? Click here to subscribe to our blog!

This blog was written by Michael Blume, MS, SCCC; Athletic Performance Coach. To learn more about the NIFS bloggers, click here.

Topics: healthy habits motivation resolutions personal training new year's superset covid-19 lockdown

Getting Geared Up for Cold Weather Wellness

GettyImages-1179065933As winter approaches, don’t let it discourage you from reaching your full potential and goals you’ve set for yourself. Continue to use exercise and strength training to keep your body healthy.

Keep Setting Fitness Goals

Continue to set goals; goal-setting will help you stay the course. Setting goals gives you purpose and meaning, and a reason to come to the gym. Set small goals and watch them turn into big ones. If you feel you’re plateauing, get a personal trainer to help you push past your threshold. They will keep you accountable as well as push you to new heights in your fitness journey.

Focus on Nutrition and Healthy Eating

Use the cold months to really focus on your nutrition. Winter months can lead to more relaxation since outside activities are not as prevalent. Keeping good nutritional habits will help you achieve your goals. If you need help with nutrition, utilize a dietitian to help you find the right foods to eat. Meal prepping and eating real foods will be key during the winter months—not getting set on carryout food and outside dining. Although every once in a while it’s okay to eat restaurant food, you want to focus on eating clean and getting proper nutrients into your body. Especially now during COVID-19, you want to make sure you’re staying as healthy as possible.

Maintain Safe Practices in the Pandemic

Speaking of the pandemic, continue to practice safe distancing while out in public. That way, you’ll keep your family safe and those around you. Try to minimize large gatherings. If you have to be with friends and family, make sure everyone does the proper things to keep everyone healthy and safe, including wearing masks. Use your best judgment while out and in social gatherings. Continue to wash your hands and sanitize equipment and any object that has been touched or will be touched.

Stay Busy and Keep Planning

Find new hobbies. If you’re able to get outdoors, enjoy that time with family and friends. If you’re not fortunate enough to be able to be outdoors due to the cold weather, find indoor activities to pass the time, but keep yourself busy. Don’t let the winter months bring you down. Continue to plan daily to attack the day and stay motivated. Stay busy and stay healthy!

Like what you've just read? Click here to subscribe to our blog!

This blog was written by Michael Blume, MS, SCCC; Athletic Performance Coach. To learn more about the NIFS bloggers, click here.

Topics: winter fitness nutrition healthy eating winter strength training cold weather wellness goals pandemic

Warming Up for Vertical and Broad Jumps with Pogo Jumps

GettyImages-1225454377Want to jump higher, jump farther, or possibly dunk a basketball? With all the athletes I have trained over the years, at some point within their sport they all jump. Competitive as athletes are, they want to be able to jump higher like in volleyball, or jump farther like swimmers coming of the blocks, for example.

Warming Up Your Lower Body

Before you start jumping, you need to warm up your lower body. A fun way to wake up your lower body and prepare for explosive work like vertical or broad jumps is to incorporate easy plyometrics into your fitness routines. Plyometrics refers to exercises involving rapid stretching and contracting of your muscles.

An easy warm-up drill into plyometrics for athletes is to start with pogo jumps. They are one of my favorite athletic drills to warm up with and incorporate within athletic workouts. Pogo jumps are a great tool for teaching athletes what it feels like to be fast and or explosive off the ground. I use pogo jumps primarily to target the calves and shins. To a lesser degree they also target the hamstrings and quads within our warm-ups.

Proper Form for Pogo Jumps

Here’s what we want to see out of athletes when doing pogo jumps: minimal ground contact time, and minimal knee flexion (knees over the toes). Each jump is mainly with ankle movement instead of hips and knees. Never let your heel touch the ground. Stay on the ball of your foot to utilize your lower-leg elasticity. Low pogo jumps look similar to bunny hops, and high pogo jumps are similar but emphasize more explosive power for height on each jump, making you look more like a kangaroo.

Pogo Jump Drills

Depending on available space, pogo jumps can be done in place for typically 10–20 jumps in a row, or you can do them for distance down and back in a 10-yard space. If doing pogo jumps laterally, I like to go 10 yards down right and switch halfway, and keep going 10 yards left. Like most exercises, you are only going to get out what you put into it, so really push yourself to jump for speed (quickness) or height (explosive) each time. As always, make sure that you are keeping good form when you jump as well.

Goal: Improve vertical leap, quickness, and footwork
Equipment Needed: None—just you!
Space: In place or 10–20 yards distance

Drill: Low Pogo Jump

Execution: Begin the drill in an athletic posture with the feet hip/shoulder-width apart. Raise heels up and stand on the balls of your feet. Quickly bounce up and down on the balls of your feet. Don’t let your heels touch the ground. 

Drill: High Pogo Jump

Execution: Starting the same as low pogo, stand tall with feet slightly spread apart about hip-width. Raise heels up and stand on the balls of your feet. Advance the low pogo drill by attempting to gain more height in your jump and still minimizing ground contact time.

Like what you've just read? Click here to subscribe to our blog!

This blog was written by Michael Blume, MS, SCCC; Athletic Performance Coach. To learn more about the NIFS bloggers, click here.

Topics: exercises plyometric sports warmups drills jumpings

Three Drills to Develop Athletic Agility

GettyImages-871413050Agility drills basically represent an obstacle. Athletes who can respond faster to starts, stops, and change of direction earlier than the obstacle will have a practical advantage on the playing field. This blog highlights three of my favorite agility drills that can be built into your team’s conditioning routines. The benefits of these runs, jumps, and cuts include increases in reactionary speed, coordination, footwork, and body awareness. Athletes need to be able to change direction rapidly under control without decreases in speed.

You will need a good strength base before doing any high-intensity agility drills. These three drills are great for giving athletes the ability to keep their eyes on the play while knowing what is around them. Adding teammates to the mix always makes it fun and competitive.

Enjoy the drills!

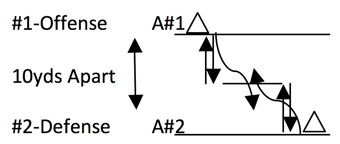
Screen Shot 2020-03-03 at 2.54.12 PMDrill 1: Offense/Defense—Partner Reaction Acceleration Tag

Setup: Cones are spaced 10 yards apart with a middle cone at the halfway point.

Number of Athletes: 2
Athlete 1: Offense (starts the drill); Athlete 2: Defense (reacts and chases)

Execution: Both athletes start on the ground head to head on the baseline. Athlete 1 starts the drill and is allowed two fakes before they must stand, turn, and sprint 10 yards. Athlete 2 reacts and chases Athlete 1 once they stand and turn and has 10 yards to catch and tag Athlete 1 in a sprint fashion.

Screen Shot 2020-03-03 at 2.54.22 PMDrill 2: Cat & Mouse—5-5 Shuttle Reaction Tag

Setup: Cones are spaced 10 yards apart with a middle cone at the halfway point.

Number of Athletes: 2
Athlete 1: Offense; Athlete 2: Defense
Athletes will face each on opposite sides 10 yards apart.

Execution: At the start of a whistle or cue, both athletes sprint a 5-yard shuttle 5–5.

Athlete 1 then tries to sprint past the midline as fast as possible before Athlete 2 tags him before passing the midline after they both do a 5-yard shuttle.

After the 5-yard shuttle, Athlete 1 can juke/cut, etc. to get to the midline to fake out Athlete 2 before being tagged. Athletes switch between offense and defense.

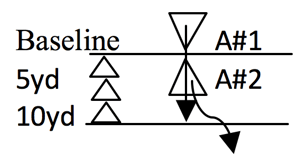
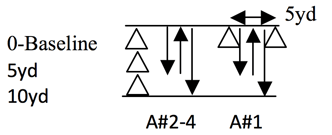
Screen Shot 2020-03-03 at 2.54.44 PMDrill 3: Shuttle Runs—Reaction 5-5-10 Shuttle

Setup: Cones are spaced 0, 5, and 10 yards apart.
Another set of cones is 5 yards apart on the baseline.

Number of Athletes: 3–4
Athlete 1: Shuttles (drill start); Athletes 2–4: Reactionary

Execution: At start of a whistle or cue, Athlete 1, facing the baseline, begins shuffling between the 5-yard cones. Athletes 2–4 stand facing the other way on the baseline waiting to react to Athlete 1. Athlete 1 can shuffle back and forth for a total of two times. However, within the two shuffle attempts, Athlete 1 can turn and sprint whenever. Athletes 2–4 must respond to Athlete 1 and turn and sprint. After Athlete 1 initiates the sprint shuttle, all athletes are now in a race to sprint a 5–5–10-yard shuttle.

Like what you've just read? Click here to subscribe to our blog!

This blog was written by Michael Blume, MS, SCCC; Athletic Performance Coach. To learn more about the NIFS bloggers, click here.

Topics: team training sports speed athletic performance drills agility coordination proprioception footwork