 One of the major misconceptions I am happy to battle as a fitness professional is the wildly popular idea that if a little is good, more must be better. One of my favorite quotes from movement guru Grey Cook is, “More is not better; better is better.” It is a motto I strive to live by in my fitness world as well as my personal life.
So if more is not always better, why do so many continue to focus on how many reps, and usually how quickly they can complete them, with the hope of getting stronger and prepping the physique for the upcoming spring break? I guess I can’t blame them; when it comes to getting those physical results, volume does play a role; however, there are more ways to create the volume stimuli than simply 100 reps of everything as fast as you can.
So what are we talking about here, slowing down? Exactly! I know that can be a hard concept to grasp for many, but creating time under tension (TUT) or slowing things down can actually do more than twice the volume in a “reppy” workout. TUT simply refers to the time that a muscle is under load or under strain during a set of a particular exercise. Brad Schoenfeld, PhD, suggests you can achieve this with a heavy load for several seconds or lighter loads for a minute. This is definitely not a new concept, but it seems to have come and gone like a lot of fitness concepts due to something else becoming the next big thing in fitness, like the 6-minute abs. But TUT is worth keeping in the programming conversation because of the multitude of benefits that result from the concept of creating tension to build strength and muscle size.
Four Reasons to Slow It Down
We will discuss some examples of how to get some more TUT into your workout later, but here are four reasons you should keep tension in mind when you train.
- Mindful movement: Although we use fitness and exercise for health, wellness, physique, and other reasons, exercise can and should be used for creating a mind at peace. I know that I use exercise to reconnect with both my body and the environment; exercise and movement can be spiritual. But being in the moment, or in this sense, the rep, is important. I think we get too caught up in getting things done so quickly that we miss most of the enjoyment of why we move in the first place. This is also a great time to practice proper breathing techniques throughout your movement and training session. Proper breathing throughout a movement will help in alignment, neuromuscular control, and overall enjoyment of the exercise. Concentrate on what you are doing and be in that moment; you will feel the difference.
- Motor control/Movement enhancement: Enhancing specific movement patterns should be atop your “to-do” list when you head to the gym. If you don’t know how you are doing with movement patterns, I suggest scheduling a Functional Movement Screen with a NIFS instructor. This will provide you with the necessary information about how you are moving. We use TUT in this sense to aid in developing and maintaining motor control of a particular pattern. Holding a certain position for a period of time, slowly moving through a pattern, and pausing to complete deep breaths are ways your brain can make the connection of what a pattern should feel like. This will also allow you to “press save” on the pattern you are working on. So next time you are doing some goblet squats, pause at the bottom and take a deep breath (5 seconds in through your nose and 8 seconds out through your mouth), and then stand to complete the rep and help upgrade your movement software.
- Muscle hypertrophy: Muscle tension created through resistance training stimulates the growth of new muscle proteins, making your muscles bigger, a process called hypertrophy. Simply put, lifting weights at a certain rate of time under tension will elicit different rates of hypertrophy. Generally speaking, when you are looking at rep counts per set, 3–6 reps = strength and power, 8–12 reps = hypertrophy, and 15+ reps = endurance. For hypertrophy (and there are different schools of thought on this point), 60–90 seconds a set will provide an optimal stimulus to promote muscle synthesis. What do you need to know? Volume and time under load is what will get those muscles bigger, given that the load you choose allows for greater volume. So if getting bigger muscles is your goal, slow it down and make each rep count.
- Adding a new challenge: If you have ever tried to either hold a position for a period of time or complete a bodyweight exercise as slowly as you can, you know how much more challenging that exercise becomes. Not only will TUT provide the above benefits, but it will add a huge challenge to the movements and exercises in your training sessions. If you are looking for something new, don’t look too far; just slow down a bench press or a bodyweight squat, or anything you are currently doing. It will change everything, and the challenge will go through the roof. And that soreness that you feel the next day and probably the day after is your body telling you that you created enough stimuli to promote growth! Ultimately, that’s what we want, right?
How to Add TUT into Your Workouts
Here are some movements that will add more time under tension when you exercise.
- Isometric holds: To increase TUT, add movements that rely on creating more tension. Isometric holds are a great place to start. Examples of these movements are planks, static squats and split squats, and static TRX rows. As I mentioned above, pick a movement and hold the position at the most difficult portion of the movement. These exercises are usually timed and start with a short amount of time and progressively build up.
- Tempo reps: With this method, you slow down both the eccentric (lengthening) and concentric (shortening) phases of the movement. Typically 3–6 seconds per phase will increase the load on the muscle group being worked. Take the TRX row, for example; here Thomas would lower his body for 3 seconds and pull his body back up for 3 seconds for 8–12 reps, increasing his time under tension. You could go even more slowly for a super-slow set to muscular failure as another option of tempo reps.
- Hypertrophy sets and reps: As stated above, to promote hypertrophy in a particular muscle group, a solid set and rep range is 3 x 8–10 with a tempo of 3:3 (total rep time of :6) for each movement. This is not fancy, but it will get the job done if you are hoping to increase size. So keep it simple and slow it down a little bit.
No matter whether you are looking to enhance your movement, muscle building to get those biceps ready for the beach, or find more joy and fulfillment in your exercise, slowing down can help get you there. If you need some assistance on how to implement TUT into your workout routine, schedule your free personal training session with a NIFS instructor today.

This blog was written by Tony Maloney, ACSM Certified Exercise Physiologist and Fitness Center Manager. To find out more about the NIFS bloggers, click here.
 Knowing whether you are an introvert or an extrovert can help determine what type of fitness plan/program will work best for you.
  In my previous
  Have you ever thought of doing something big for those special birthday milestones? I can easily recall all the excitement that came with my 16
 A New Year is a great time to
  You lose 15 pounds. Then gain back 10. Then it’s time to try the newest diet out there and you lose 20 pounds. Then gain 20 back. Does this cycle sound familiar? This is called yo-yo dieting, or the cycle of gaining and losing the same pounds over and over again. This cycle is dangerous because of its long-term health effects. Hopefully reading through these dangers will prevent you from trying the next fad diet craze and instead adopt the theory of “slow and steady!”
 For years fitness enthusiasts have used the colder months of the year as an opportunity to put on muscle mass (or
  So which type of hypertrophy should you go for? That depends on what your personal goal is. Ask yourself these three quick questions before you approach method 1 or method 2:
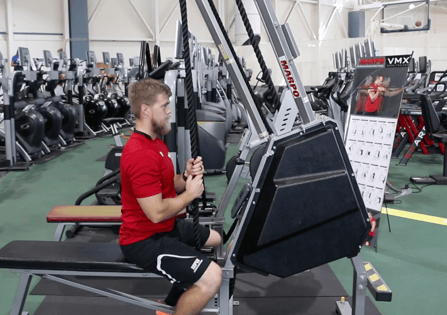 We’ve all done it. New lifters, old lifters—everyone has experienced that week where your normal training program just doesn’t have the same motivation for you that it did in the past. Monday is chest-tri day, Tuesday is squat, Wednesday is back-bi, so on and so forth. No one is immune to this feeling, especially if you are as religious about following your program as many of the
