 Ergometers have been a mainstay in the fitness world for a long time. You might not realize it, but many of the cardio pieces in your fitness center that you use regularly are ergometers. The arm ergometer comes from two Greek words: ergo, which means work, and metro or meter, which means measurement. In essence, any cardio equipment you have been using that has the capability to measure your workload can be considered an ergometer.
Because this is a wide spectrum of possibilities, we will focus on some pieces of equipment that fall into a subcategory, Upper-body Arm Ergometers (or UBE for short). I will give some professional tips and workout ideas to incorporate some great exercise into your program well into the new year.
NIFS has several options for UBE-minded people. For starters, the Marpo Rope Climb Machine, the Concept II SkiErg, and the Schwinn Air Bikes can each provide a nice, challenging upper-body cardio exercise. Because each machine specializes in its own fitness discipline (climbing, skiing, and biking), exercisers have an opportunity to not only do the exercises they love to do, but also try new pieces of equipment.
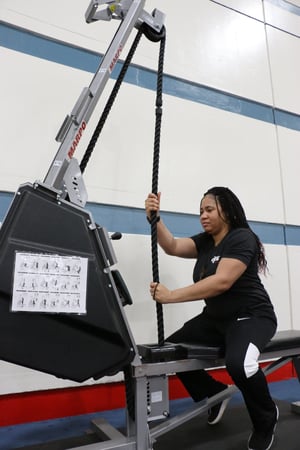
Rope Climbing Machine
Rope climbing is hard work, but quite beneficial. The main movers here are the Latissimus Dorsi, also known as the Lats; however, you can easily notice other muscles that work to support the movement, such as core and grip strength. Sometimes, though, this exercise is a little aggressive and you might not be ready to attempt a rope ascent. In this case, we can introduce you to the Marpo Rope Climbing Machine. This device can simulate various rope activities ranging from climbing the rope to a tug-of-war. Further, accessibility and versatility are both pluses. I like to use the rope machine for cardio on days that my legs are too sore to go, or if I am recovering from a lower-body injury.
Workout: I would suggest doing an interval of 30 seconds on, 30 seconds off for 4 to 5 rounds at the end of your workout. During the “go” time, be ready to work!
Concept II Ski Erg
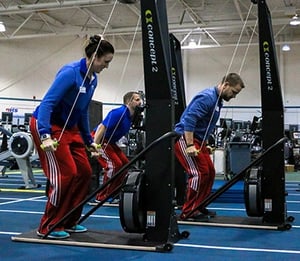 Another piece of UBE equipment you can find is the Concept II Ski Erg. The machine is designed to replicate cross-country skiing, but can also be used for upper-body only. For years, cross-country skiing has been associated with some of the most beneficial exercises in our industry. When snow is not in the forecast or if we lived far away from winter weather, it might be hard to come by a set of skis. The Ski Erg takes up a relatively small space and still gives a great workout. The Concept II machines are designed to take a lot of intensity while providing a good, safe workout.
Workout: A quick workout could be as easy as measuring your quickest 1,000 meters and then trying to beat that time the next time you are at NIFS.
Air Bike
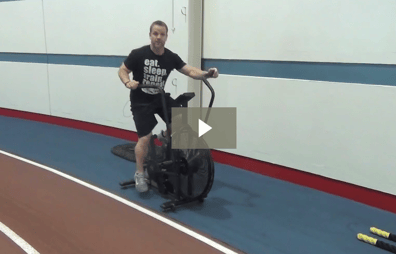 The final piece of equipment is the air bike. Bikes have been around for quite a while, but not all bikes are created equal. The air bike is fan driven, which means that the intensity you feel is based on your exercise output. Because it uses both your arms and legs, you get a full-body effect from the exercise. When muscles contract, not only are calories being burnt, but blood has to pump out to all those muscles, hence your heart rate increases. Ask anyone who has used the air bike and they will tell you that it could be one of the best challengers in the gym.
Workout: Use the bike as a warmup or a final finisher. I like to use the bike as a cool-down to keep the blood flowing and ease out of a hard workout. Try an 8–10-minute ride at moderate intensity at the end of your session.
***
For people who are injured or just want a great workout, the UBE equipment has something for everyone. NIFS provides support and will help you find the equipment and workouts that are appropriate for your goals and level of training. Train hard with equipment designed to push you to the limits.
If you are unsure about the UBE equipment, please stop and see a NIFS staff member to assist you with your needs. As always, keep working hard to achieve your goals, and don’t be afraid to try something a little different at the gym—you might end up loving it!

This blog was written by Thomas Livengood, NIFS Health Fitness Instructor and Personal Trainer. To read more about the other NIFS bloggers, click here.
 ’Tis the season for holiday traveling, holiday parties, not having as much time to hit the gym, and eating more calories than are in your average diet. Spending time with family and friends is so important over the holiday season, but taking care of your health and fitness is just as important.
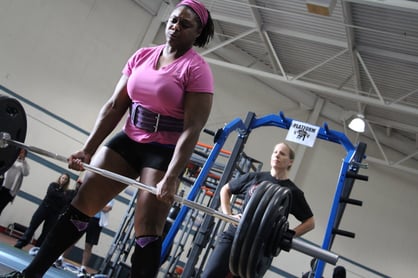 Weight-lifting belts have become a staple in many gym settings for powerlifting, Olympic lifting, bodybuilding, and strongman, and for anyone who wants to lift heavy loads. Whether you use them for training or on the competition platform, you need to know the ins and outs of weight belts so that you can make a smart decision.
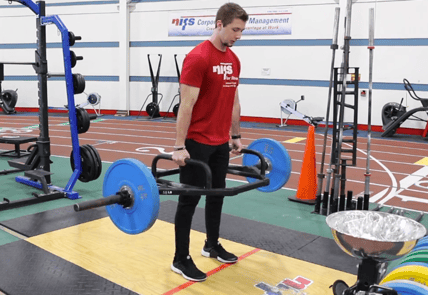 As a fitness professional I approach training and helping people from the direction that principles guide methods. The reason for this is that methods and fads will always change, but principles never do. It’s beneficial that the methods and variations of movements change from time to time, as long as the decision to change them is based on solid principles and reasoning. Variations are great, such as a change in foot position in a squat, adding load to a plank position, or varying the implement you are using during the exercise. One implement change that can pay heavy dividends (pun very much intended) is using a specialty lifting bar.
 Believe it or not, shoes do serve a higher purpose than just to make a fashion statement—especially when you’re
  I have been in a gym environment of some kind for the majority of my life, first as a student athlete through adulthood and now as my profession. There really hasn’t been a time in my life when I haven’t been a part of the gym culture. There is a reason for that: I LOVE IT! I love to move, push myself beyond perceived limits, see successes, be around likeminded people, and witness amazing transformations and feats of strength. There is nothing like it, and I have done a great deal of growing up in a gym, and now it is my livelihood, literally.
 Starting from the ground up might sound like a daunting task, but with
  Busy college schedule? No time to fit in your workout between exams, papers, and class? Don’t let school be the excuse to skip or miss your workout. According to