<img height="1" width="1" style="display:none" src="https://www.facebook.com/tr?id=424649934352787&amp;ev=PageView&amp;noscript=1">

NIFS Healthy Living Blog

The Importance of Post-Season Active Rest

ThinkstockPhotos-78322425.jpgOver the past six to eights weeks, I have been creating summer workout manuals for the teams that I work with during the school year. These manuals are meant to bridge the strength and conditioning gap between the time they leave for summer break and when they return for the fall semester. There is much to be gained, or lost, through a summer of hard work (or lack thereof). Although summer break is a true “break” for most athletes academically, there never really is a true break for training.

Many of the teams I work with are spring sports. Their seasons begin a couple months after the turn of the year and may not finish until after school is out. They go from the playing field, track, course, or court, back home where family, friends, and summer jobs await. Being spring sports, their summer usually begins with a recovery period that occurs when their competitive season comes to a close. The components of this recovery process include mental, emotional, and physical aspects that need to be met in order to fully prepare for the next bout of training and the following season.

For the sports that I work with, the first portion of the training calendar for the post-season is called active rest. Active rest is an approximately two-week period where the athlete performs light physical activity at least two to three days per week. These physical activities should have nothing to do with the sport that they participate in. Think about it: after spending six to seven days per week over the past four months participating or thinking about their specific sport, the last thing many individuals want to do is continue to do just that. Although this is the sport that you may love, getting away from it for a short period of time can do wonders.

Taking a Break from Training

Active rest can mean a lot of things, and the best part is the fact that you basically have free reign over what you choose to do, as long as you are staying active. This gives you the opportunity to choose something totally unrelated to your sport and do it for the next few weeks.

I would recommend that the intensity of the activity you choose not climb above “moderate.” The low to moderate style will allow adequate blood flow to working muscles, which will help promote physical recovery of the muscles that were taxed so much during your competitive season. Another recommendation I would make would be to limit the amount of impact (foot strikes) you have during this period, especially if your sport requires a large amount of impact. This will allow your body to recover from the constant “ground and pound” that you might have during track, tennis, or softball season.

Active rest is also a good time to incorporate corrective exercises from the Functional Movement Screen (FMS) that your coach or trainer gave you. These exercises focus mainly on mobility and require very few pieces of equipment for the most part. Spending two to three weeks working on any muscular imbalances that may have developed during the season will give you a leg up when you begin your intense off-season training program in a month or so.

Active Rest Recommendations

Following are my top 5 recommendations for the rest period of your training:

  • FMS corrective exercises
  • Swimming
  • Hiking
  • Bike/elliptical/arc trainer/rower
  • DO SOMETHING FUN!

Physical recovery is definitely important during this time, but recovery of your mental and emotional well-being may be just as or possibly more important. Let’s face it—any competitive season has a multitude of ups and downs, which creates an emotional rollercoaster that could send anyone through a loop. You have spent 48 out of the past 52 weeks preparing or playing your sport. You owe it to yourself to do something a little different and come back refreshed for the preparation for the next season.

If you have any questions about how to set up active rest for your post-season training, or need help constructing an off-season training program for your sport, contact me at asoller@nifs.org. To read more about setting up training programs for athletes, see my blog series that begins here.

Like what you've just read? Click here to subscribe to our blog!

This blog was written by Alex Soller, NIFS Athletic Performance Coach. To find out more about the NIFS bloggers click here.

Topics: training sports recovery functional movement post-season rest student athletes

Five Resistance-Training Mistakes that Slow Muscle-Building

ThinkstockPhotos-517048740.jpgBuilding muscle is perhaps the most common goal (second to fat loss) of an exercise program. Many people eventually hit a plateau with exercise routines and muscle-gaining processes and find it increasingly difficult to continue putting on new muscle. Once the body becomes too familiar with certain exercises or a certain style of training, your results will be hindered.

However, you might in fact need to take a closer look at your training habits before you jump to the conclusion that you have hit a plateau. Take a look at my top 5 muscle-building mistakes, and how to power through the plateau and continue making gains.

1. Overtraining

Overtraining is a very real trap to which many people trying to gain muscle fall victim. In our society we often think that when trying to gain muscle, “more is better.” However, when it comes to training, more is often not better. Only the right amount of the right type of training will be beneficial to increasing muscle in the body.

The easiest way to explain this concept is to first point out that in order for muscles to grow in size (hypertrophy), they must be allowed to fully recover from micro tears experienced during an intense resistance-training workout. If we fall into the trap of thinking more is better, we often find ourselves either doing an absurd amount of sets and reps for each muscle group, or training the same muscle group multiple times a week, and not allowing proper recovery time. While I do applaud the effort in this technique, I have learned from personal experience that sometimes instead of training harder, we must train smarter.

2. Under-training

As opposed to mistake number 1, numerous people also often under-train when working out. Under-training happens when you walk into the gym and head over to the leg extension machine, perform a set of 12 reps at low-moderate intensity, and play with your phone for 2 or 3 minutes while resting, waiting on your next set. When trying to build muscle, the number of reps you complete does not mean anything if you are not bringing the correct intensity to those numbers. If you are on rep 12 and it feels like you are trying to lift a car, you are at the correct intensity for that exercise. If you get to rep 12 and you are already looking forward to your next set because you felt as though 12 reps was not enough, you might not be training with the proper intensity to build muscle. A good workout should come with challenges; therefore, you should almost be reaching failure on each set you do. If a person does not push themselves close to their limits, gaining new muscle and improving lifts will be rather difficult.

3. Avoiding the Hard Exercises

Most of us are guilty of this (including myself). We tend to avoid the hard exercises because they challenge our comfort level in the gym. However, since a majority of the “hard exercises” we tend to avoid happen to be compound exercises, we are actually doing ourselves a huge disservice. Compound exercises are extremely beneficial when trying to build muscle. They tend to use multiple muscle groups at the same time (even the ones we are not accustomed to working out individually). Therefore, compound exercises are great not only for working the major muscle groups in the body, but are also great for working the smaller muscle groups, which will result in improved strength levels overall that should transfer over to other lifts.

4. Failure to Build a Foundation

Before you can move to the “hard” or compound exercises, you must first build a solid foundation through muscular strength, muscular endurance, and proper movement patterns. These three components tie into one another very closely. If a person does not have a solid foundation with correct movement patterns, he or she will be performing compound exercises with improper lifting techniques, causing untargeted muscle groups to compensate. If the targeted muscle is not firing as effectively as it should be within the compound exercise, how can you expect a great deal of muscle growth?

Conversely, if a person has not improved their muscular endurance before attempting to improve their muscular strength, he or she might only be able to lift a certain amount of weight for only a short time (due to lack of muscular endurance), even if the person has learned proper movement technique. Lastly, if a person has not improved their muscular strength, it will be very difficult to continuously improve the weight needed to lift in order to create muscle hypertrophy (or size). So as you can see, building those three foundations first plays a huge role in long-term increase of muscle.

5. Nutrition

The last and arguably most common mistake seen when trying to build muscle is actually undernourishing the muscles themselves. Can you really expect your muscles to be able to grow when you are not giving them the proper amount of nutrients? That’s like expecting your car to survive a family road trip from Indiana to California without putting gas in it first. It simply won’t happen.

The mistake we usually make is thinking that as long as we are allowing our bodies to be in a “caloric surplus,” we will grow new muscle as long as we participate in a consistent resistance-training program. Unfortunately, not all foods are created with equal nutritional value, meaning there are foods we consume on a daily basis that are not giving us the proper amount of protein, carbohydrates, and healthy fats our muscles need in order to grow. Instead they fill us up with “empty calories” (no nutritional value) that include calories from sugar and saturated fat that provide little to no health benefits.

To make matters even worse, you actually intake more calories per gram when you consume fats compared to carbohydrates and proteins.

Nutrient Calories per Gram Calories in 50 grams
Carbohydrates 4 200
Proteins 4 200
Fats 9 450

***

Many times people overlook these mistakes when trying to build muscle. However, if you begin to understand that all of these factors play a huge role in the efficiency of the muscle-building process, you will finally be able to get past the physical barriers you have unintentionally created for yourself.

Like what you've just read? Click here to subscribe to our blog!

This blog was written by Darius Felix, Health Fitness Specialist. To find out more about the NIFS bloggers, click here.

Topics: NIFS nutrition muscles resistance overtraining recovery muscle building functional movement assessments rest

Caddy Smack Deuce: More Fitness Tips to Improve Your Golf Game

It is finally time! If you are like me, that “itch” to get back out onto the golf course may be starting to emerge. You check your weather app at least four or five times a day to see if the conditions for the upcoming weekend are going to be suitable playing (no wind/rain = good for me).

GettyImages-497545811_webMost of us might have been lucky to get out and play a handful of times over the winter, but some might be picking up a club for the first time in almost five months or more when that first tee time rolls around. Regardless of how many times you have played in recent months, everyone can benefit from improving golf-specific fitness areas before the full-fledged season begins.

About a year or so ago, I wrote a blog called “Caddy Smack” (hence “Caddy Smack Deuce”). Caddy Smack was designed to give you a few starting points on how you can increase one very important aspect of the golf swing, rotational power. Rotational power is a very important force-generating factor and may help you gain a few extra yards off of the tee. But as most of you probably know, there is MUCH more to the golf swing than just power. Follow along as I go over five of the most important fitness areas to improve that can have a direct impact on your swing.

Ankle Mobility

All great golf swings start from the ground up. How the feet are positioned and the movement (or lack thereof) can change a smooth swing into one that looks like a rusted teeter-totter. Lack of mobility throughout the ankles can constrict your range of motion and can also prevent you from using the ground as a force-generating tool.

What can you do to improve it? Do Wall Ankle Mobility Drills: 2 to 3 sets of 10 repetitions per leg

Hip Mobility

As Chubbs from the movie Happy Gilmore once said, “It’s all in the hips.” Well, I’m here to tell you that Chubbs wasn’t lying. A solid portion of the movement that occurs in the swing can be attributed to your ability to achieve a full range of motion within your hips. If you have been around the game long enough, you know the term “hip turn.” This does not happen with poor mobility.

What can you do to improve it? Do Supine Bridge Leg Circles: 2 sets of 5 reps (clockwise and counterclockwise) per leg

Rotational Power

If you have read this blog’s big brother, you know that rotational power plays an important role in your swing. My belief is that if you become more powerful, you will not have to swing as hard in order for the ball to fly the same distance, thus minimizing mis-hits due to being out of control. Essentially, you are generating the same amount of force (or possibly greater) without feeling like you are doing anything different. Seems like a win-win to me.

What (else) can you do to improve it? Perform Standing Rotational Shot Put: 2 to 3 sets of 5 to 8 reps per side

Shoulder Mobility

I know you have done it, watching the slow-mo of one of the tour players’ swings, being enamored by their ability to draw the club back so far (Phil Mickelson goes way past parallel to the shoulders). The next time you hit the driving range, you try to mimic that exact takeaway and the shot is a proverbial dumpster fire. I’ve done it too. You wonder to yourself, “How do they do that”?

Well, for most of them, their swings have been forged since they exited the womb. That feeling is natural to them. But one factor in which they may have a slight advantage over you may be shoulder mobility, or the ability for the shoulder to move freely and under control throughout the range of motion without the sense of constriction. There is no way that you will be able to recreate a backswing of such length if you cannot perform similar tasks without the golf club in your hands.

What can you do to improve it? Standing (or seated) Wall Slides: 2 sets of 10 reps

Single-Leg Stability

My final important aspect to aim to improve for your golf swing is single-leg (SL) stability. SL stability combines other factors that I mentioned previously (such as ankle/hip mobility), but for some individuals, it’s just something that needs to be practiced. After you make contact with the ball in your swing, there is a transfer of weight to your lead foot, which causes that hip turn and allows you to hold the finish pose. Although both feet are still in contact with the ground, the lead leg is providing the majority of the support.

When is the last time you balanced on one leg for 30 seconds? What about balancing for 30 seconds with your eyes closed? What about balancing with your eyes closed, juggling flaming bowling pins, while eating sushi (okay, maybe I’m kidding). That is a good place to start. Feel what it is like to stand without using anything but that plant foot. Do it on both sides. After you have mastered the balance, you can add more elements.

What can you do to improve it? Do Single Leg Balance with Tennis Ball Bounce (against wall): 3 sets of 20 per leg

The golf swing is as unique and complex as any movement that I have ever analyzed. There are so many factors that could make or break your success; however, many of those factors are modifiable. I hope that this spring, summer, and fall golfing seasons are the best you’ve ever had!

Now, watch me hit a ball over the White River bridge!

Golf blog 2

This blog was written by Alex Soller, NIFS Athletic Performance Coach. To find out more about the NIFS bloggers click here.

Like what you've just read? Click here to subscribe to our blog!

Topics: fitness nifs staff balance flexibility exercises golf golf swing mobility functional movement

Mobility: Why Strength Training Is More Than Just Weightlifting

Strength training is becoming increasingly popular in the United States, and I couldn’t be more excited about that. It can benefit everyone in some way. Now that we are all started down the right track, I would like to offer some more in-depth advice on an aspect of strength training that is overlooked: mobility.

Strength and Mobility Go Hand in Hand

Mobility.jpgMany people shy away from lifting weights because they think it will make them “big and bulky.” To bring a little more clarity to that notion, please see this blog post. However, strength and mobility should not be thought of as separate ideas. “Strength” can mean many things. To me, strength is not just about one certain lift or exercise. Sure, there are some competitions that measure just three lifts, but that is its own little niche. I think that for anyone who is not a competitive powerlifter or weightlifter, strength has to be applied to all forms of movement.

There are five major categories of movement, which are squatting movements, hip-hinging movements, pressing, pulling, and “other” (such as isokinetic movements—for example, a plank). All of these movement patterns should be strengthened in a strength training program (barring any limiting injuries).

Before I get too far off topic, let’s get back to our main focus: mobility. Mobility, like all of the different movement patterns, is another aspect of strength training. It is impossible to be all-around strong without being mobile. You may be able to put up some respectable numbers on a few different lifts, but if you neglect mobility, that will come back to haunt you. Strength training is great, but over time it can cause muscle tightness, and even limited range of motion if muscle growth is substantial. This can be countered by putting time and effort into working on mobility.

The Functional Movement Screen (FMS)

IMG_2714_2.jpgThe Functional Movement Screen was developed to help determine whether an individual is at risk for an injury. What it also assists in doing is locating mobility issues. The tests that are included in the FMS were specifically chosen to test the areas that are most commonly associated with limited mobility. Not only does the FMS pinpoint areas that need some work, but it also gives exercises that can improve on your deficiency. The truth is that everyone is unique, and everyone’s exercises should be, too.

Here are a few examples of what might be included in your FMS corrective exercise list:

  • Single Leg Lowering: While lying face up on a mat, bring your feet together and lay your hands down at your sides. Bring both legs up as far as possible while keeping them totally straight. Slowly lower one leg at a time, still keeping it straight, and try to get your leg all the way to the floor. Bring the lowered leg back up slowly and then switch legs.
  • Lumbar Locked T-Spine Rotation: Start by sitting with your shins on the ground and sit back onto your heels. Grab the back of your neck with one hand, and put the other hand on the ground straight in front of you. Without moving your hips, take the arm that is grabbing your neck and try to point that elbow up toward the ceiling without removing the hand from your neck. Hold at the top for one second, then bring the elbow back down and in toward the opposite-side knee. Repeat for the other side.

Everyone is unique when it comes to mobility. Your corrective exercise list can be determined by simply going through a 20-minute Functional Movement Screen appointment with any of the Health Fitness Specialists at NIFS. These results will determine which corrective exercises will most benefit you; then you will get a detailed list of these exercises and how to perform them. So get down to NIFS and schedule an FMS appointment today, or call 317-274-3432 and ask for the track desk.

Free Fitness Assessment

This blog was written by Aaron Combs, NSCA CSCS and Health/Fitness Instructor. To find out more about the NIFS bloggers, click here.
Topics: NIFS range of motion weightlifting strength training mobility functional movement

Five Powerlifting Pieces to the Power Clean Puzzle

Olympic (Oly, ah-LEE) and powerlifting have become increasingly popular over recent years and will continue to grow, considering their application to functional training and athletic movement.

deadlift-2new.jpg
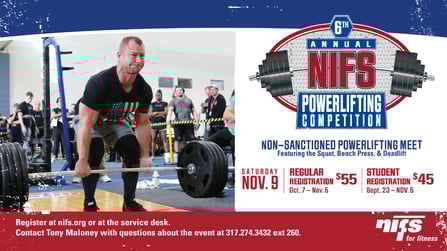
Whether you have particpated in our Powerlifting Competition or interested in joining,  I’m going to give you a solid progression that will allow you to develop a strong power clean with proper technique. The following movements can be a starting point for beginners or experienced lifters looking to get a fresh perspective on their current programs.

When I venture into any Olympic or powerlifting movements with a client or athlete, the most important factor is that their body be able to perform the movement that I am asking them to do. I get a good idea of this by using the Functional Movement Screening (FMS) and a few lower-intensity exercises (kettlebell swing, goblet squat, ground-based plyometrics, etc.) that utilize similar movement patterns to those that the Oly or powerlifts entail. If an individual is not able to perform these movements correctly or their FMS score contraindicates their participation in them, I would focus on other areas in order to better prepare that individual for these lifts. Once I believe someone is fully capable of performing the lifts (in this case with regard to the power clean progression), I could start them on the progression.

1. The Deadlift 

The first (and arguably most important, in my opinion) step in this progression would be to teach proper hip-hinge technique for a deadlift. This is the foundation of the majority of the Oly movements and needs to be perfected in order to reach the fullest potential in subsequent lifts. Learning this movement could take as little as a couple weeks, but will likely take more like 4 to 6 weeks depending on your current abilities. Take your time; it will be worth it!

Points of Emphasis:

  1. Keep your back flat.
  2. Keep the bar close to your body.
  3. Use a Hook or Pronated grip (which has a better translation to Olympic movements).
  4. Start by pulling slowly from the ground; velocity will be added later.
Recommended training time frame: 4 to 6 weeks (depending on ability level)

2. The Power Shrug

Once you have perfected the deadlift, you can implement the next movement. From the deadlift position, I usually transition to a power shrug. The power shrug is just what it sounds like, a shrug with more speed than normal. The power shrug allows for the client or athlete to feel what it is like to achieve triple extension after the deadlift. It begins with a deadlift to an RDL position (with the bar at or just below the knees). Once the RDL position is achieved, the hips are driven through to generate the upward momentum to the bar. The client simultaneously shrugs his or her shoulders toward their ears to finish the movement.

Steps to Achieve:

  1. Start with a deadlift to the RDL position.
  2. Once the RDL position is met, drive the hips through.
  3. Finish with shoulders shrugged toward the ears and on the tiptoes.
Recommended training time frame: 3 to 4 weeks

3.The Hang Pull

The next step in my progression would be to go into a hang pull. This movement is more of a “top-down” movement versus a “bottoms-up” movement when compared to the deadlift and the power shrug. The deadlift and power shrug start from the ground and move upward from there. In contrast, the hang pull starts from a standing straight up position. The ultimate goal for all of the movements will be to get to the powerful RDL position. The hang pull involves lowering the bar to the knees and then driving the hips through to generate an explosive upright rowing motion. You may integrate the shrug that you have learned in progression #2 in order to produce more of that upward drive. The movement finishes with the client coming down from their toes after the pulling motion.

Steps to Achieve:

  1. Stand up straight.
  2. Lower the bar down the legs in a hip-hinge motion.
  3. Once RDL is achieved, drive the hips through, shrug, and row.
  4. Finish on tiptoes.
Recommended training time frame: 2 to 3 weeks

4. The Hang Clean

Now the fun begins. Through the first three steps you’ve learned to properly hip hinge and how to achieve triple extension through the hips, knees, and ankles. You’ve learned to shrug and pull from steps 2 and 3. If done properly, step 4 (the Hang Clean) should be a piece of cake. The hang clean builds off of the hang pull by adding the firing of the elbows under and through the bar to achieve a front rack position with the barbell positioned across the shoulders. If you have been diligent through steps 1 to 3, this should not be an issue. The biggest problem I see with individuals in this stage would be a lack of mobility through the wrists, triceps, and shoulders. Timing is everything with these lifts, so once you know you are doing them correctly, practice, practice, practice. The less your mind has to think about any part of this movement, the more success you will see.

Steps to Achieve:

  1. Perform steps 1 to 4 for the Hang Pull.
  2. Slightly sink the hips.
  3. Pull and fire the elbows under the bar.
  4. Finish with the bar racked across the shoulders.
Recommended training time frame: 4 to 6 weeks

5. The Power Clean

You have made it this far; it’s time to seal the deal! The final progression for the power clean would be, well, the power clean. During this progression, your job will be to assemble all of the pieces of the power clean puzzle from steps 1 to 5. This movement will start with the deadlift to the RDL position, continue with a big shrug and pull, fire the elbows, and sink beneath the bar. It is essentially step #4, but we are pulling from the floor.

Sounds simple, right? Not exactly. This will introduce a whole separate challenge with regard to timing, but as always, your timing will get better with practice. Once you feel comfortable pulling from the ground and catching the bar in the upright/hips loaded position, catching into a front squat will be next (but you should perfect this first).

Steps to Achieve:

  1. Deadlift to RDL position.
  2. Drive hips through.
  3. Shrug shoulders and pull upward: get triple extension!
  4. Sink and fire elbows beneath the bar.
  5. Catch and rack the bar across the shoulders.
Recommended training time frame: 4 to 6 weeks

***

Olympic and powerlifting movements are definitely the king of the fitness world jungle. They should be done with extreme attention to detail due to the high velocities of the bars (Oly lifting) and extreme weights being used (powerlifting). That doesn’t mean you need to be a fitness expert to perform them; just learn how to do them correctly. Although these pieces to the power clean puzzle lead you in the right direction, it is always beneficial to have another set of eyes on you to make sure that everything is in working order. Realize that it takes a while for your body to adapt and grasp these movement concepts, especially if you are new to this type of lifting. Remember, be patient and a stickler on details; it will pay off in the long run!

***

NIFS 6th annual Powerlifting competition is coming in November. For more information and to get registered click here. Early Bird pricing is $45 until October 6th.

Screen Shot 2019-09-25 at 9.30.23 AM
This blog was written by Alex Soller, NIFS Athletic Performance Coach. To find out more about the NIFS bloggers click here.

Like what you've just read? Click here to subscribe to our blog!

Topics: NIFS group training NIFS programs weight lifting powerlifting functional movement assessments