<img height="1" width="1" style="display:none" src="https://www.facebook.com/tr?id=424649934352787&amp;ev=PageView&amp;noscript=1">

NIFS Healthy Living Blog

Back to Exercise Basics: The Split Squat

As we continue down the road of improving our basic movement patterns (which is always under construction, by the way), we take a look at the squat pattern and its variations a bit further. Many fitness pros, including myself, argue that we spend more time on one leg than we do on two. Think about it: walking, running, traveling up stairs—for varying amounts of time, you can find yourself on one leg a lot.

What Makes a Split Squat a Split Squat?

So if you are on one leg a bunch, it only makes sense that you build that position to be strong and stable, and in many different planes of motion. Let’s take a look at what makes a split squat a split squat, which is very different from the lunge but often is called by the same name (kind of a pet peeve of mine).

Tony_split-squat

  1. Base of support—Forward Foot – Weight on heel
  2. Base of support—Rear Foot – Weight on toes, heel up
  3. Base of support—Split distance is 3-4’ 
  4. Shin angle—moving forward
  5. Front Knee – Tracking over but not beyond toes
  6. Trail knee – path towards ground, suspended
  7. Glute “stacked” above knee
  8. Neutral Spine
  9. Shoulders back and down
  10. Eyes up

Many of the aspects of the regular squat are found in the split. You are simply in a single-leg-supported position.

Options to Get More Out of the Split Squat

Now that you have the foundation, here are a few options you can use to get more out of this movement pattern.

  1. TRX Split Squat
  2. 2KB Split Squat—Farmer position
  3. 1KB RFEE Split Squat—Down position
  4. 2KB Split Squat-Racked position


Exercise Variations in the Frontal and Transverse Planes

Human beings need to travel in 3D. It’s important to all of us, from the athlete to the accountant. Often we train in one plane of motion, typically the sagittal plane (in the regular squat, for example, or the overhead press). But in the real world we move in more ways than straight ahead. Here are some variations that will get you in the frontal (side-to-side) and the transverse (rotational) planes.

  1. 3D Body Weight
  2. Offset KB Spit Squat
  3. SaB Lateral Split Squat
  4. SaB + KB Rot. Split Squat


The split squat is a super-important movement pattern that I feel we need to train more. As single-leg beings, mastering this pattern in multiple planes will transfer big time to the real world and allow us to move better, more often, with fewer injuries.

Like what you've just read? Click here to subscribe to our blog!

This blog was written by Tony Maloney, ACSM Certified Exercise Physiologist and Fitness Center Manager. To find out more about the NIFS bloggers, click here.

Topics: fitness center injury prevention functional movement movement squat stability leg day exercise basics

New Year, Try Some Healthier Habits

GettyImages-1239872153This year make an effort to change small things and create healthier habits. You'd be surprised how little changes can lead to big benefits.

Think Your Drink

Studies have shown that when liquid is consumed with a meal, whether or not it is calorie-free, the person’s level of satiation does not change. This means that all of those calories are being drunk but no food is given up to balance them out. Load up on plenty of liquids that are low in calories such as decaffeinated coffee and tea, flavored water, and low-calorie juices.

Portion Distortion

The portion sizes that are served today are considerably larger than they were 20 years ago. Therefore, more calories are being consumed in serving sizes that seem “normal.” Attempt to stick to a single serving or the smallest offerings of items. Look at labels and use the serving size on the nutrition facts panel as a guide. Aim to stick to the amount recommended.

Filling Fiber

Foods that offer fiber help the body stay full; therefore, the need to eat more is lessened. Reach for whole-wheat bread, pasta, and brown rice versus the non-fiber-filled counterparts, and the fiber will help keep your stomach from growling for a longer period of time.

The same is true when you eat a piece of fresh fruit or veggies, which are higher in fiber, instead of chips or pretzels that have no fiber. The more fiber you eat, the fuller you will feel and the fewer calories you will consume.

Move More

Here are some ways to get moving more:

  • Park farther away at stores.
  • Take the stairs instead of the elevator
  • Work out for 25 minutes instead of 20
  • Go for a walk after lunch or dinner.
  • Play your child’s Wii games.
  • Take hourly stretch breaks.
  • Wear a pedometer.
  • Add strength training to your normal cardio routine
  • Sign up for a race and start to train for it.

Whatever you choose, make sure it is something enjoyable so you will continue for the long term.

Track Your Choices

Start writing down your food and beverage choices daily. Seeing what you eat can be very helpful to guide serving sizes and the types of food you choose—and helps with accountability.

A helpful online food journal database is MyFitnessPal. This allows you to pick from a large database of food choices and see where your diet is lacking or in excess. In addition, physical activity can be tracked, too. But be honest; on average, users underreport around 10% of their food intake.

Like what you've just read? Click here to subscribe to our blog!

This blog was written by Angie Mitchell, RD, Wellness Coordinator. To find out more about the NIFS bloggers, click here.


Topics: nutrition weight loss calories accountability water fiber new year movement

What Is "Good Posture" (and How Is It Related to Movement)?

GettyImages-955753008“Stand up straight!” and “Don’t slouch!” are just a couple of variations on the same advice we’ve all likely heard at least once. I apologize if I’m bringing up bad memories of being scolded for less-than-perfect posture, but this read might give you a few reasons why those remarks might have been useless after all. That’s right, folks. We’re diving into the widely covered topic of posture: What it is, whether there is such a thing as “good” posture, and what you can do to optimize your posture at any given point.

What Is Posture and How Is It Related to Movement?

If you look up the definition of posture, you’ll find different definitions depending on where you look. One, from Oxford, says “The position in which someone holds their body when standing or sitting.” Another variation, from Merriam Webster, says it is “The position or bearing of the body whether characteristic or assumed for a special purpose.” Which one is correct? Well, I’m not sure either is incorrect, but I do have a preference for the Merriam Webster version. Why? Because it assumes that your posture at any given time is serving a particular purpose, whether that’s standing, sitting, walking, picking up an object, or performing any other bodily movement.

Your posture is ever-changing depending on the task you need to perform, so we might be missing the point entirely by getting caught up in analyzing a snapshot of what your posture looks like while you are sitting or standing still. As it turns out, it's fairly difficult to agree on what the ideal static posture actually is. Given the variance in how different individuals’ bodies are built, it seems pointless to assign a perfect static posture across the board. Not to mention, there is little evidence that supports the claim that “bad” posture or asymmetries put you at greater risk for pain. Perhaps our thought process is backward. What happens when you have pain in your back? Your posture changes! Wouldn’t it be reasonable that consistent, chronic pain could be the cause of postural adaptations that become your new normal?

Maybe our efforts should initially be focused on moving very well in a variety of ways. Moving well means maintaining the position of your body throughout a given movement or task. If you can train to move with quality in a variety of situations, it might allow for new options for movement to complete a given task, instead of repeatedly compensating. Having a variety of movement options available to you can prevent a default to the same repetitive movement patterns over and over again.

Increasing Your Movement Options

So, how do we increase the amount of movement options that are available to us? Practice, practice, practice. Yes, the dreaded p-word. The only way to learn something is to repeatedly do it, and do it correctly. And then do it correctly again. And again.

How do you know if you’re moving correctly? Have somebody watch you, of course. Without the guidance of an experienced professional who is competent with how the human body should move—whether that’s a physical therapist, personal trainer, strength coach, or other professional—you will have no outside perspective on what your body is actually doing.

Take something as simple as foot position. Just recently, I corrected somebody’s foot position from being “pigeon-toed” to being more “neutral,” with the toes pointing straight ahead. “I feel like my feet are duck-footed now!” I heard her exclaim. This is a common occurrence. When correcting somebody’s position to be more appropriate for the goal of the task, all of a sudden they feel way out of line. When your body resorts to only one option to complete a variety of movements, exposing it to a brand-new option will feel completely foreign.

Even those of us who are trained in technically correct strategies for movement can’t view ourselves from the outside. So, either we need to analyze some video footage, or more appropriately, employ an outside source as an unbiased third-party reviewer to say whether we’re moving the way we should.

Get a Movement Assessment

FMS-New
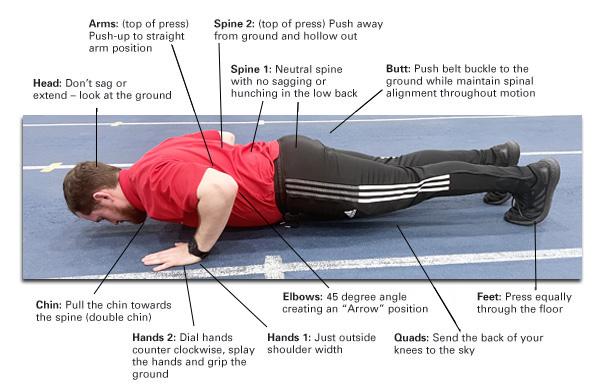
If you’re generally healthy and pain-free, you can consult with a competent trainer to do some sort of an assessment on your strategies for movement. Each individual uses preferred methods to assess movement, whether that is a Functional Movement Screen like we offer here at NIFS, a more general flexibility screen, or an even more in-depth orthopedic analysis. All have their limitations, but you can learn a lot if you know what to look for, regardless of the testing system.

One of my favorite big-bang movement assessments is watching somebody march in place. I have an opportunity to watch the strategy they use for shifting weight back and forth between sides, I can see somebody’s ability to extend one hip while flexing the other hip under the load of gravity, I can assess an individual’s thorax position during this activity, and I can even watch what’s going on with the upper extremities in response to a stepping pattern.

As long as the observer knows what to look for, the test or system of analysis becomes less important. What does take priority is the ability of your trusted expert to provide you with the strategies you need to maintain your position, or posture, throughout your daily life. Ultimately, however, it is up to you to employ those strategies and, yes, even practice them consistently so they can become your new normal, as if movement dysfunction never even existed!

To schedule an FMS with a NIFS certified instructor please click below to learn more.

Learn More

This blog was written by David Schoch, CSCS, and FMS. To learn more about the NIFS bloggers, click here.

Topics: NIFS posture movement healthy lifestyle functional movement screen

Stability and Mobility in Fitness: The Dynamic Duo of Movement

GettyImages-961867136Think about the most recognized duos of all time: Batman and Robin. Mario and Luigi. Buzz and Woody. Stability and Mobility. Wait, what? Yes, like superhero teams, stability and mobility work together to achieve a balanced, harmonious environment for functional movement.

It’s All Connected

First, I want to bring to your attention a concept that has been around for some time; however, we often forget the important role it plays in day-to-day performance. Let’s reflect on anatomy and the structure of the human body. I challenge you to think of it in terms of one continuous structure in which each joint affects the joints above or below it. This concept is commonly referred to as the kinetic chain. It boils down to stable joints being stable when they should be and mobile joints being mobile when they’re meant to be. In terms of starting or stopping movement, stability and mobility are quite often complementary in nature.

Being Flexible and Mobile

In case you missed it, let’s review the details from my preceding blog. Flexibility is primarily genetic, but can be improved slowly over time. It refers to the greatest length a muscle can achieve. This is often known as a joint’s range of motion (ROM).

Mobility is the ability to synchronize one’s coordination and overall strength to move around a joint under load—as, for example, when doing the front squat.

Now that we are adding stability to the equation, it enhances movement and helps it make sense. Stability is the ability to provide firmness and strength to certain joints, often with help from the surrounding connective tissue.

The Kinetic Chain in Action

The following illustration at www.acefitness.org depicts the six common links involved in the kinetic chain, along with their assigned level of stability. Each link or joint plays an important role in human movement and overall function.

Therefore, a joint’s health and function are ultimately determined by its structure and the continuous tradeoff between being stable or mobile. When there is more of one, there is always less of the other.

Why This Relationship Is Important: Injury Prevention

Why should you care? Well, when a joint is less stable, that means it is more mobile. More mobility means more motion at that joint; it can also mean more wear and tear, which can lead to more injury at that joint, including arthritis. Also, a less stable joint has to rely on surrounding muscle and tissue to provide the required stability, which can lead to injury in certain joints that are already highly susceptible.

So the next logical question is, how do I train to improve stability? We’ll explore that question in my next blog.

Like what you've just read? Click here to subscribe to our blog!

This blog was written by Cara Hartman, NIFS Health Fitness Instructor. To find out more about the NIFS bloggers, click here.

Topics: fitness injury prevention flexibility mobility joints movement stability

Readiness and Durability: Better Movement Warmups for Fitness Training

GettyImages-1191766401_low resI used to work at a golf course during my time as a teacher. It was a great way to spend my summers and be close to a game I truly enjoy playing. I mainly mowed greens and tees and dug a bunch of holes. I really enjoyed that time of my life very much. On all of the mowers there was a sign that read, “If this equipment can’t work, nor can you.” I think the message is self-explanatory: if the equipment is not properly cared for, it is a very good possibility it will stop working, leading to loss of productivity and failure to complete the job.

I believe the same can be said for our approach to preparing the body for training so that the body (equipment) can work when you need it to accomplish the job at hand. The most critical step in this process is changing the perception of the “warmup” as a secondary or unnecessary part of a training program—something you can skip if you are short on time. In actuality, warmups should be a major part of your training program (if you are truly looking for results, that is).

Long ago I adopted, both for the people I work with and for my personal workouts, a process from a great coach on preparing the body for work. It involves four exercises in four major categories of movement preparation: mobility, stability, core engagement, and loco-motor (dynamic stretches and small plyometrics). For obvious reasons, this is referred to as a 4x4 approach to physical readiness and preparation.

Mobility Drills

Mobility drills refers to the exercises aimed at gaining and enhancing the range of motion in a particular joint. With a joint-by-joint, ground-up approach, these drills typically work to tackle mobility of the ankle, hip, thoracic and cervical spine, and shoulder. Here at NIFS, we work to mobilize movement patterns that involve these joints, and others, which we evaluate in a Functional Movement Screen.

Here are just two of my favorite mobility drills:

i. 1/2K—Abducted T-Spine Rotation
ii. Dynamic Pigeon—Knee & Foot


Wistia video thumbnail


Stability Drills

These drills work to help stabilize the mobility you just gained with the preceding drills. A mobile joint is a great start, but then you must stabilize it with exercises that will aid in alignment and strength of the joint. These exercises are generally used immediately after the mobility work to help in the retention of the alignment and position we are hoping to obtain. Check out a couple of these drills that you can add to your 4x4 warmup.

i. Band Lat. Walks
ii. Split Squat w/ Band Pull-apart


Wistia video thumbnail


Core Drills

Exercises in this phase of our preparation are to “fire up” the core to stabilize the trunk before loading the body with all the great tools we use in strength training and conditioning. A common practice is to save the “ab work” for last during your training session, which is all fine and good, but adding these to your 4x4 work before a weight is lifted can help your performance. A strong, “awake” center will keep you safe during your exercises and allow you to get the most out of them at the same time.

i. Foam Roller Dead Bug with Ext.
ii. Side plank and row


Wistia video thumbnail


Loco-motor Drills

After mobilizing and stabilizing the system, now it’s time to energize it! These drills are used to increase the body and tissue temperature that will prepare your body for the strength and conditioning work that lies ahead. These drills are typically fast and fun, and can combine some dynamic stretching with basic calisthenics. These can be as simple as a jumping jack or lateral lunges, or these two gems:

i. Snowboarders
ii. Sprinter Lunge


Wistia video thumbnail

***

To prepare your body for work and to limit the chances of injury, you must perform a proper warmup. No more skipping a major part of your training session! As soon as you begin to look at the 4x4 warmup as a must-do, the harder it will be to work without it.

Like what you've just read? Click here to subscribe to our blog!

This blog was written by Tony Maloney, ACSM Certified Exercise Physiologist and Fitness Center Manager. To find out more about the NIFS bloggers, click here.

Topics: functional training core videos warmups mobility movement stability loco-motor drills

How the Half-Kneeling Workout Position Helps with Movement

For many years now, the half-kneeling position has been a favorite of mine and a workout program staple for the individuals I work with. As a “pattern–first” coach, the half-kneeling position not only provides another dimension to many exercises; it also helps in enhancing a few movement patterns at the same time.


Why It’s a Great Position

One of the reasons it’s such a great position is that it teaches us how we learned to move in the first place, from the ground up. Becoming proficient in the basic functional movement patterns carries over immensely into higher-order movements and exercises, as well as develops strength and stability in the trunk and core, which will be a benefit in many aspects of fitness and while we travel around this earth.

Getting the Most from the Movement

But the half-kneeling position is more than just putting one knee on the ground. There are a few intricacies you want to pay attention to in order to get the most out of the movement you’re performing in this position.

Let’s break down the half-kneeling position, shall we?


3:00


3:00


Wistia video thumbnail - Half-Kneel Position
 

Thanks for reporting a problem. We'll attach technical data about this session to help us figure out the issue. Which of these best describes the problem?

Any other details or context?

Cancel
message


As you can see, there is more to this position than simply placing one knee on the ground and performing a movement.

The Best Half-Kneeling Exercises

Now that we know the best way to set-up this position, here are a few of my favorite half-kneeling exercises for you to add into your workout program.


2:13


2:13


Thanks for reporting a problem. We'll attach technical data about this session to help us figure out the issue. Which of these best describes the problem?

Any other details or context?

Cancel
message


  • Hip flexor stretch
  • Windmills
  • Cable chop
  • Cable lift
  • AR press
  • Sandbag halo
  • MB hip toss
  • SA land mine OH press
  • SA chest press
  • KB seesaw press
  • Lat pulls

Getting the most out of every movement in exercise should be a priority when designing a program or individual workout session. Concepts like combination exercises, multi-joint movements, and pattern-specific exercises provide maximal benefits to your fitness and routine. Take a knee and improve multiple facets of your fitness at the same time.

Like what you've just read? Click here to subscribe to our blog!

This blog was written by Tony Maloney, ACSM Certified Exercise Physiologist and Fitness Center Manager. To find out more about the NIFS bloggers, click here.

Topics: exercise workouts core functional movement programs movement knee

Back to Exercise Basics: The Proper Push-up

In our current state of fitness, many folks are continually looking for the next best exercise, program, or intense challenge. My challenge to you is to return to the basics, perfect those, and then explore the possibility of increasing the difficulty or completing some monster challenge. Gray Cook says it best: “Don’t add strength to dysfunction; move well and then often.” Translation: stop jumping right to something you are not prepared for just because you viewed it on “insta.” I challenge you not to focus on and post epic exercise fails, but to post a video of someone performing a stellar squat, a pristine pull-up, or the proper push-up.

A Full-Body Exercise

The push-up is easily the most versatile and effective exercise in the vast movement library in fitness and health. Challenging spinal and core stability, upper- and lower-body endurance, and strength, the push-up, done correctly is truly a full-body exercise. A great push-up starts with a strong trunk, so start there by improving your planks and hip bridges to strengthen the entire system.

Proper Pushup_David

Push-up Checklist

Next, consult the following checklist to perform your best push-ups, and learn some variations to both assist and challenge yourself.

  1. Spine 1: Neutral spine with no sagging or hunching in the low back.
  2. Spine 2 (top of press): Push away from the ground and hollow out.
  3. Head: Don’t sag or extend—look at the ground.
  4. Chin: Pull the chin toward the spine (double chin).
  5. Hands 1: Just outside shoulder width.
  6. Hands 2: Dial hands counterclockwise, splay the hands, and grip the ground.
  7. Elbows: 45-degree angle creating an “arrow” position.
  8. Arms (top of press): Push-up to straight-arm position.
  9. Butt: Push belt buckle to the ground while maintaining spinal alignment throughout motion.
  10. Quads: Send the back of your knees to the sky.
  11. Feet: Press equally through the floor.

Like what you've just read? Click here to subscribe to our blog!

This blog was written by Tony Maloney, ACSM Certified Exercise Physiologist and Health Fitness Instructor. To find out more about the NIFS bloggers, click here.


Topics: exercise fitness fitness center endurance strength core movement push-ups

NIFS Powerlifting Prep Lesson #1: The Squat

If you have never entered a powerlifting competition but are interested in competing for the first time, it's a high-energy, exciting celebration of strength. Many enter with the goal of dominating their weight class as well as grabbing that coveted top male or female trophy and being Champion.

Powerlifting 2018 DeadliftIf you are one of the athletes who want to throw their hat into the ring, I want to give you three key principles that will help you be the best you can be on event day for each of the three lifts. Those lifts, of course, are the squat, bench, and deadlift. Today we will focus on the squat. We will get to the other two soon, so keep an eye on the NIFS blog. You can improve by using these three key principles, whether you are a competitor or a spectator.

We will look at the same three weightlifting principles for each of the lifts, but each concept will be aimed specifically for each of the three different movement patterns. I learned long ago that principles should guide not only your training, but also your life. And as it relates to movement, variations of movement patterns may change, but the principles to train it will not.

The three key principles we will focus on for each of the lifts are

  • Mobility: The full range of motion of a particular joint(s).
  • Stability: Alignment, with integrity, under load. (A great lesson from Gray Cook that I learned in a workshop once.)
  • Tension: For our context in this and the two following posts, we will define tension as the word stiffness and explain phrases like “bending the bar” and “spread the floor.”

All three of these principles will directly impact how well you perform in each of the three lifts in specific ways. Let’s see how these can impact your squat and how to work to make things better.

Mobility

In the squat, and the back squat specifically, we continue to find the lack of ankle mobility to be a huge factor in how deep you can go and how much weight you can throw on your back. In a July article by Gray Cook (if you can’t tell, I learn a lot from him), Gray explains the importance of knowing your ability to flex your ankle and how it can disrupt the chain. Come see us and we can provide that screen for you. Improving your ankle mobility is a sure-fire way to improve your squat. The first step would be to do some soft-tissue work on the calf and surrounding areas using a foam roller, roller stick, or tennis/lacrosse ball. A simple drill that I would recommend is a wall ankle flexion drill, which you will perform in a few different directions.

Place your hands on a wall with one foot approximately 2–3 inches away from the wall and stagger the other foot behind you. While keeping the heel of the front foot “glued” to the ground, attempt to touch the wall with that same-side knee. Hold the position for a 2 count, return to the start position, and repeat for 4–5 more reps. Then aim that same side knee over your big toe and repeat for 5–6 reps, and then again but with your knee aimed out over your pinky toe. Switch legs and repeat the series. If you can touch the wall with your knee and your heel stays on the ground, move back one inch. The goal is to increase the degree of flexion in your ankle. You can measure your progress by how far from the wall your foot is.

Stability

Considering that powerlifters place huge amounts of weight on their shoulders and pretty much sit down and stand up, spinal stability is so important in performing technically sound and safe squats. Of course, planks and carries are great exercises to strengthen your trunk muscles, which will help prepare you for squatting, but what about during an actual mid-weight squat? Increase your intra-abdominal pressure by bracing your abdominal and low-back muscles. A great way to accomplish this is by wearing a belt. Tighten the belt and push your entire midsection against it, then squat. The belt also provides its own stability by reducing spinal flexion, or bending over. Lastly, wearing a belt is a requirement during competition, so if you are not training with one, you’d better get on it.

Tension

Tension, or stiffness in a lifter, is key when loading up the body with a challenging load. Without it, safety is at risk as well as success in completing the lift. “Bending the bar” is a phrase we use where a lifter will attempt to bend the bar on their shoulders by pulling the bar down with their hands. This, as they say, will take tension out of the bar and stiffen the lifter to move as one complete unit. Another major benefit of this cue is engaging the lats of the back by pulling the bar around your shoulders to help engage the glutes, which are key muscles in a strong squat. The lats connect to the glutes, the only muscle that connects the upper and lower body. Simply put, by creating tension in the lats, you increase the effectiveness of your butt.

The other cue that will increase tension in a lifter, specifically in the glutes, will be to “spread the floor” with your feet. Once in position and before you squat, feel as if you are trying to create space between your feet by pushing the floor away. Your position should not change, but your tension surely will. Maintain spreading the floor throughout the squat to reap the full benefits of this strategy.

***

So squat on, athletes, using mobility, stability, and tension to improve your positioning, which will ultimately lead to bigger lifts. Stay tuned as we break down the bench and the deadlift, focusing again on these key aspects.

Come watch our 6th Annual Powerlifting Competition here at NIFS, Saturday, November 9th at 9am.

Like what you've just read? Click here to subscribe to our blog!

This blog was written by Tony Maloney, ACSM Certified Exercise Physiologist and Fitness Center Manager. To find out more about the NIFS bloggers, click here.


Topics: NIFS weightlifting powerlifting competition glutes mobility movement squat stability tension